
Tough TG-4 Support Topics
Is the Digital Tele-converter function available with any kind of lens attached?
Yes, the Digital Tele-converter function can be used with every E-M5 Mark II attachable lens because it is an in-camera function.
- Digital Tele-converter is not available with multiple exposures, in
 (PHOTO STORY) mode or when
  (3D Photo),
 (Panorama),
  (Fisheye Effect),
  (Wide-Angle) or
  (Macro) is selected in SCN mode.
 - When a RAW photo is displayed in playback, the area that you enlarged on the monitor using Digital Tele-converter is indicated by a white frame.
- This function is not available when Movie Effect is On in movie mode.
- While using the Digital Tele-converter, the number of AF targets decreases.
What are the features of the electronic viewfinder?
The following describes the main features of the electronic viewfinder:
- Approx. 2,360,000 dots LCD
- Field of view: 100%
- Magnification: Approx. 1.30x to 1.48x (depending on selected viewfinder style)
- Eye point: Approx. 21 mm (in +1m+1)
- Diopter adjustment range: -4 to +2 m
- Eye sensor available
- 3 viewfinder styles selectable
- Interchangeable eyecup EP-16 (sold separately) is available
Refer to the product page for more information:
 E-M5 Mark II
How many pictures can be taken sequentially per second?
While the shutter button is fully depressed, you can shoot approximately 10 frames per second (max.) when shooting in S-AF or MF.
| Mode | Image Quality | Sequential Shooting Speed | Recordable Pictures on Sequential Shooting |
|---|---|---|---|
| Sequential Shooting H | RAW | Approx. 10 frames per second (when image stabilization is OFF) |
Approx. 16 frames (in sequential shooting H, 10fps) |
| Sequential Shooting L | Approx. 5 frames per second (when image stabilization is OFF) |
Up to card capacity (in sequential shooting L, 5fps) |
|
| Sequential Shooting H | JPEG | Approx. 10 frames per second (when image stabilization is OFF) |
Approx. 19 frames (in sequential shooting H, 10fps) |
| Sequential Shooting L | Approx. 5 frames per second (when image stabilization is OFF) |
Up to card capacity (in sequential shooting L, 5fps) |
- * When using the M.ZUIKO DIGITAL ED 12-40mm F2.8 PRO
- * When using the Toshiba SDHC UHS-II R260?W240 EXCERIATM PRO card
- * Based on Olympus testing
- Sequential shooting speed may differ according to the shooting condition.
- When shooting in sequential shooting H mode (S-AF or MF), focus, exposure and white balance are locked at the first frame.
- When shooting in sequential shooting L mode, focus and exposure is fixed based on the AF mode and AEL / AFL mode.
- When the battery check icon blinks because of low battery power, the camera stops the shooting and starts to store the pictures.
- Depending on the amount of power remaining in the battery, the camera may not be able to store all pictures.
How many pictures can be taken when the power battery holder HLD-8 is attached to the camera?
The power battery holder HLD-8 can hold one lithium-ion rechargeable battery BLN-1.
Using two lithium-ion rechargeable batteries, the BLN-1 battery in E-M5 Mark II camera and the BLN-1 battery in power battery holder HLD-8, you can shoot approximately 580 shots (based on CIPA test standards).
| Number of Lithium-ion Rechargeable Battery | Recordable Pictures (based on CIPA test standards) | |
|---|---|---|
| E-M5 Mark II (body only) |
one battery | Approx. 310 shots |
| E-M5 Mark II (when using HLD-8) |
two batteries | Approx. 580 shots |
AC adapter AC-3 (sold separately) can be connected when using the HLD-8. It is convenient for supplying power while indoor photography in a studio.
The lithium-ion rechargeable battery BLN-1 is not packaged with the power battery holder HLD-8.
Where can I find the instruction manual for my camera?
You can find the manual online. You can either read it online or download the instruction manual for your camera.
See the following Web page to find the available manuals:
 Download Manuals : OLYMPUS OM-D / PEN series
How many shots can be taken in time lapse photography and how long can I set its shooting interval?
You can shoot up to 999 shots in time lapse photography and you can set its shooting interval between 1 second and 24 hours.
The following procedure explains how to set and shoot time lapse photography.
How to set time lapse photography
Time lapse function is selectable when using the P, A, S or M shooting mode.
Press the [MENU] button. In Shooting Menu 1, select ![]() and press the [OK] button. In Time Lapse Settings, select On and press the arrow pad Right button. Set the number of frames and interval to a desired value and press the [OK] button to complete the setting.
and press the [OK] button. In Time Lapse Settings, select On and press the arrow pad Right button. Set the number of frames and interval to a desired value and press the [OK] button to complete the setting.

Frame
Sets the number of frames of time lapse photography. You can choose between 1 and 999 shots.
Start Waiting Time
Sets the time from pressing the shutter button until the first picture is taken. You can choose between 1 second and 24 hours.
Interval Time
Sets the shooting interval after the shooting starts. You can choose between 1second and 24 hours.
Time Lapse Movie
The sequence of time lapse photography can be converted to a movie.
Off: Records each frame as a still picture.
On: Records each frame as a still picture and generates a time lapse movie.
Movie Settings
You can choose the Movie Resolution (4K, Full HD, HD) and Frame Rate (30fps, 15fps, 10fps, 5fps).
- * Firmware version 2.0 or later is required to select 4K.
- * In 4K, the frame rate is fixed to 5fps.
- * In FullHD, you can choose the frame rate from 15fps, 10fps and 5fps.
How to take time lapse photography
When you set the time lapse photography to On, the icon for time lapse photography is displayed on the monitor. The number on the icon indicates the number of shots you can take.
Press the shutter button to start the time lapse photography.
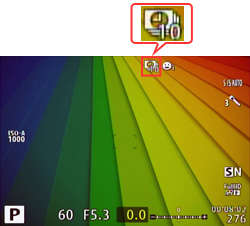
- After autofocus, the camera starts shooting even if the image is not in focus. If you want to fix the focus position, shoot in MF mode.
- Rec View operates for 0.5 seconds.
- If the Start Waiting Time or Interval Time is set to 1 minutes 31 seconds or longer, the monitor and camera power turns off after 1 minute.
10 seconds before the setting time, the power automatically turns on again.
While the monitor is off, you can also turn the power on by pressing the shutter button.
- Time lapse photography is available only in P, A, S and M mode.
- When the AF mode is set to C-AF or C-AF+TR, the setting automatically changes to S-AF.
- Touch operation is disabled during time lapse photography.
- Time lapse photography cannot be used with HDR photography.
- Time lapse photography cannot be used simultaneously with Bulb, Time, Composite Shooting, Bracketing and Multiple Exposure.
- The flash will not work when the flash charging time is longer than the shooting interval.
- If the camera automatically turns off during time lapse photography, it turns on in time before the next shot.
- If any of the still pictures are not recorded correctly, the time lapse movie will not be generated.
- If there is not enough space on the card, time lapse movie is not recorded.
- Time lapse photography is cancelled if any of the following function is operated:
Mode dial, MENU button, button, lens release button or connecting the USB cable.
 - Time lapse photography is cancelled if you turn off the camera.
- The shooting stops if there is not enough power left on the battery. Make sure your camera's battery is fully charged.
How do I link the Single Auto focus point to the spot metering.
With the E-M5 Mark II camera the position of the single AF target and range of spot metering can be linked in firmware version 3.0. The default setting is unlinked, so a setting change is necessary. When using the linked combination, Face priority AF is not available.
To link the single focus point to spot metering, check any one or all three of the spot metering modes in Spot Metering in Custom Menu Gear E. Check any one or all of the boxes by highlighting the mode and press the OK button. Press the Menu button when complete.
How do I attach the decoration ring DR-79 to the M.ZUIKO DIGITAL ED 300mm F4.0 IS PRO lens?
The decoration ring DR-79 is included with the M.ZUIKO DIGITAL ED 300mm F4.0 IS PRO lens. In case the tripod mount is removed from the lens, the decoration ring is used to cover the screws that secure the lens.
Not only does it keep the external appearance of the lens, but also makes it comfortable to hold at handheld shooting.
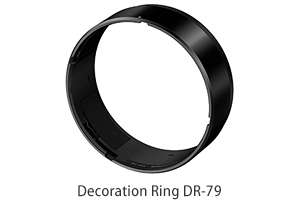
To attach the decoration ring DR-79 to the lens, please do the following procedure:
1. Remove the tripod mount from the lens
1-1. Turn the knob of the tripod mount to the left to loosen it.
1-2. Turn the tripod mount to align the mark on the tripod mount with the mark on the lens, and then remove the tripod mount from the lens.
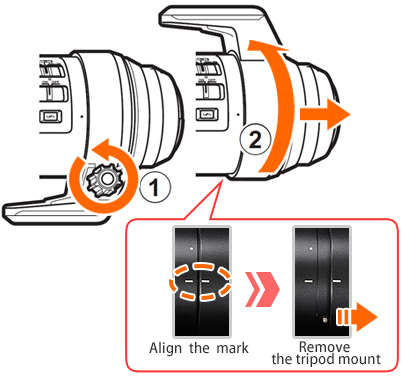
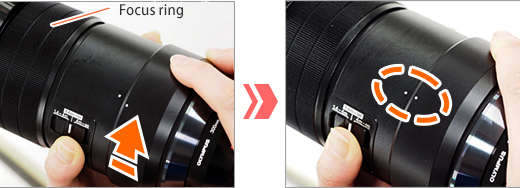
2-1. The decoration ring has a index mark (white dot).
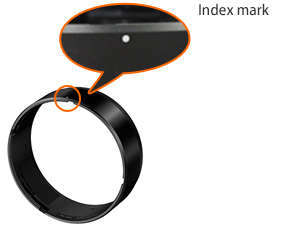
2-2. Hold the decoration ring so that you see the index mark, placing your fingers around 90 degrees beside the index mark. Align the mark on the decoration ring with the screw around the focus limiter switch on the lens, and then push the decoration ring onto the lens.
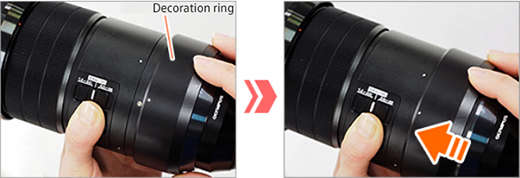
2-3. Turn the decoration ring to fasten it. Don't hold the focus ring while turning the decoration ring .
The decoration ring stops just before the marks are aligned. Turn the ring a little more strongly until it clicks securely into place.
Should I take any precautions when extending or retracting the lens hood?
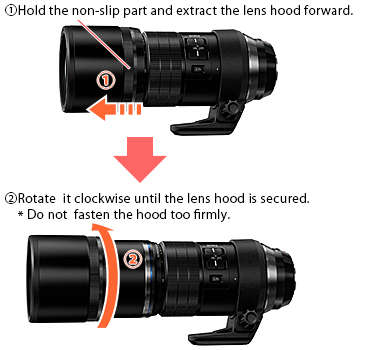
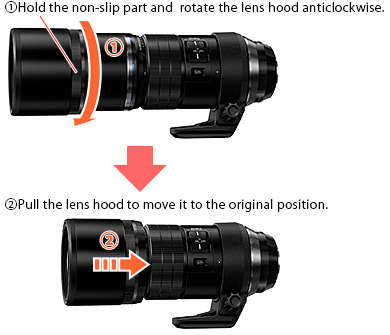
Make sure to hold the non-slip part of the lens hood when extending or retracting the lens hood for the M.ZUIKO DIGITAL ED 300mm F4.0 IS PRO lens.
The lens hood is locked into place using its screw type design.
- * Don't slide out the lens hood by holding the front end of the hood. The lens hood tends to move into an uneven position if you hold the lens front, and in such tilted condition, it may be difficult to secure or retract the lens hood.
- * Do not fasten the hood too firmly. You may have difficulty in returning the hood back to the original position.
- * Please make sure to fully slide out the lens hood all the way to the end of track, before attempting to rotate and fasten the lens hood.
You cannot remove the lens hood because it is built in.
How to extend or retract the lens hood
Extend the lens hood:
Hold the non-slip part of the lens hood and extract it forward. If you are holding the lens front up, rotate it clockwise (to the right) until the lens hood is secured.
Pull the lens hood to check the hood is surely secured.
Retract the lens hood:
Hold the non-slip part of the lens hood. If you are holding the lens front up, rotate it anticlockwise (to the left).
Pull the lens hood to move it to the original position.
How does the Image Stabilization work?
The Image Stabilization (IS) works differently depending on the combination of OLYMPUS Micro Four Thirds cameras and the M.ZUIKO DIGITAL ED 300mm F4.0 IS PRO lens. The following describes how the Image stabilization (IS) works:
- PEN-F
- E-M1 / E-M5 Mark II
- E-M5 / E-M10 Mark II / E-M10 / E-P5 / E-PL7 / E-PL6 / E-PL5 / E-PM2 / OLYMPUS AIR A01
- E-P3 / E-P2 / E-P1 / E-PL3 / E-PL2 / E-PL1s / E-PL1 / E-PM1 / Other brand cameras
PEN-F
The 5-axis image Sync stabilization is used.
If you turn off the image stabilization in the lens, the image stabilization in the camera turns off simultaneously.
The image stabilization in the camera and lens cannot be used separately.
E-M1 / E-M5 Mark II
The 5-axis image Sync stabilization is used.
(The following firmware version is required to support 5-axis IS: version 4.0 or later for E-M1, version 2.0 or later for E-M5 Mark II.)
If you turn off the image stabilization in the lens, the image stabilization in the camera turns off simultaneously.
The image stabilization in the camera and lens cannot be used separately.
- * Update the firmware of the E-M1 and E-M5 Mark II to the supported version:
 Joint update service for OLYMPUS E-SYSTEM
 - * You cannot get the optimal image stabilizing effects in cameras not having the supported firmware versions because the image stabilizer in the lens interferes with that in the camera.
E-M5 / E-M10 Mark II / E-M10 / E-P5 / E-PL7 / E-PL6 / E-PL5 / E-PM2 / OLYMPUS AIR A01
The camera recognizes the Image Stabilization built into the lens, allowing for optimal image stabilizing effects. * Not compatible with 5 axis Sync image Stabilization.
The image stabilization in the camera and the lens can be used separately. To turn off image stabilization completely, make sure to turn off image stabilization in both the lens and the camera body.
- * Update the firmware of the camera to the latest version:
 Joint update service for OLYMPUS E-SYSTEM
 - * You cannot get the optimal image stabilizing effects in cameras not having the supported firmware versions because the image stabilizer in the lens interferes with that in the camera.
- * OLYMPUS AIR A01 is compatible with Olympus lenses with a built-in image stabilizing function. You can get the optimal image stabilizing effects in movie mode.
E-P3 / E-P2 / E-P1 / E-PL3 / E-PL2 / E-PL1s / E-PL1 / E-PM1 / Other brand cameras
If a lens with a built-in image stabilizing function is in use, turn On the image stabilization of either the camera or the lens.
You cannot get the optimal image stabilizing effects when both image stabilizers in the camera and lens are turned On, since the image stabilizers will counteract each other.

