Stop motion is a fun, creative, way to create at home while putting a twist on the usual photo. It is a technique where you move your objects little by little within your frame and when you string them together it gives the impression of movement.
To try this at home you’ll need a few items:
- Subject(s) for your stop motion
- Clean, surface area
- Storyboard
- Tripod
- Camera
- Even lighting
- Remote shutter
- Editing software

1/4s | F10 | ISO 250

1/4s | F10 | ISO 250
Critical Elements in Making Stop Motion
Before we get into making a stop motion let’s cover the critical elements first.
Subject
The best part of stop motion is you can do a lot with it! If you are a food photographer you might want to illustrate making your pasta, decorating your cake, styling your setup.
If you are a travel and landscape photographer you can illustrate what you’re packing for your adventure, locations on your photography journey, or your favorite accessories for on the road.
If you are a lifestyle blogger, perhaps you might want to creatively share your favorite wine from a particular winery, your favorite local clothing brands, or how you’re decorating your home.
A lot of what you might need to create your stop motion is already in your home!
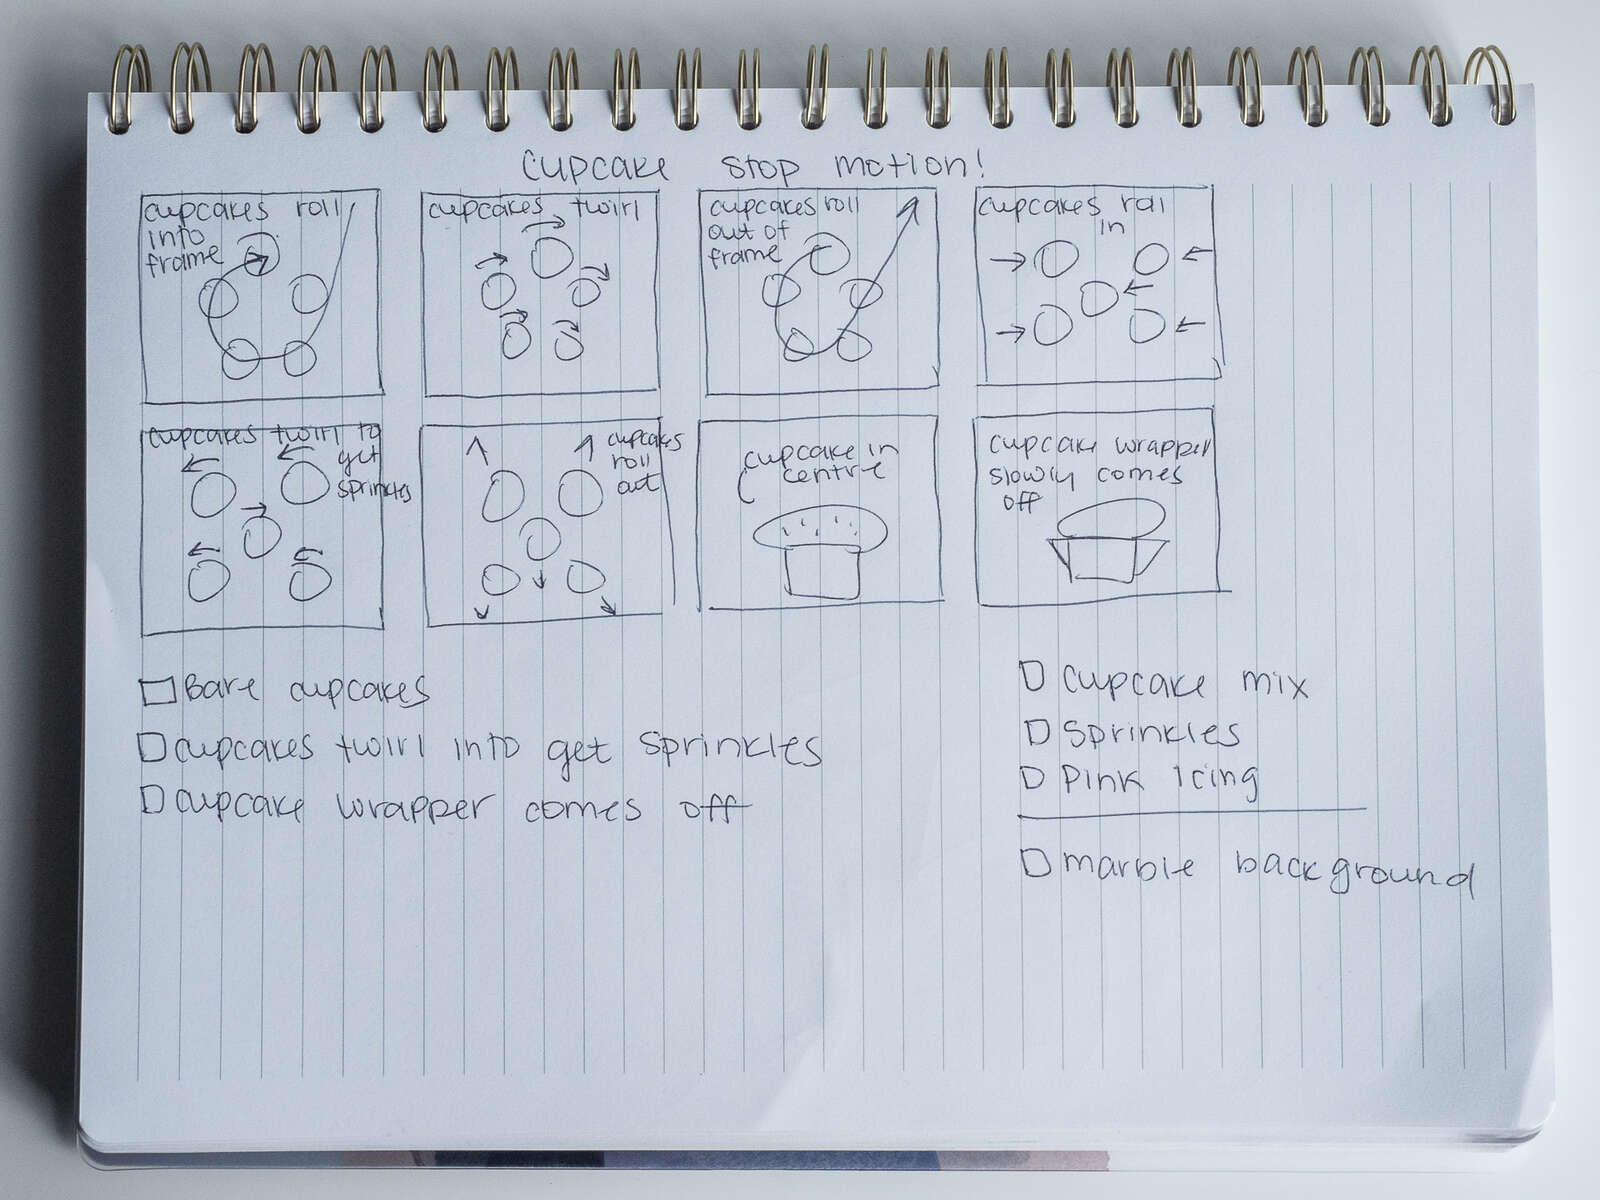
Storyboard
A storyboard essentially organizes your narrative. With stop motion, a storyboard will help you plan the overall concept, and how you want your stop motion to play out, making the process faster, easier and smoother.
Before I start shooting, I like to draw out my storyboard on paper, writing out everything I’ll need, coming up with an overall scene checklist that I can check off and track my progress, and drawing out frame-by-frame what I envision for the stop motion. For example, how I want to start the stop motion, how I’m going to transition the element out of the frame, bring the subject into the frame later, how I’m going to incorporate movement, etc.
One thing that can make producing your stop motion frustrating is when you don’t know how to animate your subjects. This is why creating your storyboard beforehand, researching how you want to incorporate movement is important. In my storyboards, I even indicate the direction I want the subject to move or twirl so when I go to capture I don’t have to guess at all.
Lighting
Creating a stop motion using natural light is extremely tricky because you’re taking several photos and if the light changes slightly then you have to do quite a bit of post-processing to make them look the same for when you string them together.
If you must capture your stop motion with natural light, try to pick a day where the sky offers the most even lighting. One tip is to avoid a partially cloudy day because the sun might pop behind the clouds constantly).
Preferably, you’ll need a light source that you can control and will give you the same lighting for every frame. Two options here are to use a flash to consistently light your subject or use a form of continuous light.
After I created my storyboard and started setting up to shoot my photos I blocked out the light from my kitchen window and used some continuous lights to prevent any changes in lighting.

1/4s | F10 | ISO 250
Zero Camera Movement
A third critical element in making a stop motion is making sure there is zero camera movement while you are shooting.
My first suggestion is to use a tripod. As well, do your best to eliminate anything from accidentally moving the tripod.
My second suggestion is to use a remote shutter or you can also use the Olympus OI.Share app.
Along the same line here you also don’t want your subject to unintentionally move from frame-to-frame. To avoid this you can secure your subject.
For the stop motion I did I placed my camera on my tripod. I also used the OI.Share app to remote control my camera so I didn’t have to touch it and accidentally bump the camera. I also used a little bit of tape to secure the cupcake when I was peeling the wrapper so it didn’t unintentionally move.
Software to String Your Frames Together
After you’ve taken your photos you’ll need a software to string your frames together. There is a variety of software you can use for all budget types - iMovie, Movie Maker, Adobe Premiere Pro, Dragonframe, Final Cut Pro, online tools, etc.
A software likely everyone has free access to is iMovie (Mac) and Movie Maker (PC). For the stop motion I did, I used iMovie to string the frames together. I pulled all the photos into iMovie, placed them along my timeline and played with their length. Depending on the software you use there may be limitations, in iMovie the shortest clip length is .10 seconds so if you want a faster movement you will have to export the clip and re-import to adjust the speed.

Don’t forget to charge your battery and have space on your memory card. A stop motion can take anywhere from 15 minutes to 3 hours to make, it can consist of 20 frames or 600. It all depends on the length and complexity of your stop motion.
Happy creating with stop motion!

Instagram: @beautifullywander
Robynne is an aspiring travel and landscape photographer based out of Kelowna, British Columbia. When she was a little girl she loved her yearly family fishing trips to the Pacific Coast, which grew her love for travelling and experiencing new places. She maintains her own blog and her ultimate goal is to travel the globe and create thought-provoking, inspirational photos of our world. When she’s not photographing the landscapes she loves exploring the Okanagan with her fiancé, spending time with her family, or cozying up on the couch with her furry companions.