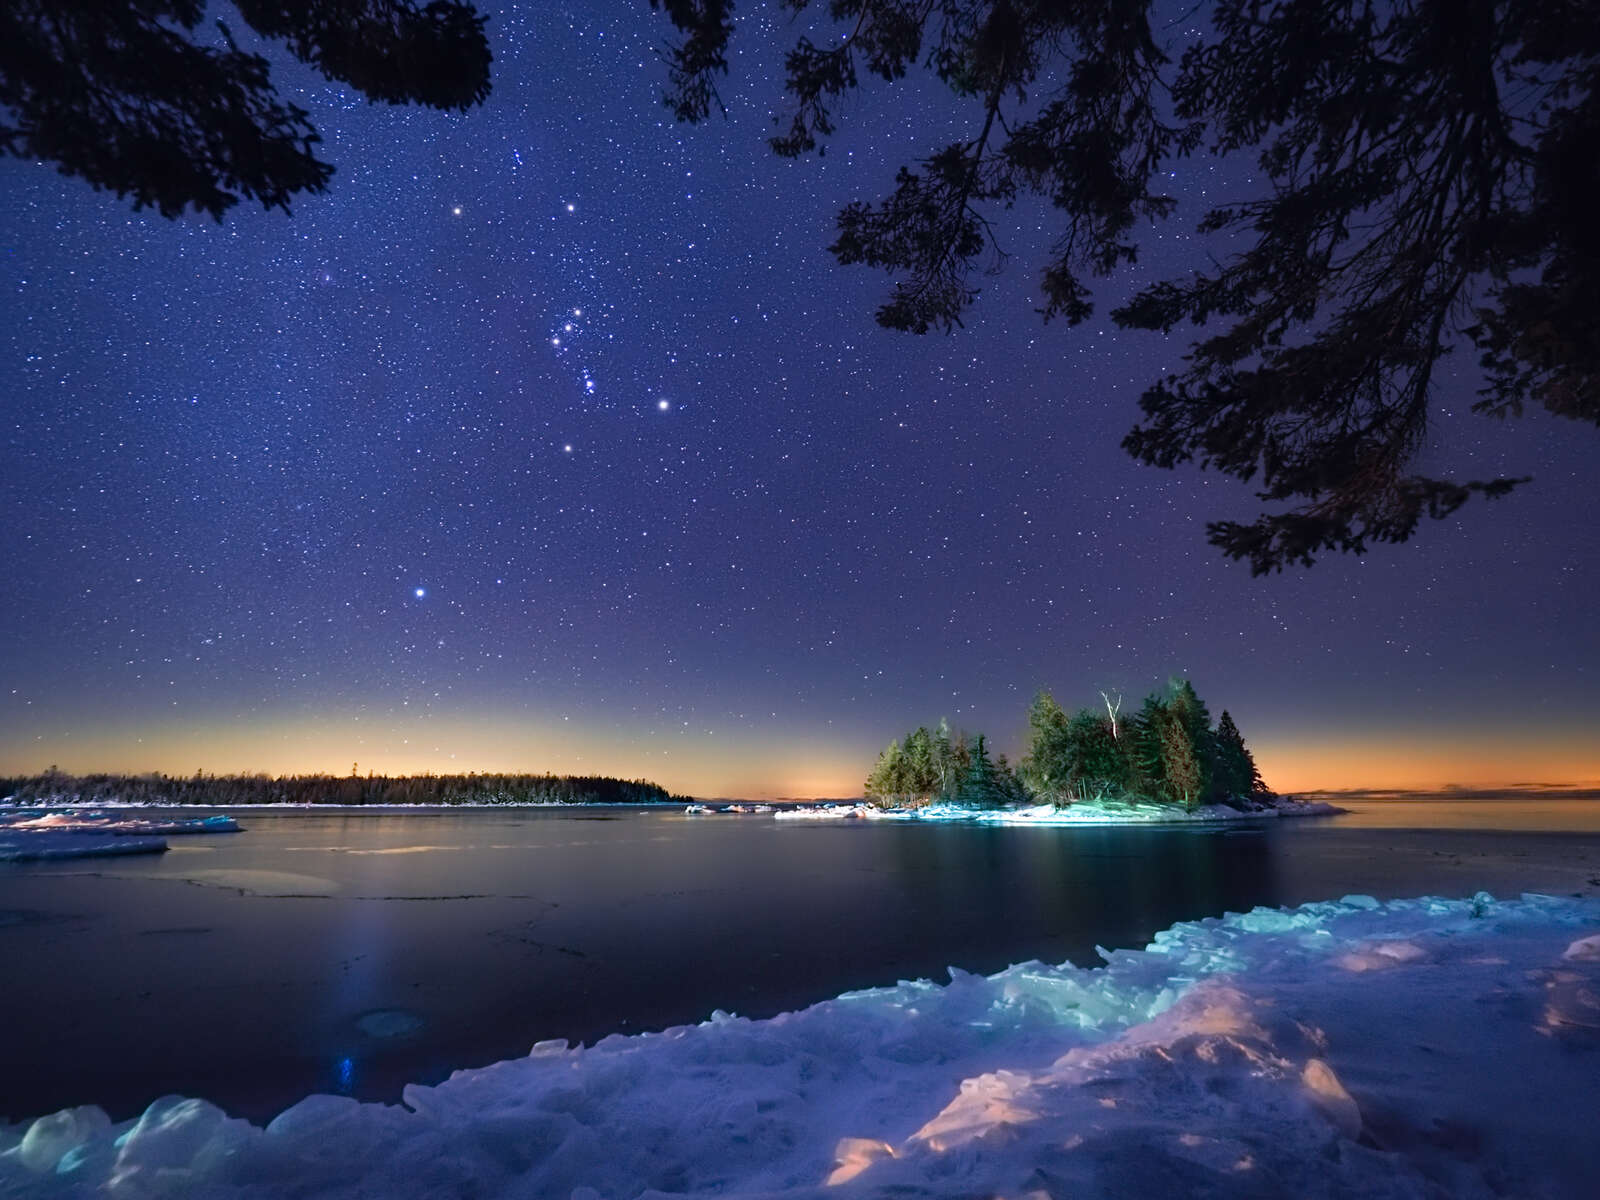
Imagine sitting outside on a warm summer night, staring at a star-filled sky. You are out there in shorts and a T-shirt enjoying the view as millions of stars twinkle down from above. It sounds appealing, but for me, the reality is that this almost never happens. As much as I love photographing the night sky, the truth is that most of my astro-landscape shooting is done in the winter, not during a warm summer night. I recently looked through my collection of night sky images and almost all of my favourite shots were captured during the colder months of the year.
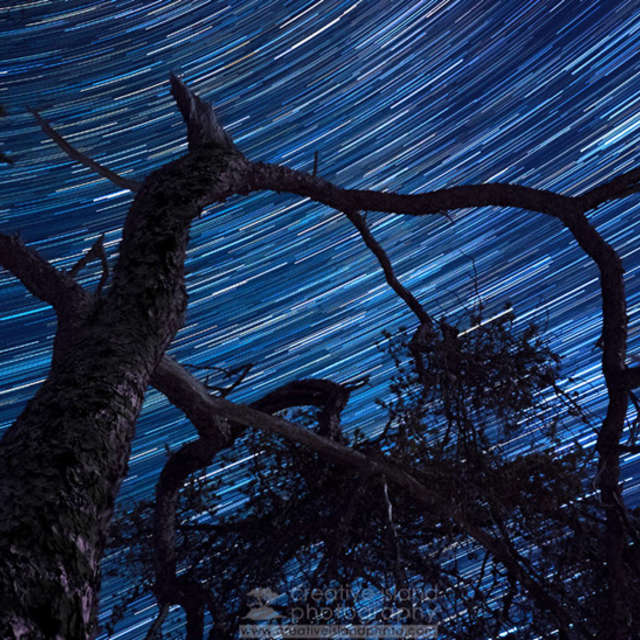
ISO3200 | 20s | f/2.0
Why Winter?
At first thought, winter may seem like the least appealing time to be out photographing the night sky, but there are a number of reasons why I gravitate toward the colder months of the year.
- Longer Nights – I’m an “early to bed, early to rise” kind of guy so there is real appeal to being able to go out in the early evening to capture an astro shot and already have darkness shrouding the landscape. The same applies to the start of the day. I can be out at five or six a.m. and still have a solid hour of shooting before the sky lightens up. In the summer, with much shorter nights, you are often stuck shooting between midnight and two a.m. especially in the mid-latitudes where I live. I’d rather be in bed at that time!
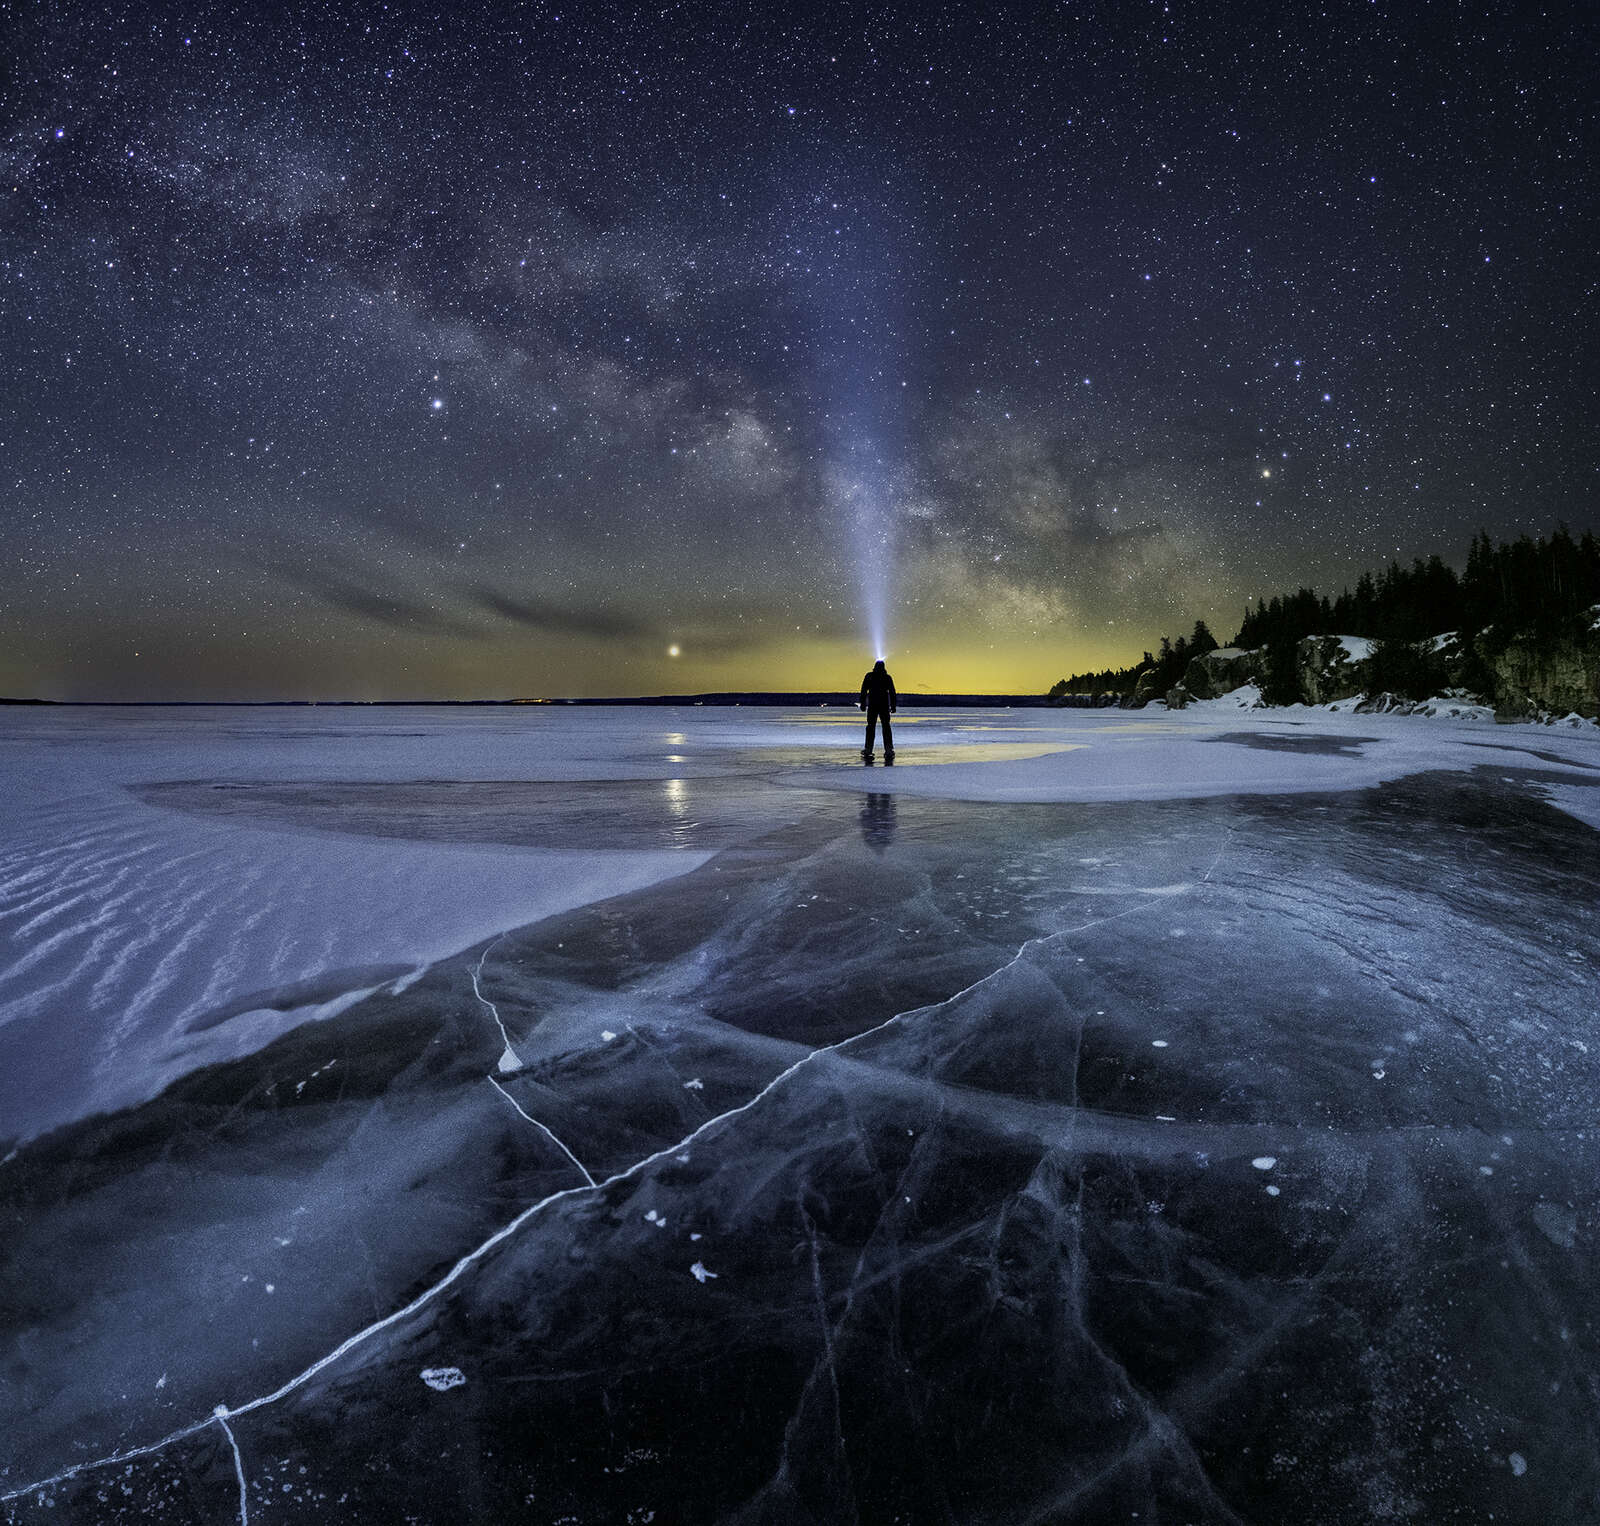
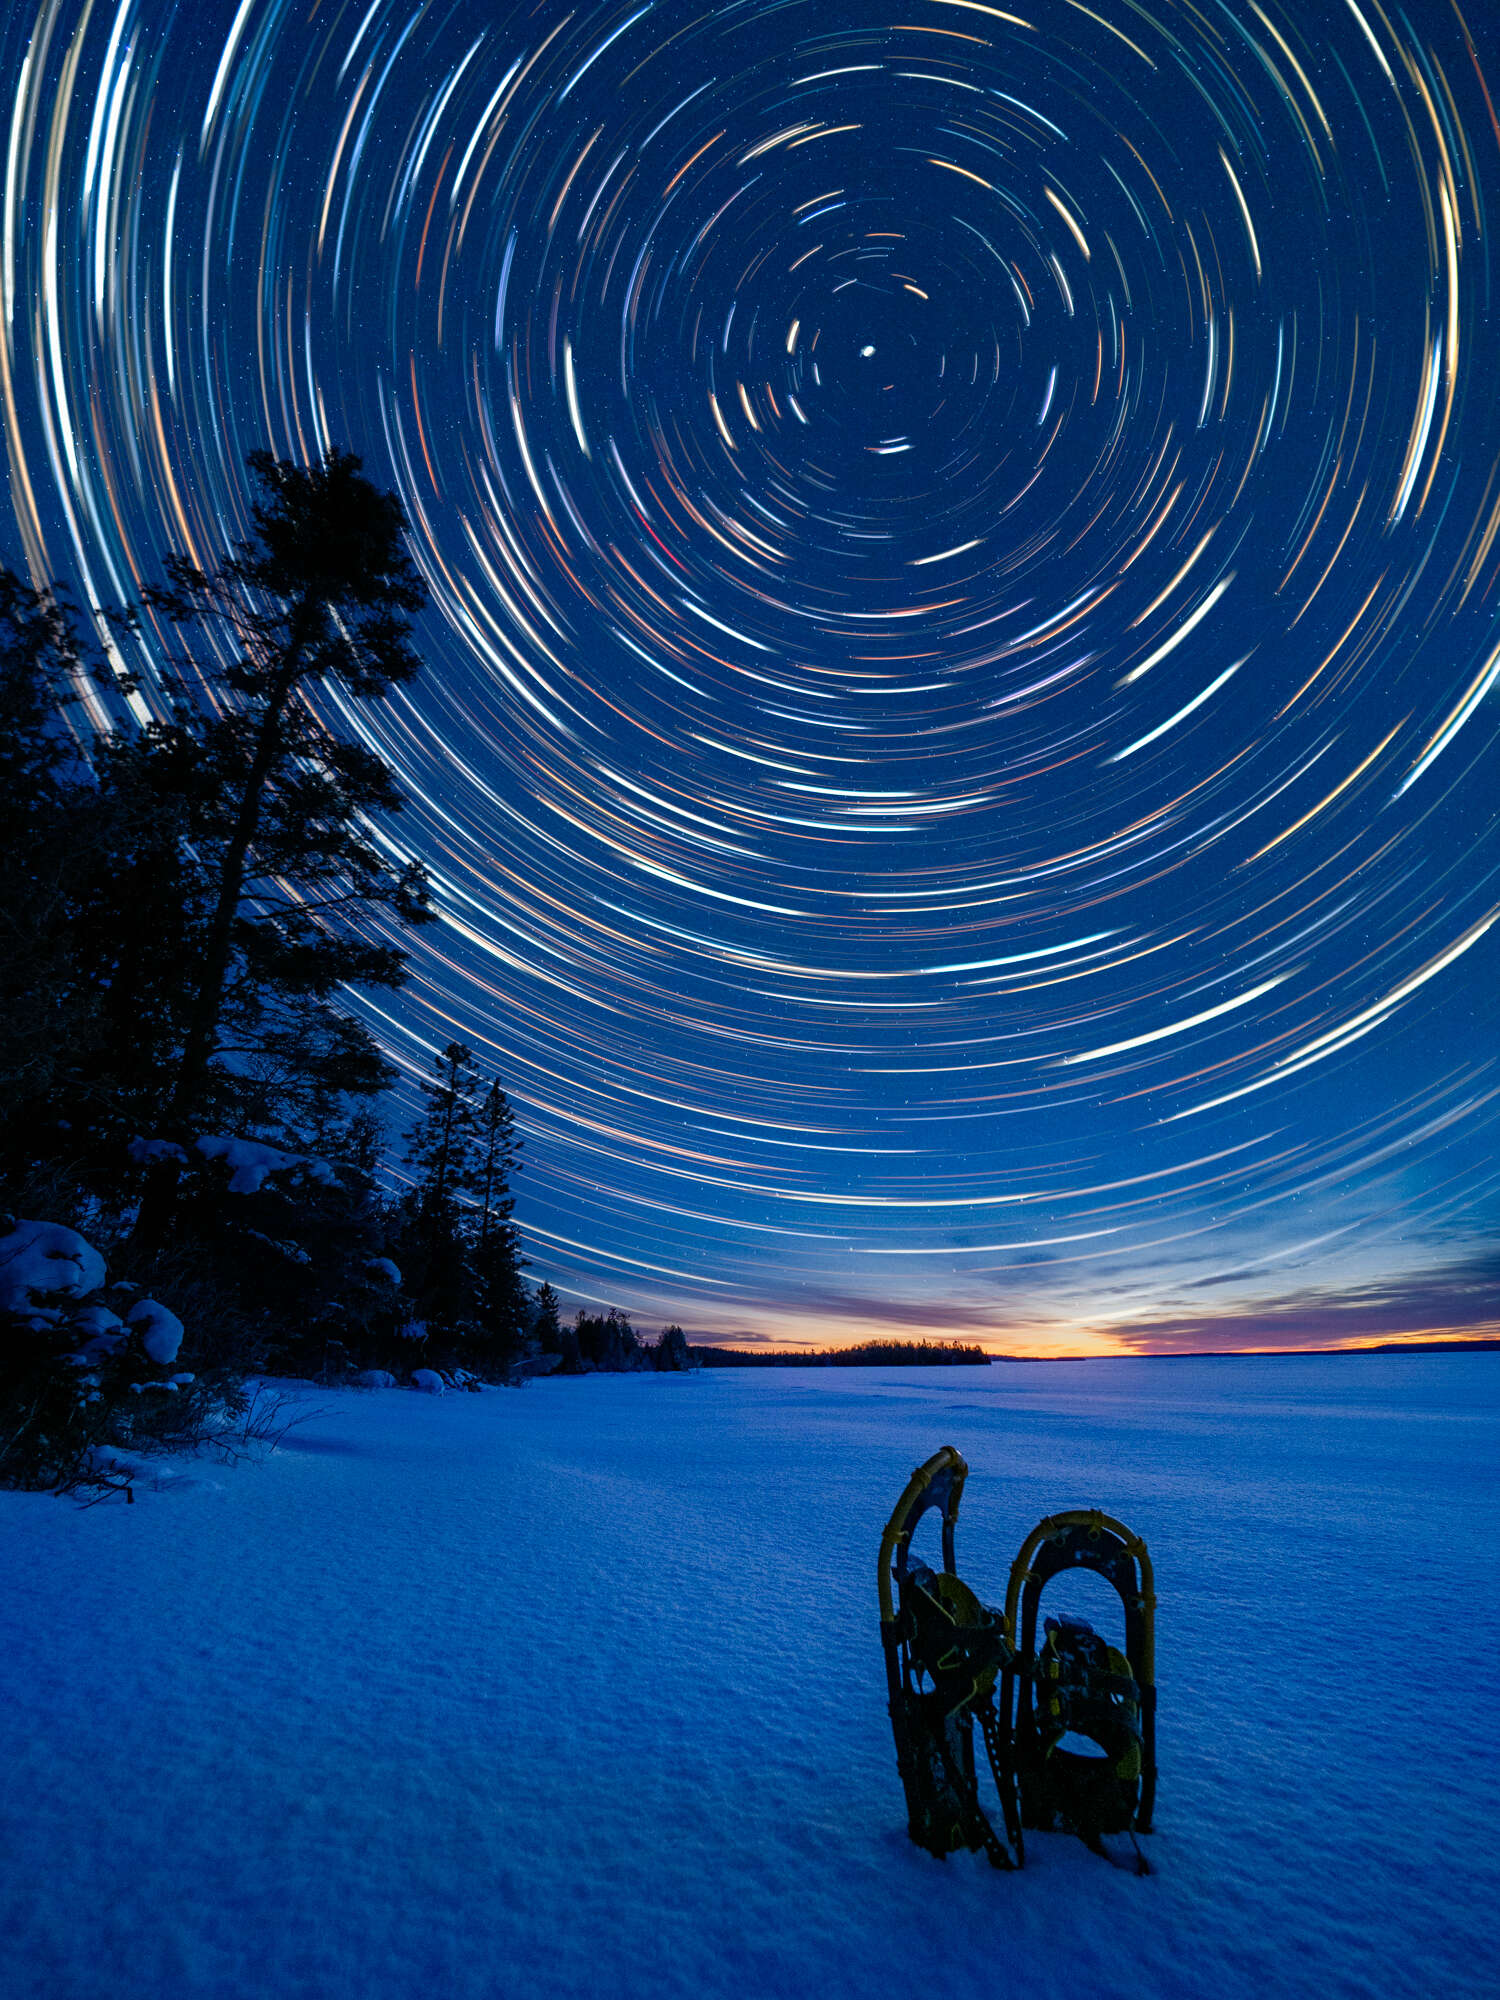
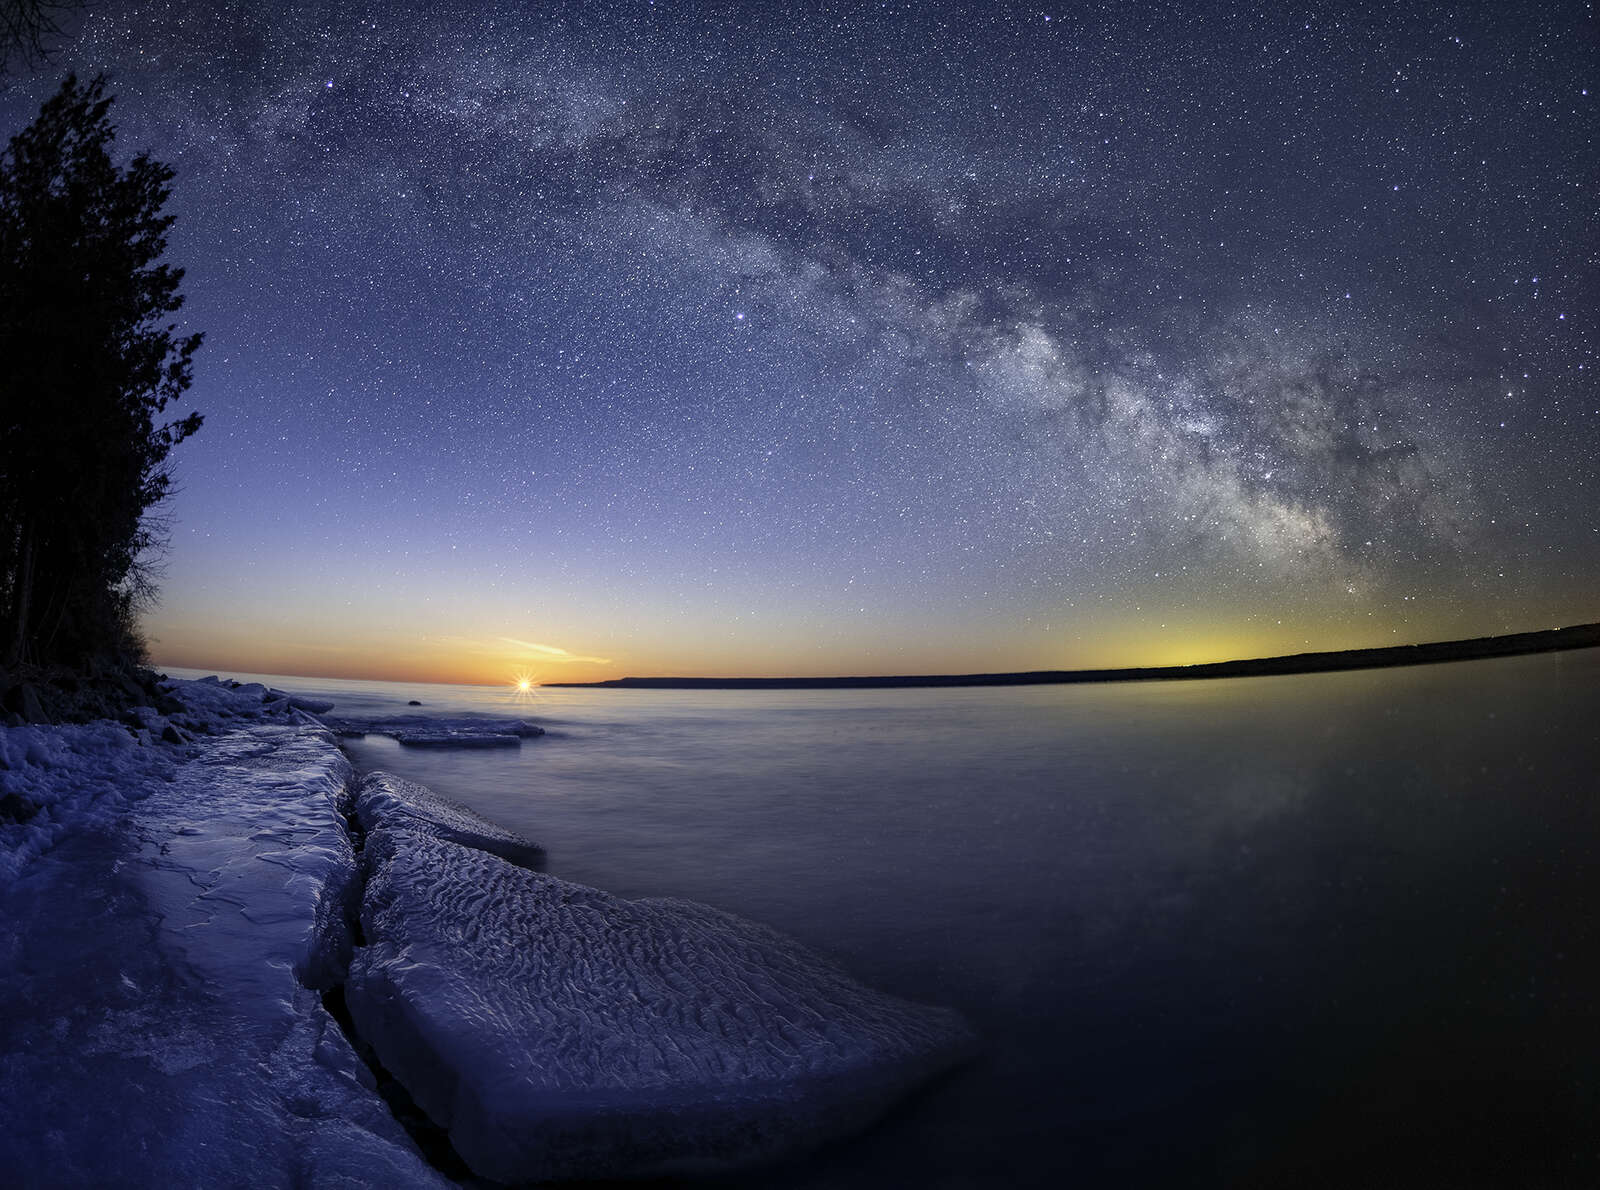
- A Changing Sky – In late autumn the core of the Milky Way has hibernated below the horizon for those of us in the northern hemisphere. It is at that time that I turn my attention to some of the other celestial features. My favourite constellation to photograph is Orion which is clearly visible during the winter months. I point my camera toward the north in order to photograph star trails using the Live Composite feature. Polaris becomes the “star attraction” (sorry, I couldn’t resist) for these images. Once February rolls around the core of the Milky Way reappears in the early morning sky and forms an impressive arc that is easy to capture with M.Zuiko 8mm F1.8 PRO fisheye lens, or by shooting a panorama with another lens like the 12mm F2.
- More Interesting Subjects – Some places are absolutely blessed with amazing landform features that can make for impressive foregrounds in your composition (think the American Southwest). I don’t live there however. I do live in a dark sky area, but it takes more effort to find and photograph an interesting foreground. That challenge is a lot easier in the winter. The ice and snow completely change the landscape and create some very impressive features.
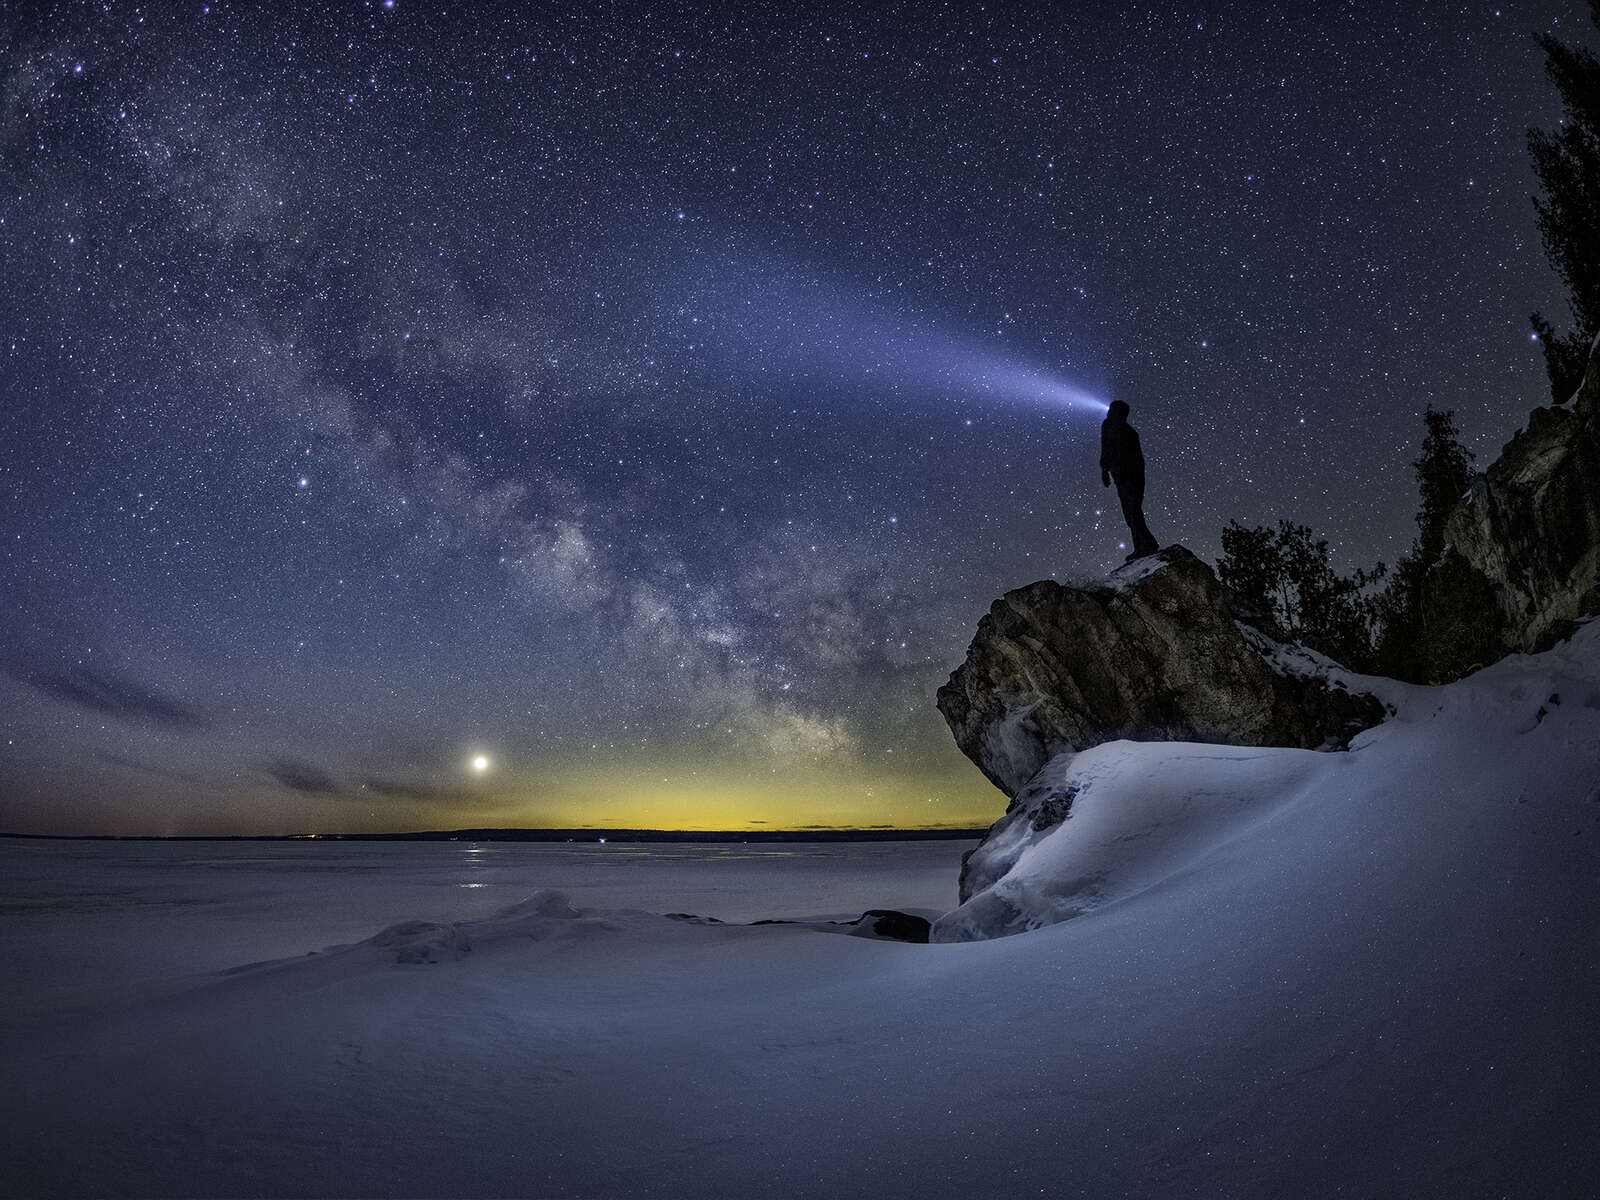
- It’s All About the Light – Astro-landscape photographers are a strange bunch. We expend a great deal of time and energy to get to a dark sky area and then we light it up in order to see the foreground details. Given the reflective quality of ice and snow that is a lot easier to do in winter, whether you use your headlamp, a flashlight or some low level lighting. And often you don’t need any artificial light source at all.
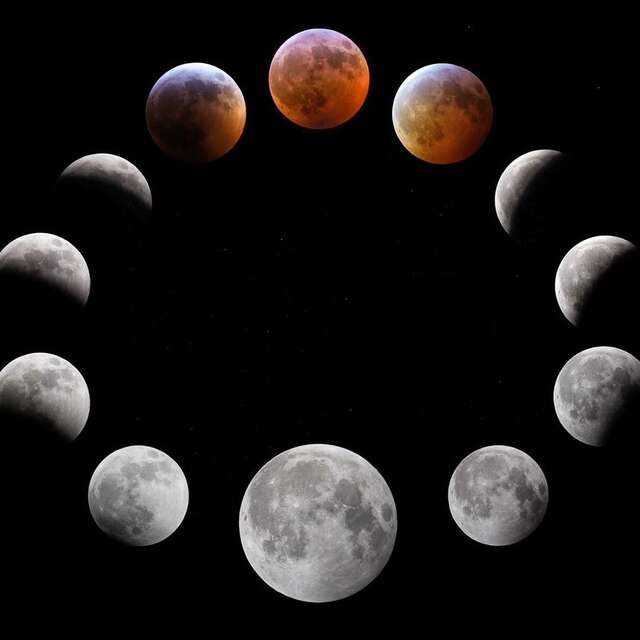
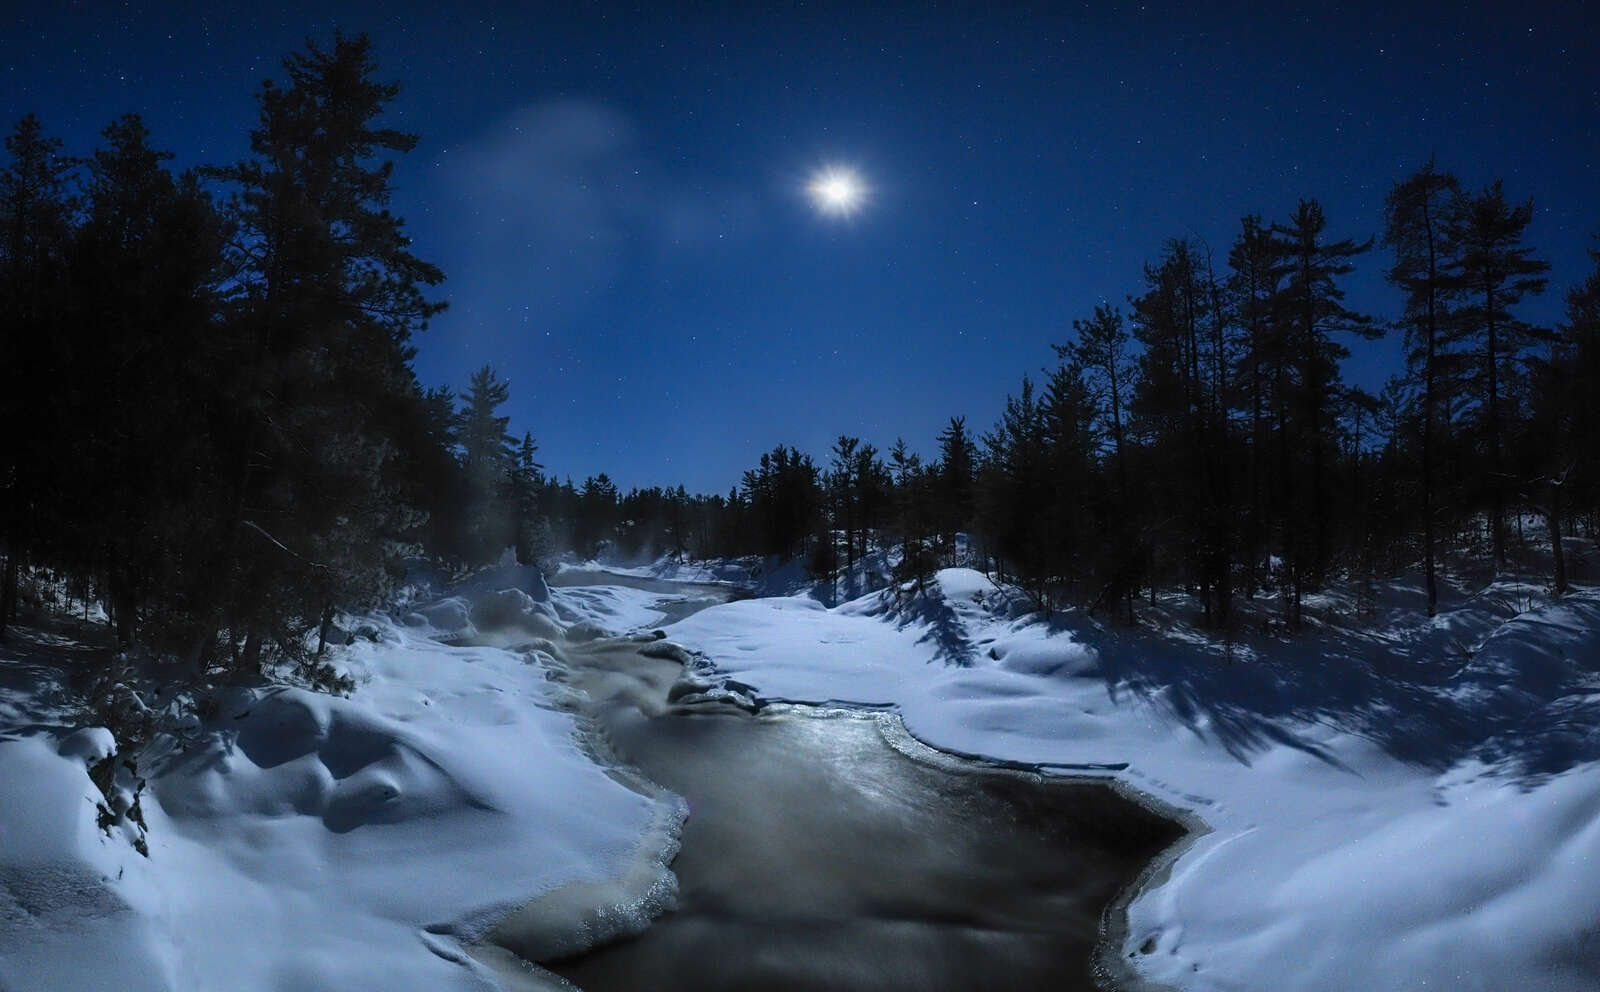
- Moonlight on Snow – Regardless of the season, photographing a full moon can be quite rewarding, but in the winter that same moonlight can make for some impressive landscape images especially with a fresh blanket of snow.
- No Bugs! – Too often I’ve been chased indoors by a swarm of mosquitos in the spring and summer. This is certainly not an issue in the winter months. Of course, winter comes with its own pest – the cold! Dressing for the conditions is absolutely critical. With good winter clothing, especially good gloves and boots, I’ve been able to stay outside for hours in extremely cold weather. You don’t have to worry about your OM SYSTEM gear either. It’s built to handle sub-zero temperatures.
OM SYSTEM E-M1 Mark III | M.Zuiko 7-14mm F2.8 PRO
ISO6400 | 20s | f/2.8
Meeting the Challenges
Photographing at night comes with some significant challenges. Most of these can be easily overcome with some basic understanding, and with the help of some of the great features in the OM SYSTEM cameras.
Gear and Settings
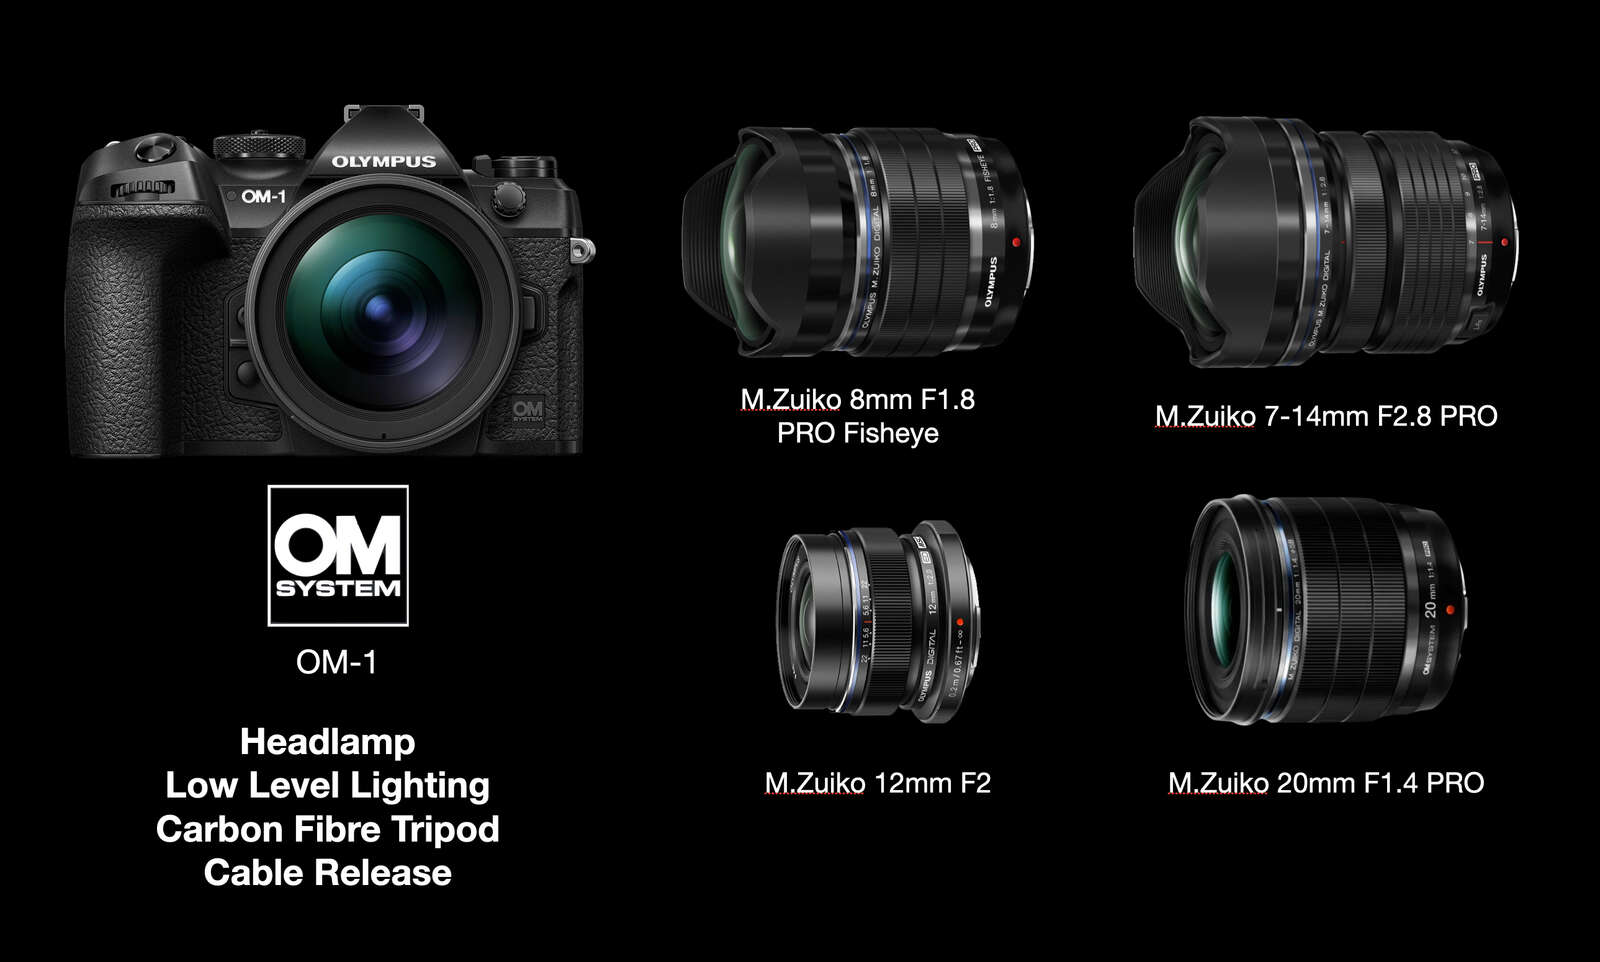
For most people this is the most intimidating part of astro shooting. It certainly was for me when I started, and then I discovered something. I could use exactly the same gear that I do for my landscape shooting, and once you know the basic settings for that gear, they almost never change. Over the years I have photographed the night sky with almost every digital camera body made by Olympus/OM SYSTEM, starting with the original E-M1. Presently I am shooting with the OM-1. As far as lens choice goes my preference is to shoot wide and fast, with my go to lenses being the M.Zuiko 8mm F1.8 PRO Fisheye and the 12mm F2. I also carry along two or three additional lenses along with a good tripod, headlamp, and a bit of low level lighting.
Camera settings could be an article all on its own, but here is a brief summary of the basic settings;
- Manual Mode – Shoot in fully manual. The auto or priority settings will not work when shooting in the dark.
- Shutter Speed – With so little light available the camera cannot determine the appropriate shutter speed. If the exposure is too long you will begin seeing star trails; too short and you are not letting enough light in. Use the following simple calculation to determine the best shutter speed. Divide the focal length into the number 200. This is the ideal shutter speed to ensure sharp stars. For example, when shooting with the 12mm F2, the calculation looks like this; 200 / 12 = 16.6 seconds. Since 16.6 s is not an available option, I round down to 15 s. Every time I put the 12mm lens on, I know that I should use a shutter speed of 15 seconds. (NOTE: The number 200 used in this calculation applies only to the 2x crop sensor in OM SYSTEM cameras.)
- Aperture – Simple. Wide open. By shooting at the largest aperture you are gathering as much light as possible. I find that OM SYSTEM lenses are incredibly sharp even when shooting wide open.
- ISO – With older camera models I would suggest starting at ISO1600 and see how the camera handles digital noise. I regularly shoot at 3200 or 6400 using the OM-1 and achieve excellent results.
- RAW – Night sky images will require some post-processing so it is best to shoot in RAW rather than jpeg.
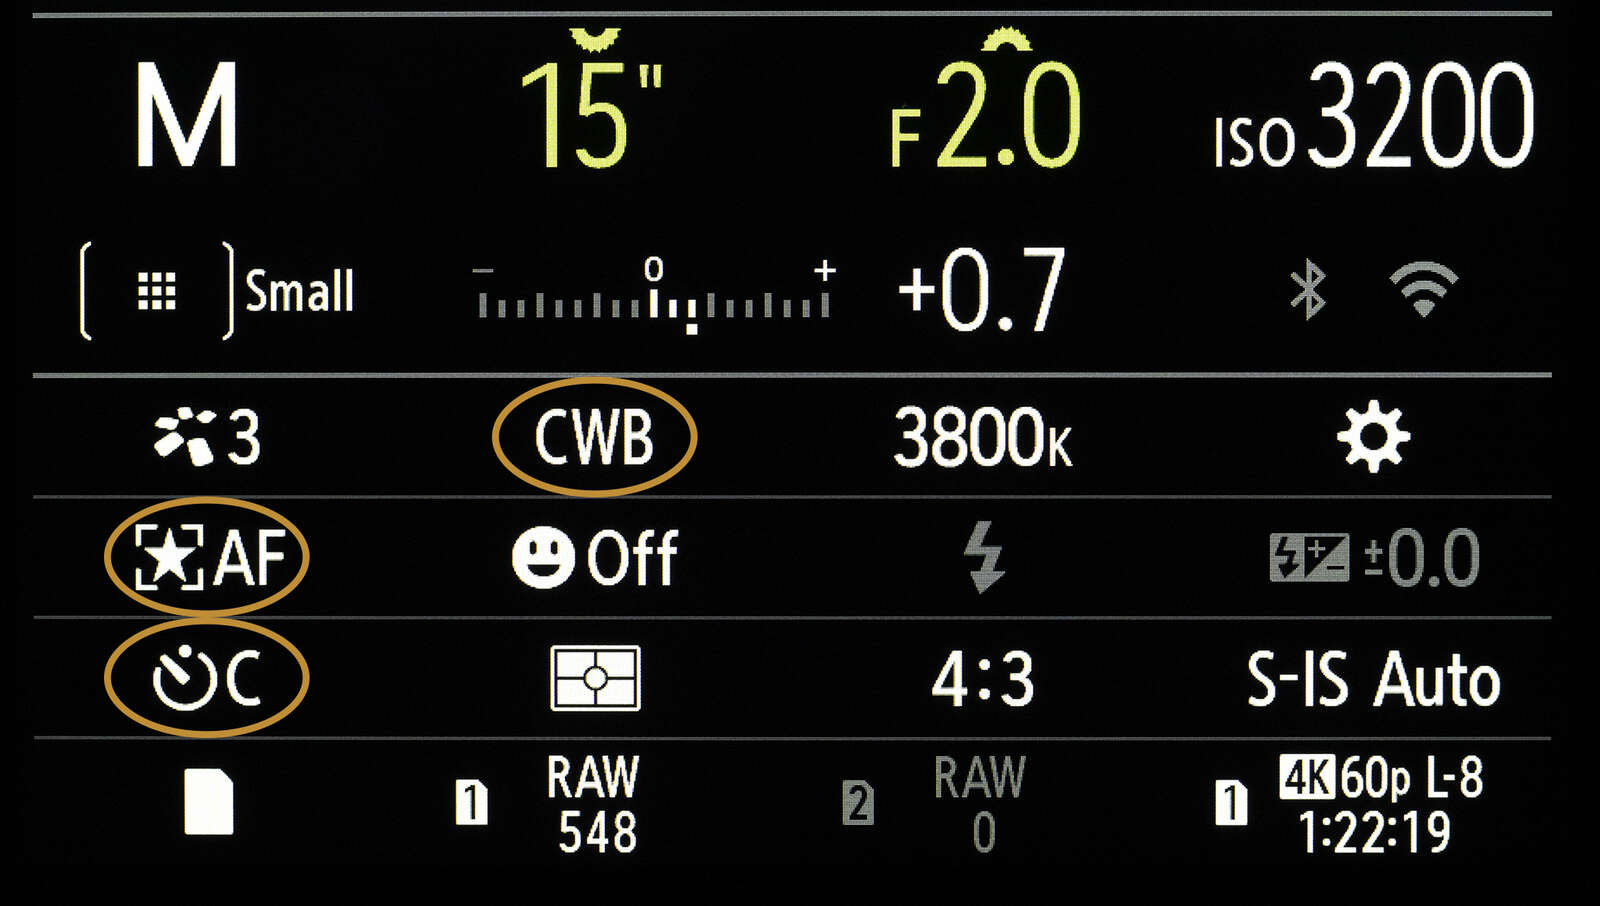
- White Balance – Since you are shooting in RAW you can adjust the white balance in post, however I prefer to set a custom white balance of 3800K. This is easy to do in the super control panel by selecting CWB and dialling in the white balance of your choice.
- Noise Reduction – Unless you are comfortable reducing noise in post or by stacking images, it is recommended that you turn noise reduction on. This will double the time of your exposure, but makes a significant difference to the amount of digital noise in the final image.
Focusing
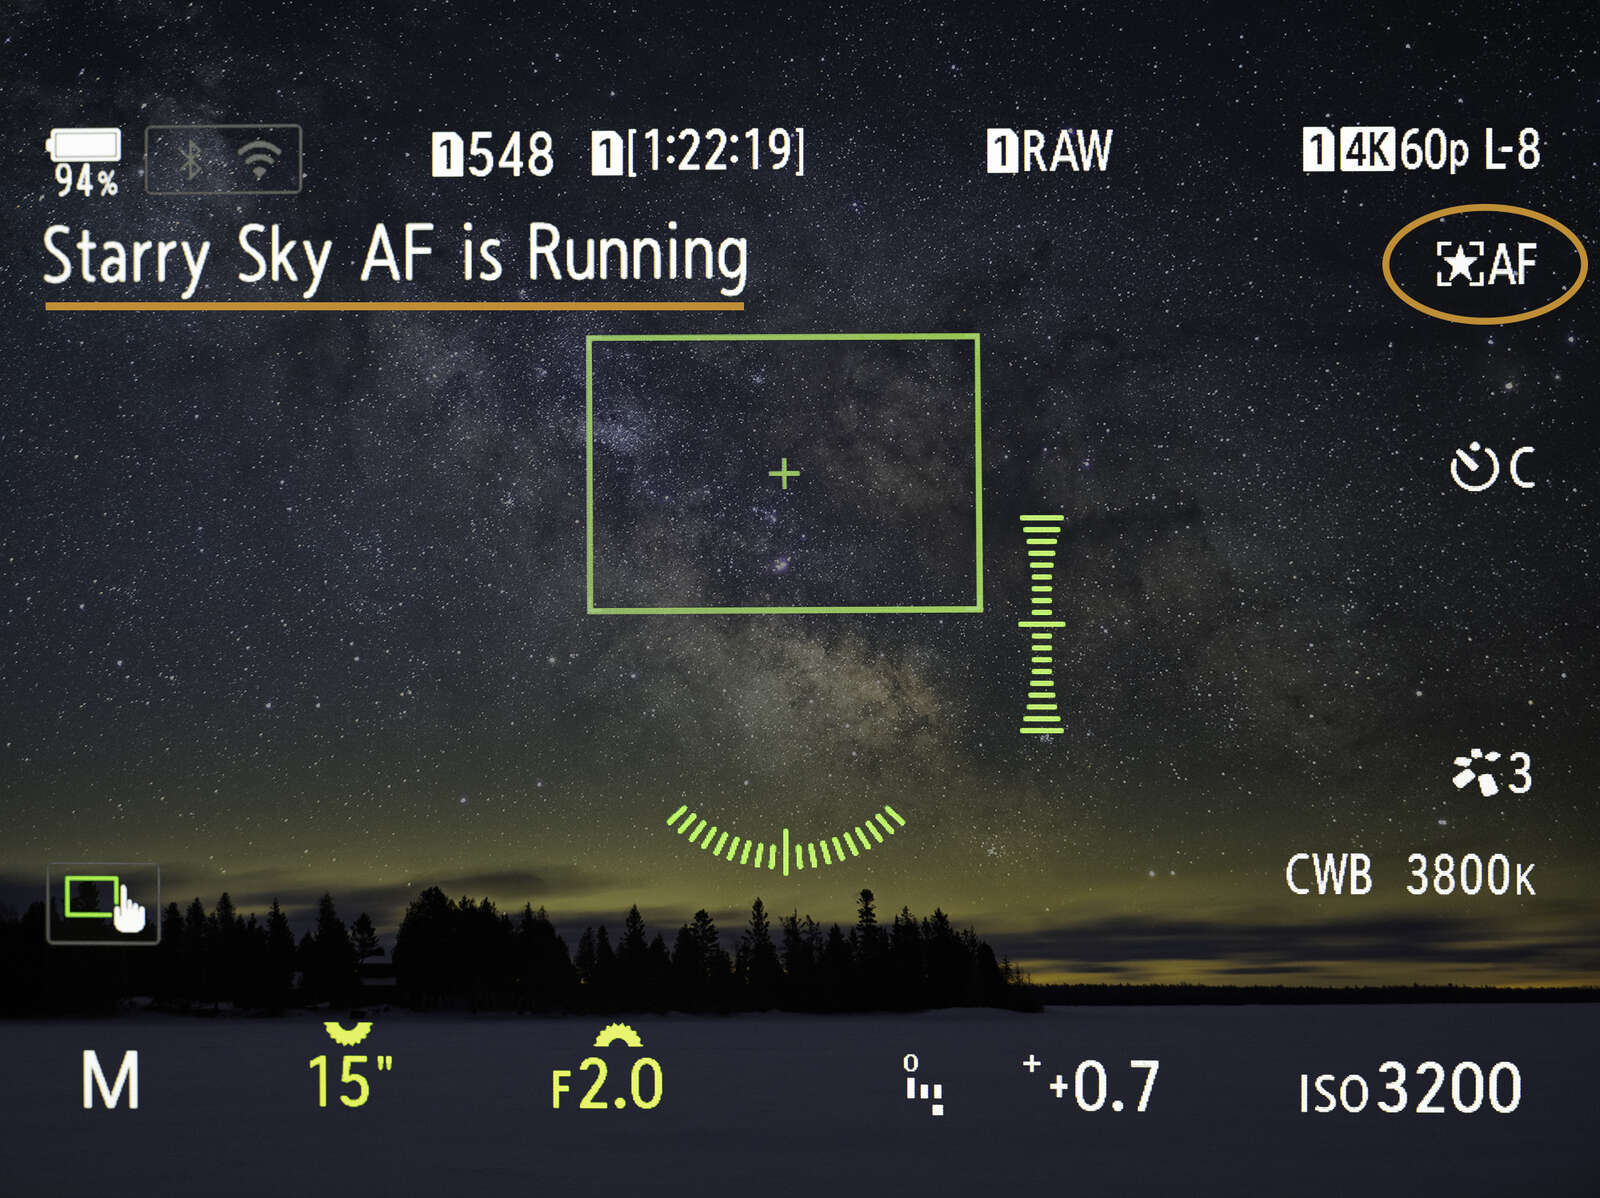
Until recently one of the biggest challenges with shooting at night was focusing. The stars are so faint that regular auto-focusing doesn’t work. Enter Starry Sky AF. The feature can be engaged using the Super Control Panel as one of the AF options. Further settings can be accessed on page 1 of the AF menu. With Starry Sky AF enabled, the camera locks focus on the stars by pressing the AF-On button on the rear of the camera. It maintains this focus until the camera is turned off or if you switch lenses. There are two different modes, Accuracy Priority and Speed Priority. My preference is the Accuracy Priority setting. The feature is available on the OM System E-M1 Mark III, the OM-1 and the OM-5. Note that with the E-M1 Mark III and the OM-5 the AEL/AFL button is used to start the Starry Sky AF process
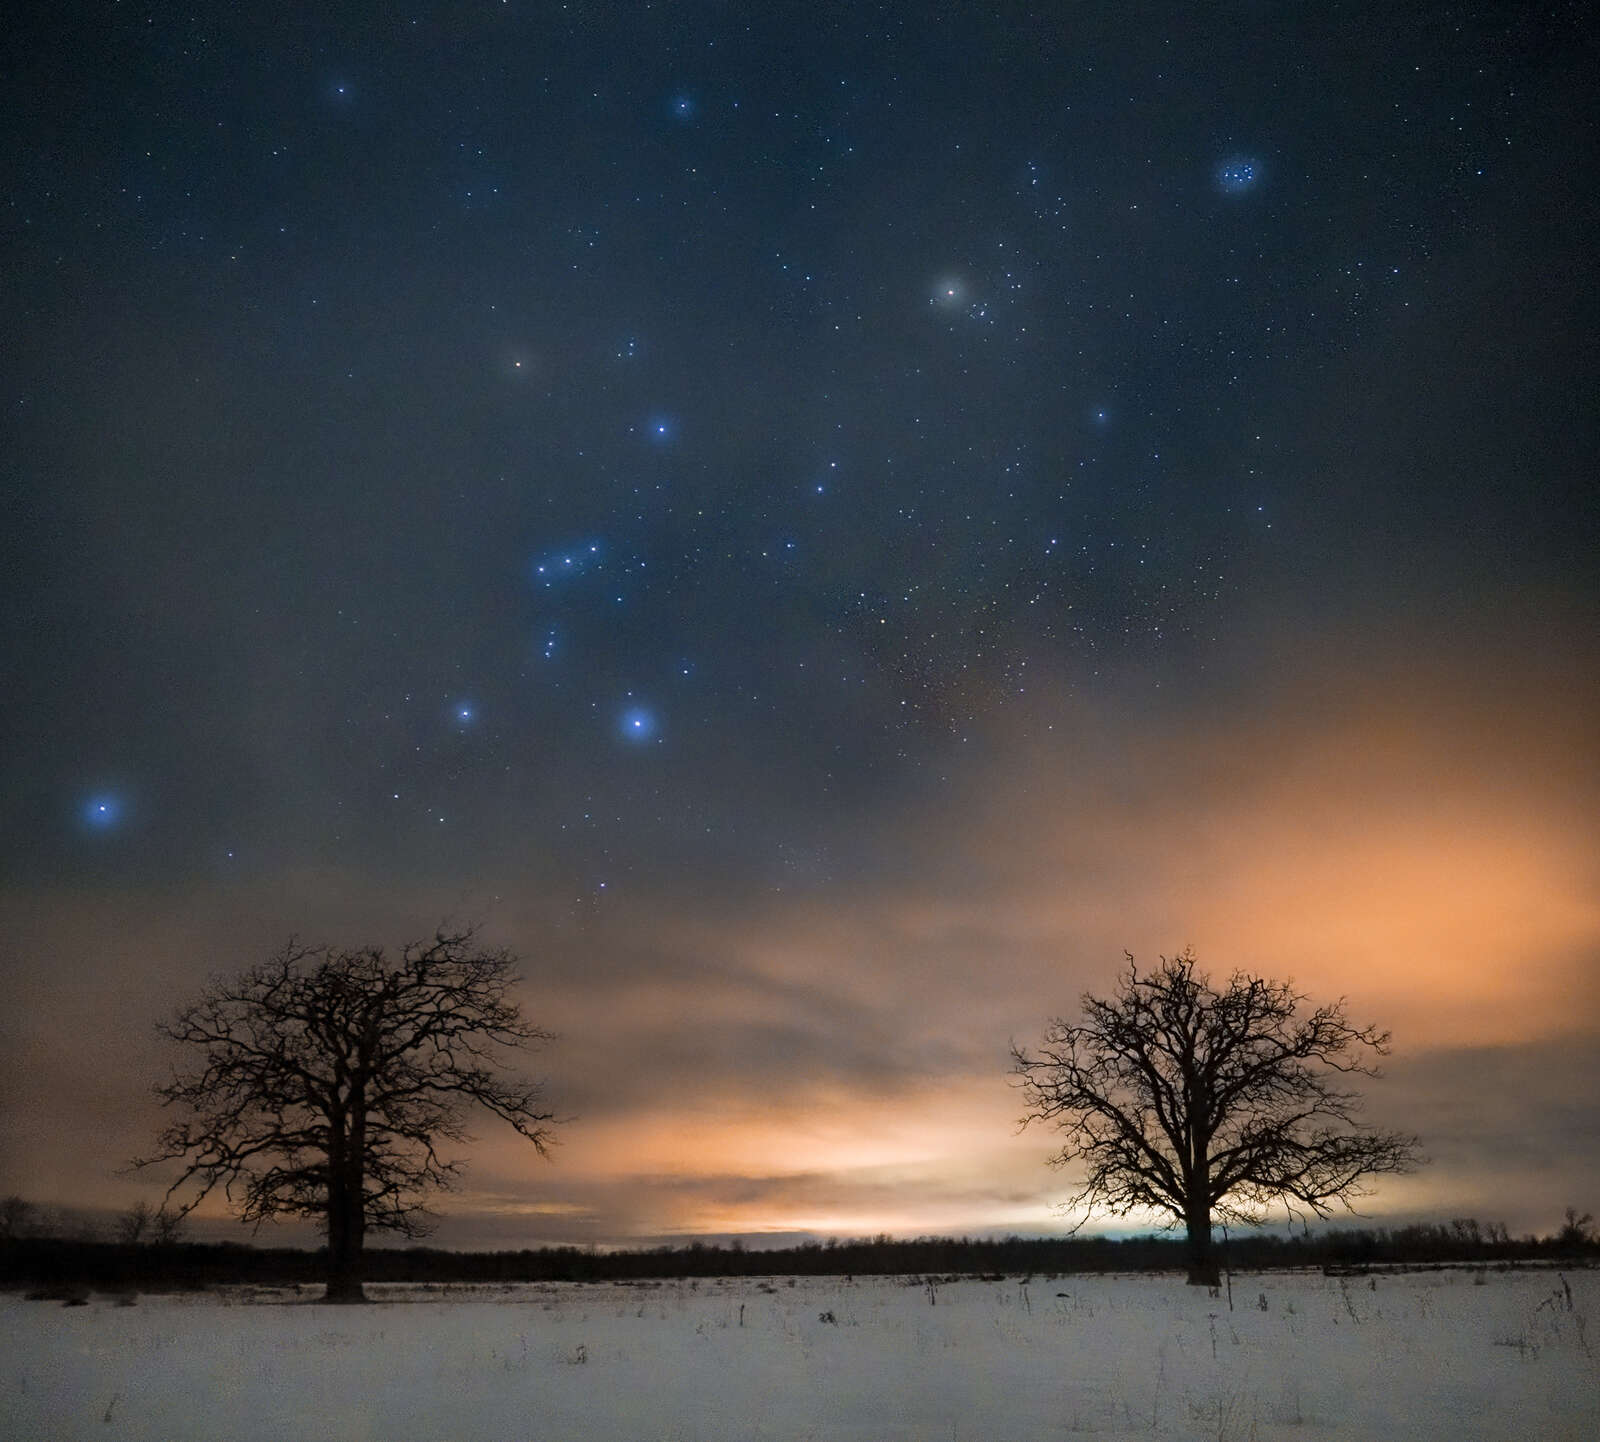
OM SYSTEM E-M1 Mark III | M.Zuiko 12mm F2.0
ISO3200 | 15s | f/2
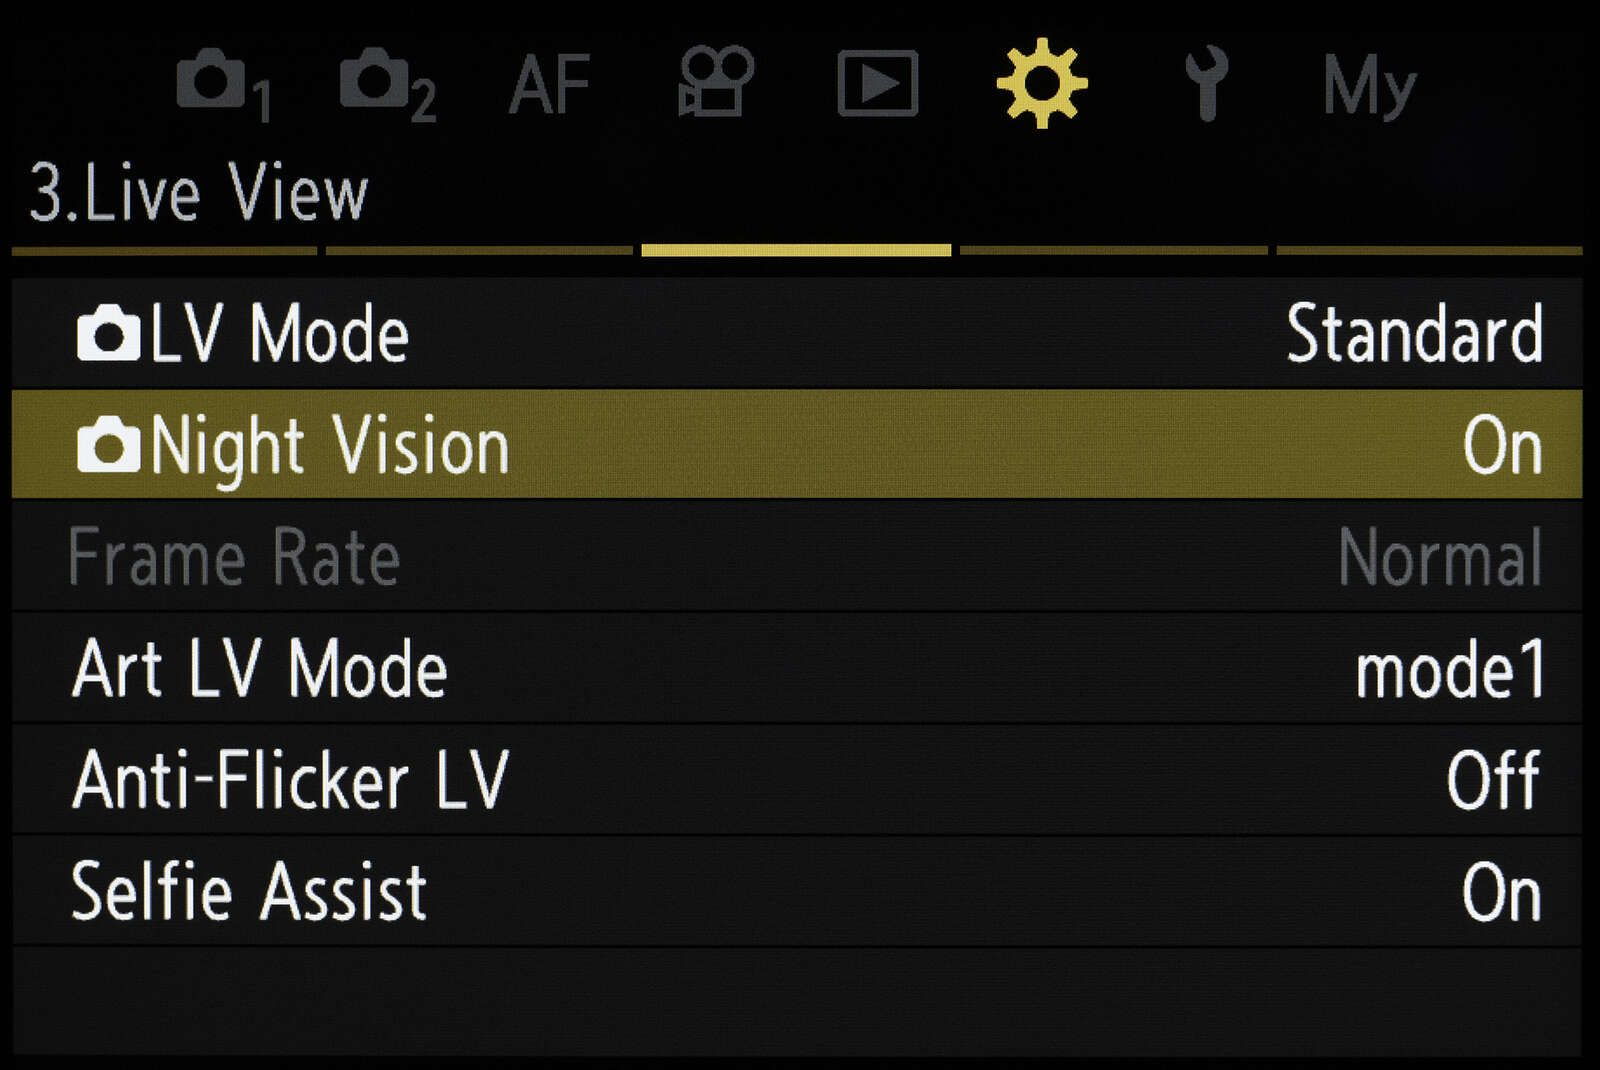
Night Vision
One issue that regularly plagues astro-landscape photographers is the challenge of composing a shot in the dark. Given the low light levels at night all you can normally see is the brightest stars when you look through the viewfinder or stare at the LCD. That’s not the case when you engage the OM-1’s Night Vision feature. Accessed through the Gear menu (page 3) it brings out the details of the scene, clearing showing both the night sky and your foreground. This greatly simplifies the process of composing a shot. In the past I would have to take several test shots, adjusting the camera position in between each until I got the composition exactly the way I wanted it. Night Vision makes that process so much faster and easier.
Custom Modes
I shoot quite often at night and want to have these settings ready at an instant. The last thing I want to do is fumble around in the dark getting my settings right each time I go out. To make that task a lot easier I program them into one of the custom modes – C4 in my case. In order to do so I put my M.Zuiko 8mm F1.8 PRO fisheye lens on my OM-1 body (the combination I use the most for night shooting), dialled in all of the appropriate settings and then saved it to Custom Mode 4. Now, when I arrive on location I just have to turn the mode dial to C4 and I’m ready to shoot.
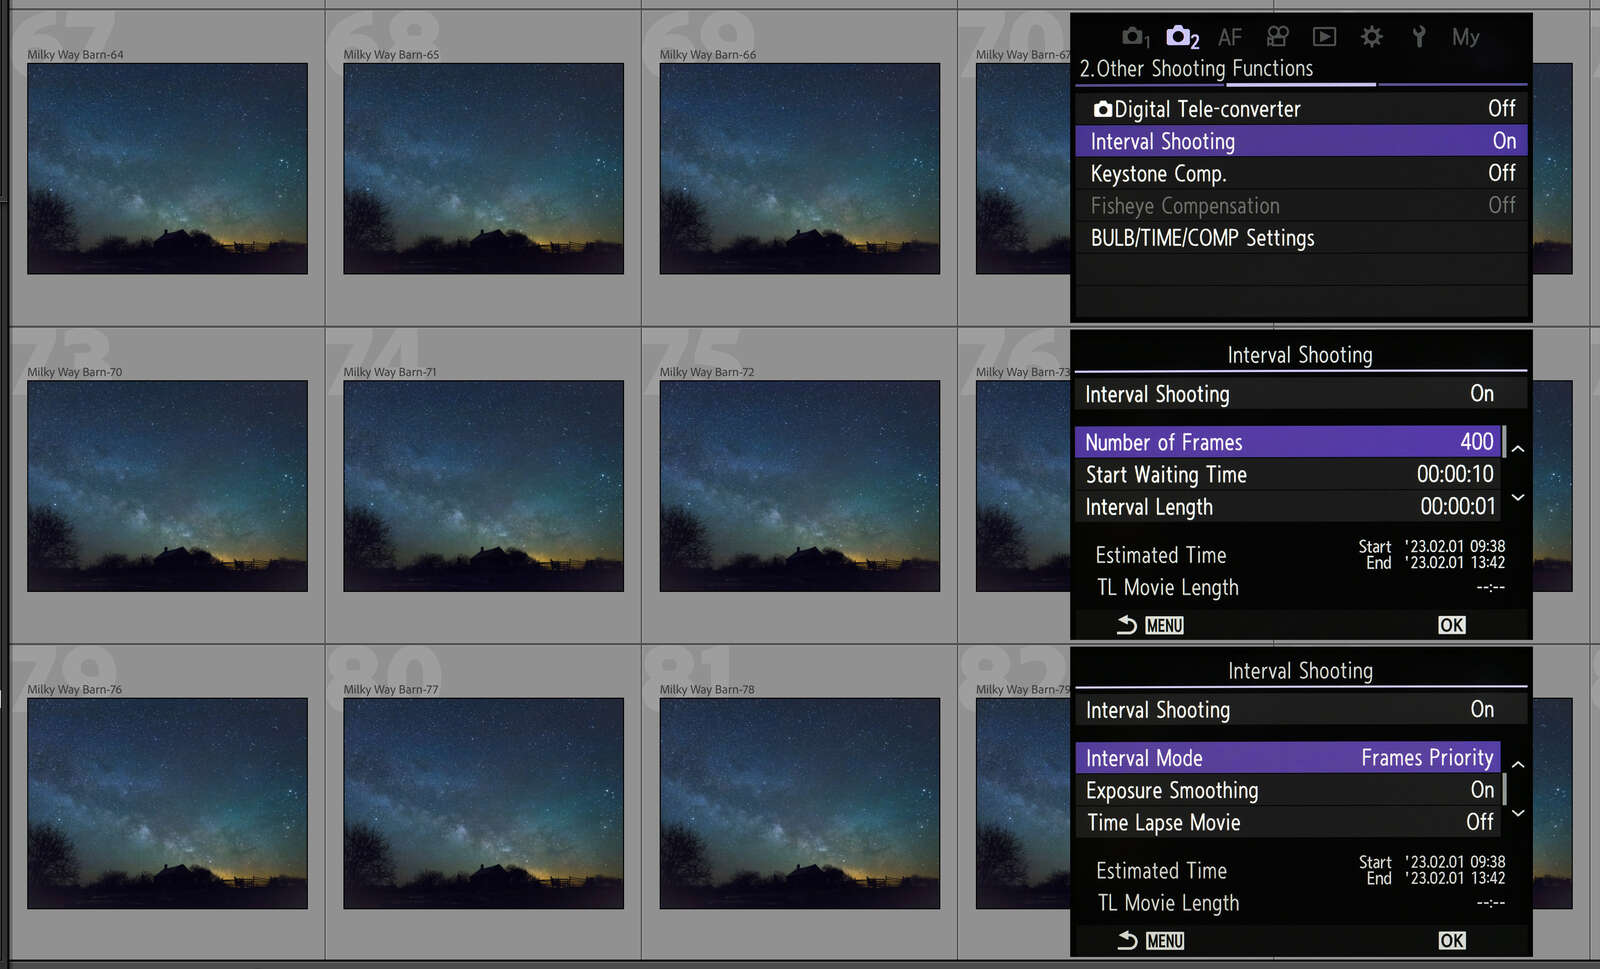
Interval Shooting
Interval or time lapse shooting can be a great way to capture a larger series of images over longer periods of time, from a few minutes to several hours. I have used this feature for several different situations;
- Time lapse videos – Several hundred photos, shot over a few hours can be pieced together in OM Workspace to create time lapse video clips. Both the camera and the software have numerous settings that control the playback of the images. I have created videos of the milky way rising, stars circling Polaris, and the aurora dancing in the sky.
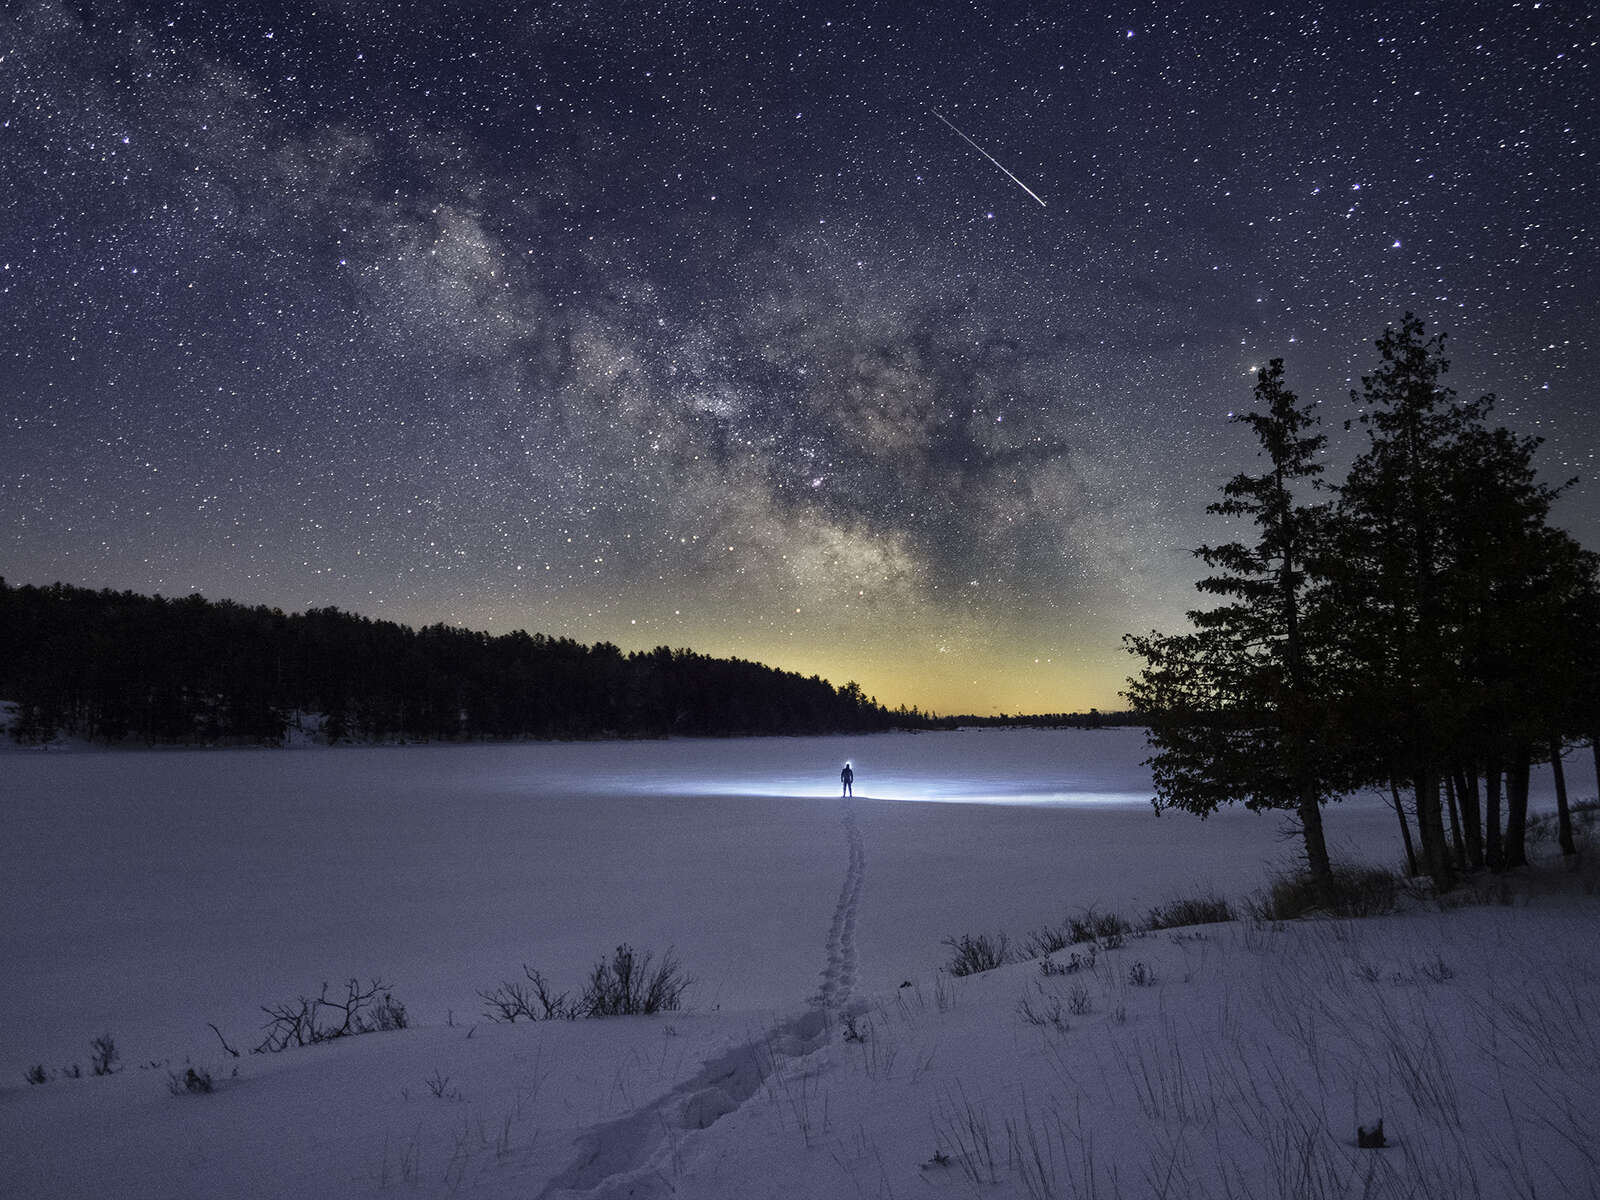
- Photographing meteor showers – When I photograph a meteor shower, such as the Geminids in December, I utilize interval shooting. This helps improve the chance of capturing a meteor strike.
- Time Blend Images – This is perhaps my favourite use of interval shooting. I set up the camera as if I were creating a time lapse video, but from the set of images I only select two or three from different times during the shoot and blend those together in post to create a more surrealistic view of the landscape.
One important consideration when using Interval Shooting is whether to have noise reduction on or not. Leaving NR on will double the time between shots. A 20 second exposure adds another 20 seconds in order to apply the noise reduction. That means your time lapse video may not be as smooth during playback. Or you may miss that incredible shooting star while the camera is applying noise reduction. Typically, I leave NR off when I am using Interval Shooting.
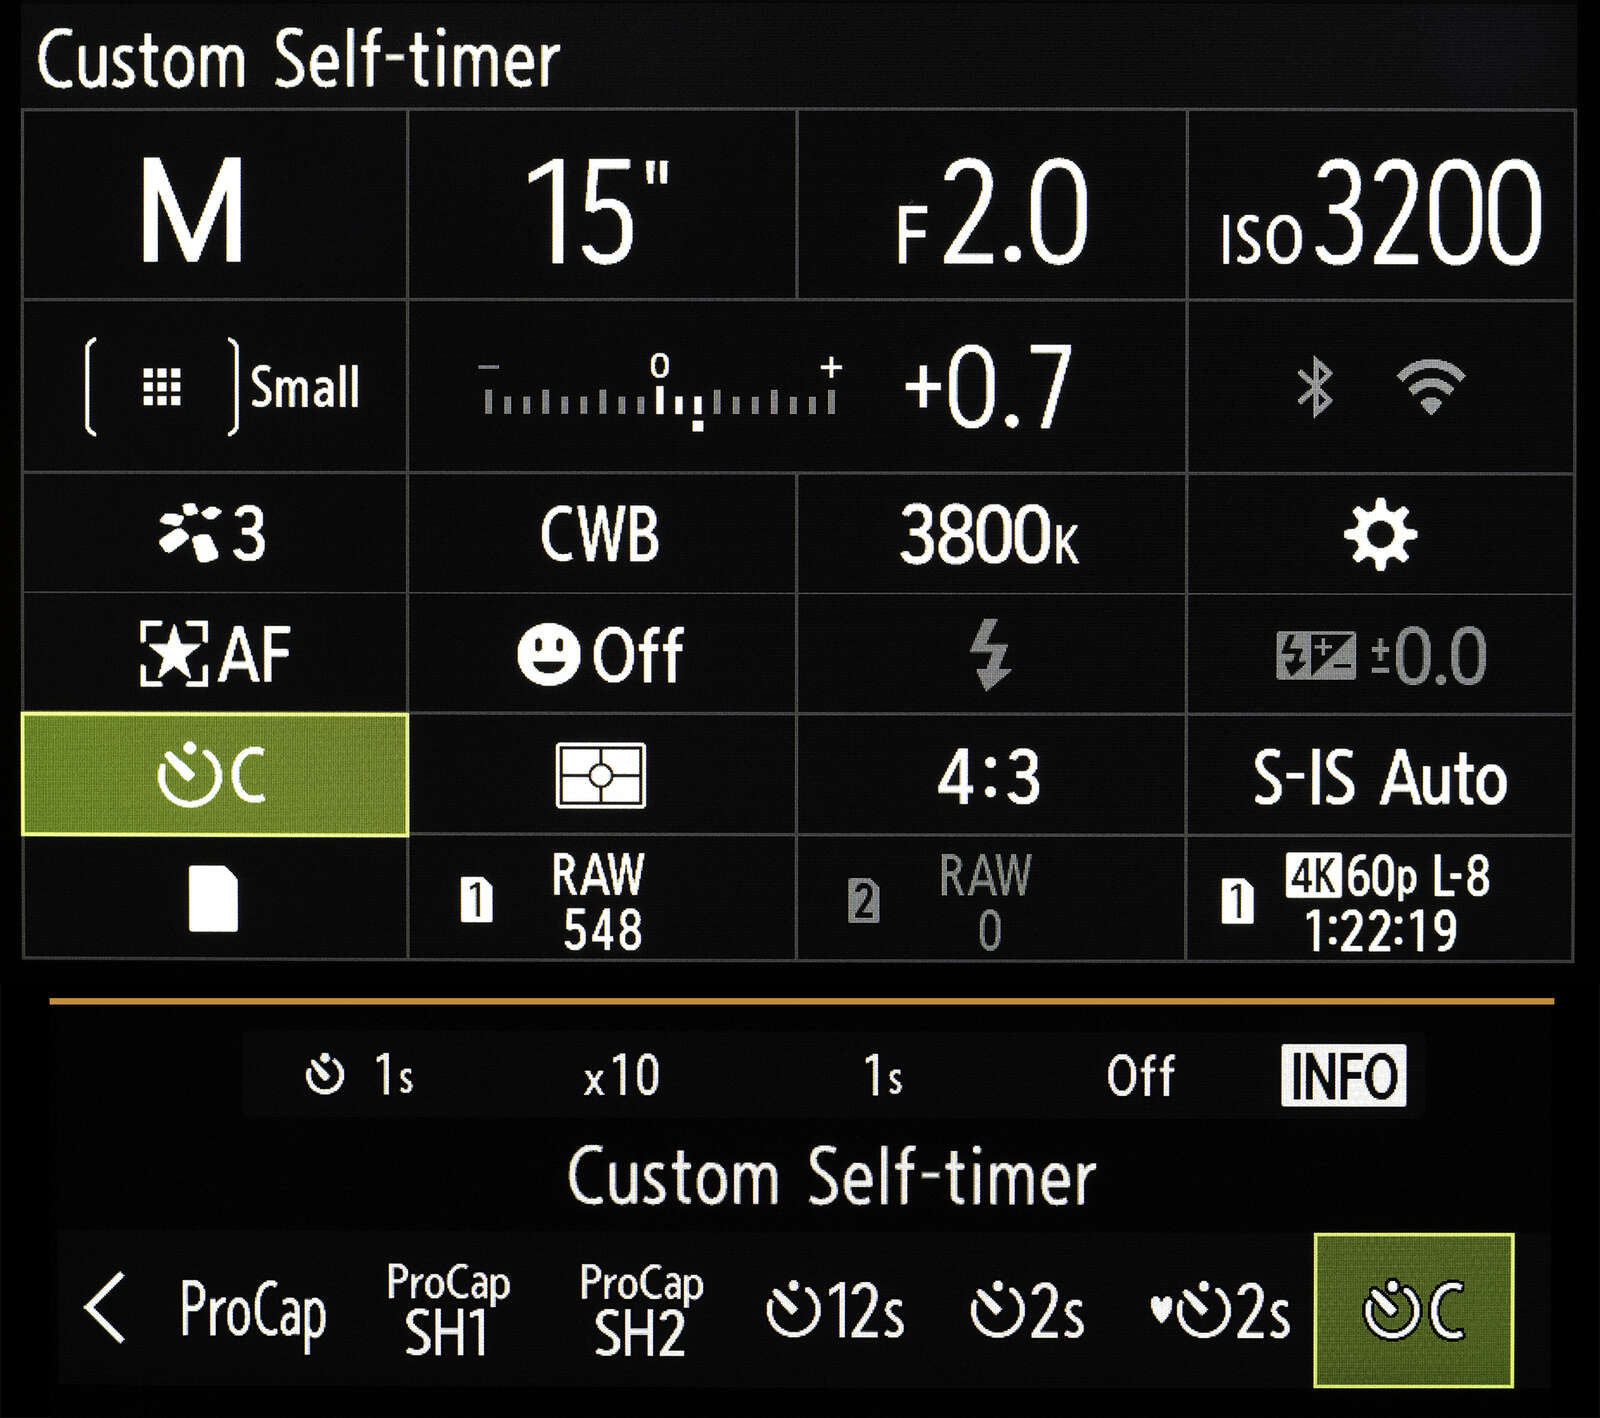
Custom Timer
Think of the custom timer as “time lapse lite”. It has most of the same controls as Interval Shooting, just on a much smaller scale. Rather than being able to shoot 9999 images, you max out at 10. Instead of having a 24-hour delay, you top out at 30 s. The largest interval length with the custom timer is only 3 s, rather than 24 hours. It may seem limiting, but I use it every time I shoot at night. To capture my night scenes, I use a technique called image stacking.
I shoot a set of 10 photos of a scene, then stack those in post. This significantly reduces the amount of digital noise in the final photograph and dramatically improves dynamic range. The custom timer allows me to easily capture these 10 images with a single click of the shutter. I will also program a delay using the custom timer if I want to put myself in the image. This give me enough time to get into position for the shot.
Special Computational Features
Live Composite
Live Composite is the perfect feature for capturing the night sky and I find that winter is the perfect time to use it. Several other articles have been written about it (see below), so I’ll keep this brief. Live Composite allows you to shoot very long exposures (up to six hours!) without blowing out the highlights in your photo. This is perfect for capturing star trails. For most situations I set the base exposure using the same settings that I would for a single shot. Live Composite is enabled by turning the mode dial to ‘B’ and selecting “LIVECOMP”. Pressing the “Menu” button takes you directly to the Composite Settings in the menu. Essentially you are setting your shutter speed. For example, if I were shooting with the M.Zuiko 12mm F2 then I would dial the Composite Setting to 15 seconds. However, since I am trying to capture star movement rather than photograph sharp pinpoints for my stars, I can get good results by using longer base exposures. This gathers more light for the image, but don’t overdo it. By using a base exposure that is too long you will blow out the subtle colours in the stars.
Once you have set the base exposure you need to press the shutter release twice. The first exposure is a dark frame lasting the length of your Composite Setting. This is used for noise reduction. With the second press of the shutter the Live Comp process begins and can be seen live on the LCD. The shutter remains open during the process and the image is updated based on the base exposure you selected. Only those areas of the frame where the light has changed with the updated in the final image. While I wait for the Milky Way to return in late winter I will often go out shooting Live Composite sequences in December and January. Although you can point your camera in any direction, my preference is to include Polaris, giving the sky that wonderful circular pattern of star trails.
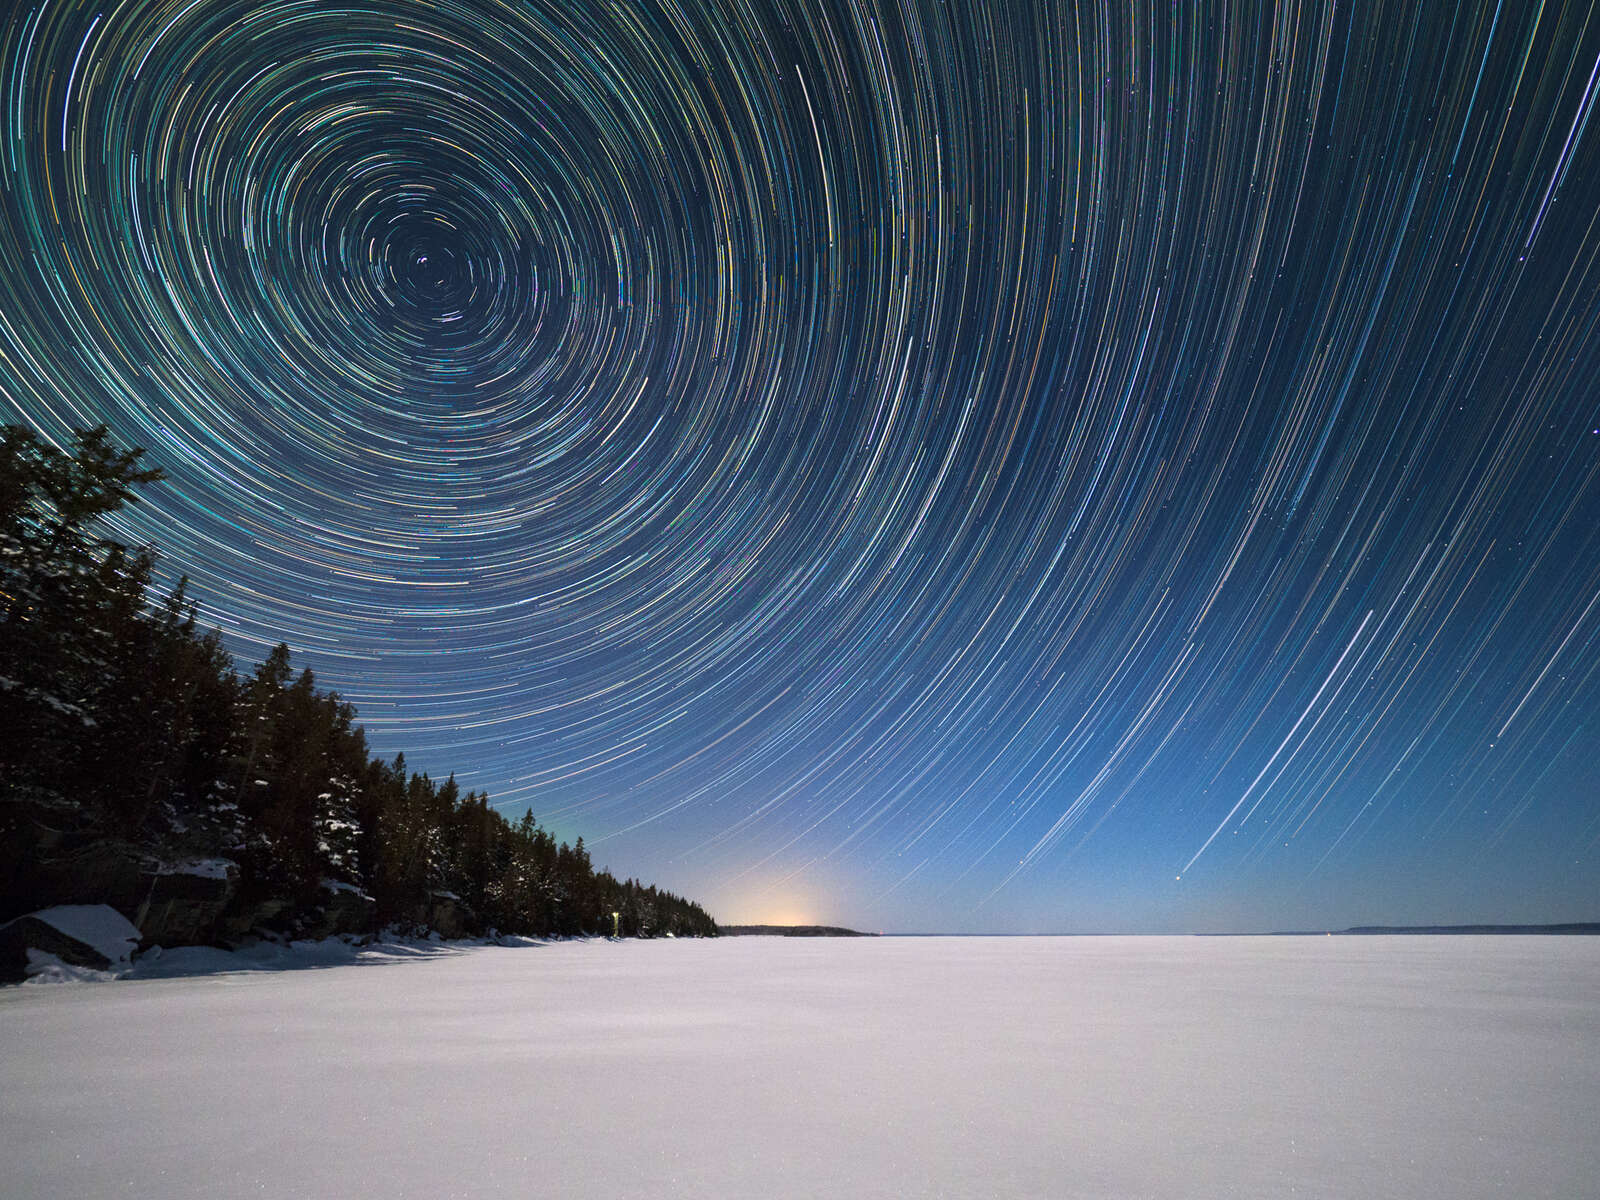
OM SYSTEM E-M1 Mark II | M.Zuiko 7-14mm F2.8 PRO
ISO1600 | 20s | f/2.8
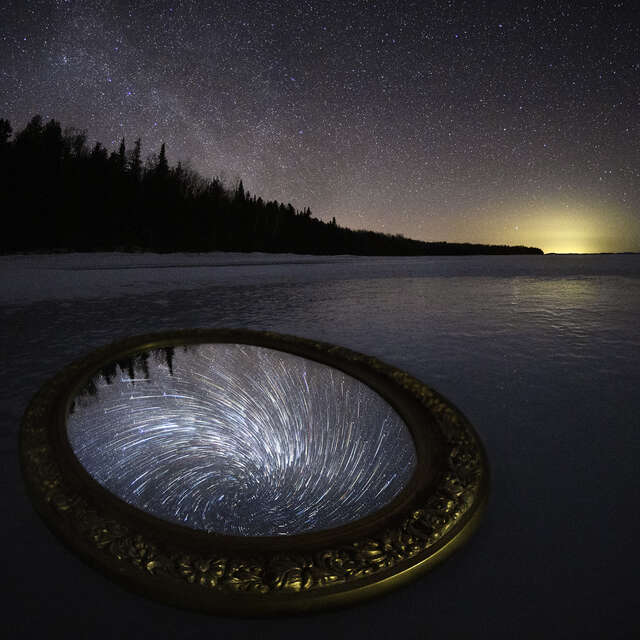
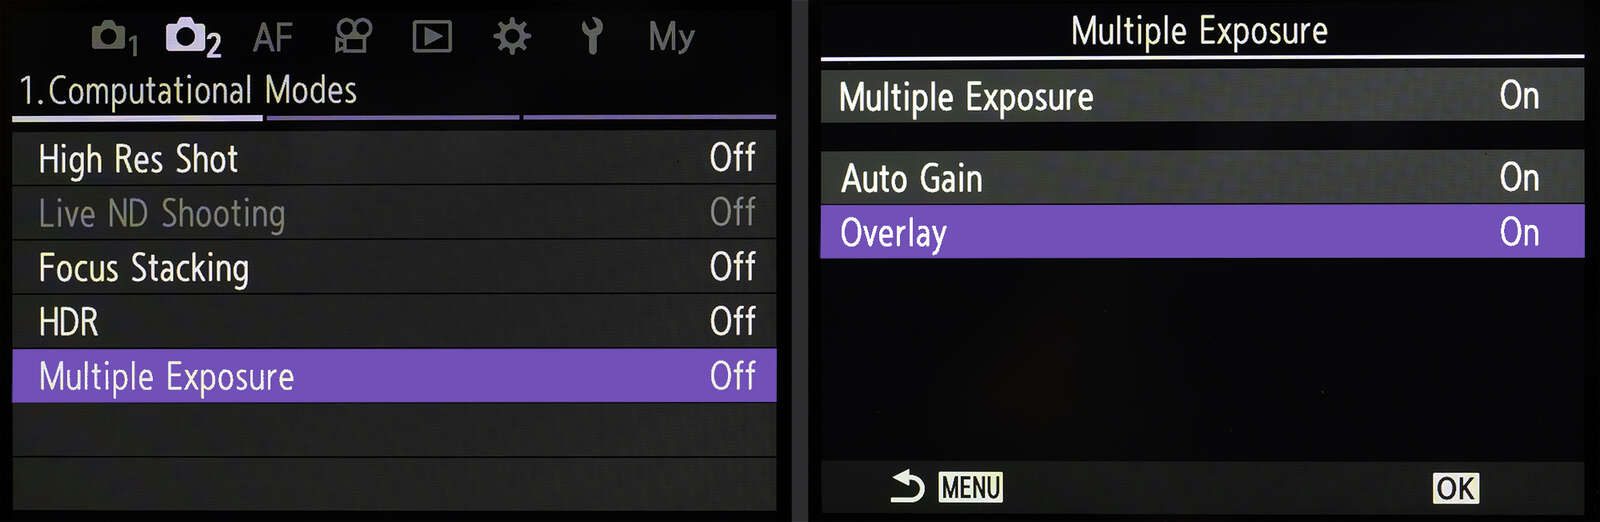
Multiple Exposure
The image below illustrates how I use the multiple exposure feature in my photography. Captured on a particularly frosty January evening I wanted to include the moon in the photograph. Unfortunately, it was much too high in the sky. Not a problem! By using Multiple Exposure I was able to grab the moon from the sky and place it exactly where I wanted it (Oh, the power!!!).
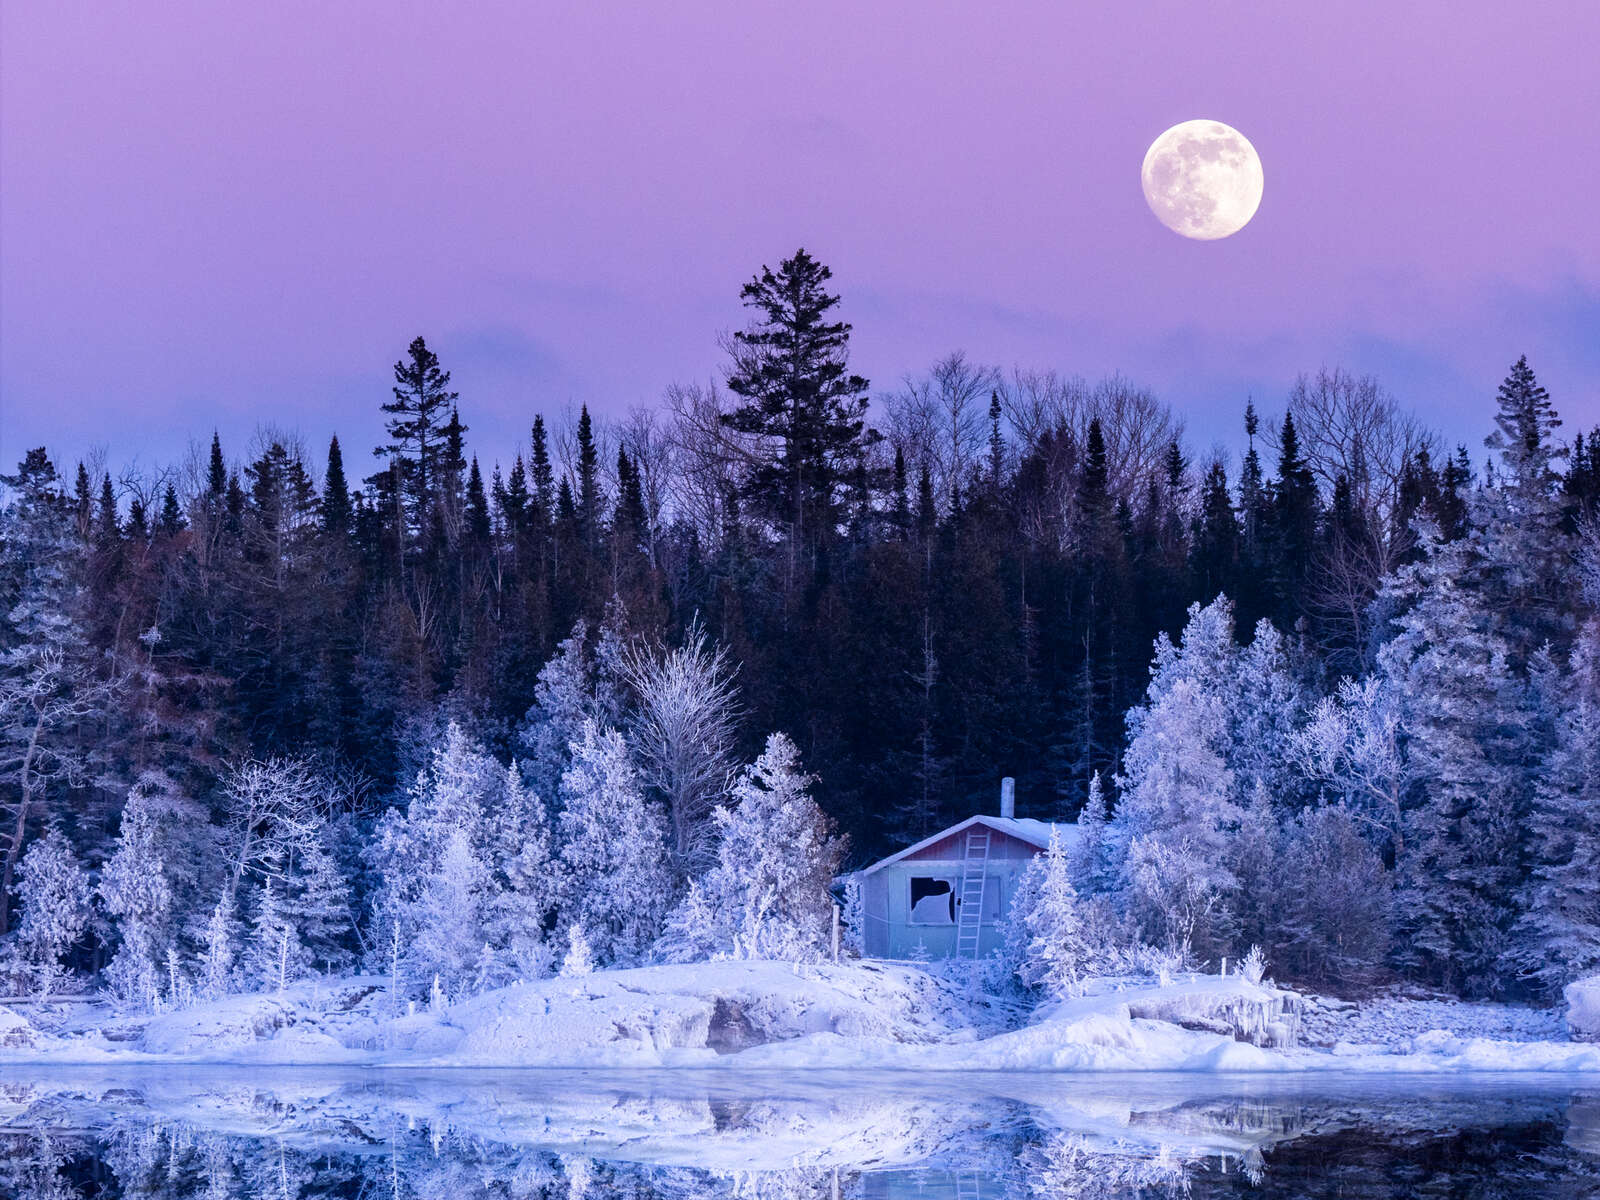
OM SYSTEM OM-1 | M.Zuiko 150-400mm F4.5 TC1.25x IS PRO
ISO500 | 1/30s | f/7.1
Final Thoughts and Images
It took quite some time for me to become completely comfortable with photographing at night. There was a lot of trial and error and a number of hurdles to overcome. I wrote this article to be a one-stop shop for people interested in astro-landscape photography. It covers the basics for those just getting started and hopefully provides inspiration for those who are well on their way. It remains one of my favourites styles of photography and winter is certainly my favourite season to capture the beauty of the night sky.
OM SYSTEM OM-1 | M.Zuiko 8mm F1.8 PRO Fisheye
ISO 3200 | 15s | f/1.8
OM SYSTEM OM-1 | M.Zuiko 7-14mm F2.8 PRO
OM SYSTEM OM-1 | M.Zuiko 8-25mm F4 PRO
ISO 1600 | 10s | f/4
OM SYSTEM E-M1 Mark III | M.Zuiko 8mm F1.8 PRO Fisheye
OM SYSTEM OM-1 | M.Zuiko 8mm F1.8 PRO Fisheye
ISO 3200 | 15s | f/1.8
ABOUT PETER
Web: creativeislandphoto.com
Blog: creativeislandphoto.com/blog
Twitter: @creativeisland4
Peter has been a dedicated Olympus shooter for nearly 40 years, and has found a way to combine his passion for photography with his love of teaching to develop photography workshops with a focus on landscape, wildlife and astrophotography. Peter’s work has been published in a number of magazines including Canadian Geographic, Shutterbug and Outdoor Photographer. He maintains his own blog with an emphasis on tutorials that assist others in bringing their photography up to the next level.