Tough TG-4 Support Topics
How do I change the position of the AF target mark?
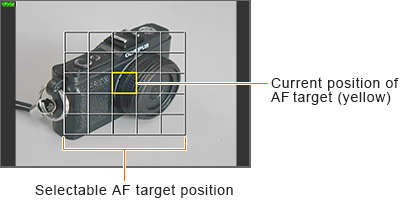
AF target selection (named AF Area in the camera menu) is a function to set the position of the focus point on the monitor.
In the TG-5, you can choose from 25 AF target marks (horizontal by vertical: 5 x 5).
This function is available when the AF Area is set to ![]() (Single Target).
(Single Target).

How to select AF target
If you press and hold the [OK] button for a few seconds, 25 selectable AF target points are displayed on the monitor. Use the arrow pad button to select the desired AF target point, and then press the [OK] button to complete.
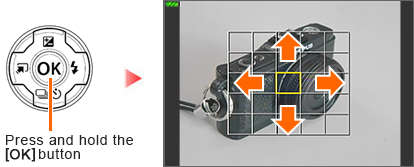
- To select the central AF target point at once, press and hold the [OK] button for a few seconds while the 25 selectable AF target points are displayed.
- AF target selection is not possible in some scene modes.
- The default setting of AF Area is
 (Single Target).
I want to focus a subject manually. What should I do? [MF / MF Assist]
How to set manual focus
To adjust the focus manually, select MF in live control.
Press the arrow pad Up and Down button or use the control dial to adjust the focus of a subject on the monitor.
Press and hold the [OK] button for a few seconds when the adjustment is completed. To change the focus again, press and hold the [OK] button for a few seconds.

Related function for manual focus (MF Assist)
There are two functions in MF Assist that are useful for adjusting the focus on the LCD monitor; Magnify and Peaking.
Press the [MENU] button and select ![]() (Custom Menu). In A.MF, select MF Assist and press the [OK] button.
(Custom Menu). In A.MF, select MF Assist and press the [OK] button.
You can set each functions to On or Off. Both functions are set to Off in default setting.

Magnify
An enlarged image is displayed on the monitor when you press the arrow pad Up or Down button to adjust the focus manually.
When you press the [INFO] button while an enlarged image is displayed, you can shift the position of the enlarged image using the arrow pad button (Up, Down, Right and Left button). You can also change the magnification up to 14x by turning the control dial.

Peaking
When adjusting the focus manually in MF, points with clear outline (in focus) are highlighted in a selected color.
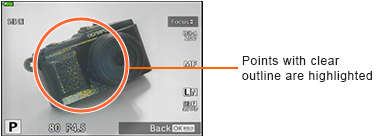
- * The peaking color in this image is Yellow. The default setting is White.
You can select a peaking color in the ![]() (Custom Menu). In B.1 Disp/
(Custom Menu). In B.1 Disp/ ![]() /PC, select Peaking Color. Four color choices are available: White, Black, Red and Yellow.
/PC, select Peaking Color. Four color choices are available: White, Black, Red and Yellow.
- When Magnify and Peaking are activated simultaneously, the outline may be hard to see depending on the subject.
- Manual Focus and MF Assist cannot be used in iAUTO
What lenses support the Pro Capture Mode?
However, you cannot use the Pro Capture Mode with the Body Cap Lens BCL-0980 and BCL-1580 because these lenses do not have electronic contacts.
Can I turn on (or off) the image stabilizer function of either the camera or the lens when attaching the camera to a lens with 5-axis Sync image stabilizer?
No, you cannot separately turn on/off the image stabilizer function of the camera or lens.
When attaching a lens with 5-axis Sync image stabilizer function, the stabilizer function of the camera and lens work together.
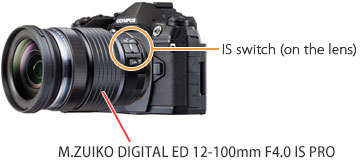
The image stabilizer function is turned on/off with the IS switch on the lens.
You cannot select the image stabilizer setting on the camera when the IS on the lens is switched off.
Note:
Lens with 5-axis Sync image stabilizer
The lens with 5-axis Sync image stabilizer function is (as of January 2017):
M.ZUIKO DIGITAL ED 12-100mm F4.0 IS PRO
M.ZUIKO DIGITAL ED 300mm F4.0 IS PRO
Custom menu "Lens I.S. Priority"
The Lens I.S. Priority function in custom menu C2 Release/![]() /Image Stabilizer on the E-M1 MarkII is a function regarding an other manufacturers' Micro Four Thirds lens with image stabilizer function. This Lens I.S. Priority function does not affect the operations when using a lens with 5-axis Sync image stabilizer.
/Image Stabilizer on the E-M1 MarkII is a function regarding an other manufacturers' Micro Four Thirds lens with image stabilizer function. This Lens I.S. Priority function does not affect the operations when using a lens with 5-axis Sync image stabilizer.
How do I assign camera settings to the Custom Menu C1, C2 and C3 on the mode dial?
Question :
How do I assign camera settings to the Custom Menu C1, C2 and C3 on the mode dial?
What is Custom Mode?
The Custom Mode (C1, C2 and C3) is used for saving and recalling custom menu settings. When you set the mode dial to a Custom Mode (C1, C2 or C3), the pre-assigned camera setting is recalled, enabling to shoot in the assigned settings.
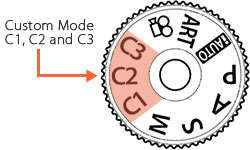
Assigning camera settings to the Custom Mode C1, C2 and C3
The following procedure explains how to assign camera settings to the Custom Mode C1, C2 and C3.
- Set the mode dial to a mode other than iAUTO, ART or movie. (e.g. P mode) Select the menu options you want to apply to the Custom Mode.
- Press the [MENU] button. In
 (Shooting Menu 1), select Reset / Custom Modes and press the [OK] button.
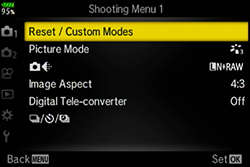
- Select Assign to Custom Mode and press the arrow pad Right button.
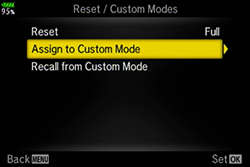
- Select a Custom Mode (C1, C2 or C3) where to assign the setting and press the [OK] button.
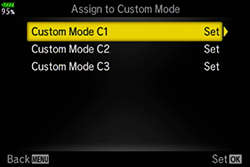
- Select Set to save the current setting and press the [OK] button.
If a setting is already registered to the selected custom mode, it will be overwritten.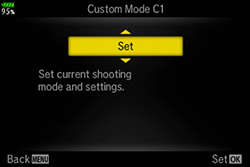
- For the functions that can be assigned to the Custom Mode, refer to the E-M1 Mark II's instruction manual (from page 165 to 175).
- You can reset the settings assigned to the Custom Mode. In
 Shooting Menu 1, select Reset / Custom Modes and press the [OK] button. In Reset, select Full and press the [OK] button to return the camera to the factory default settings.
Can I apply exposure compensation to the camera when shooting in M mode (Manual Exposure mode)?
Yes, you can apply exposure compensation to the camera when shooting in M mode (Manual Exposure mode).
After setting the ISO sensitivity to Auto, turn the Fn lever to position 2 if the Fn lever is on the default position.
Apply exposure compensation by using the front dial.
Reflecting the changes of exposure compensation on the live view display (in M mode)
For reflecting the changes of exposure compensation on the live view display in M mode, set the Live View Boost to Off.
In ![]() Custom Menu, select
Custom Menu, select ![]() Disp /
Disp / ![]() / PC and change the Live View Boost setting to Off.
/ PC and change the Live View Boost setting to Off.
In the default setting, the Live View Boost for M mode is set to On1 in which the changes of exposure compensation is not reflected.
- If ISO Auto setting is not possible in M mode, confirm the setting of
 Exp/ISO/BULB/
  in
in  Custom Menu. If P/A/S is selected in ISO-Auto setting, change the setting to All. (Default setting is All.)
 - The exposure compensation on the live view display can only be reflected up to ±3.0 EV.
How do I change the pattern of AF target area?
Question :
How do I change the pattern of AF target area?
The following procedure explains how to change the pattern of AF target area.
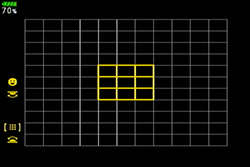
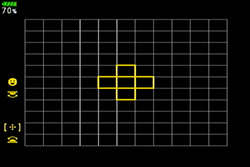
- In shooting mode, press the arrow pad button on the camera back to display the AF target selection on the monitor or viewfinder.
- * AF target selection is assigned to the arrow pad button in default setting.
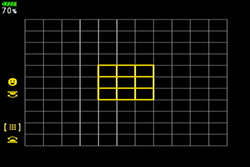
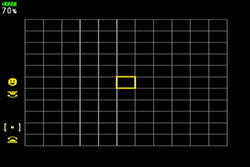
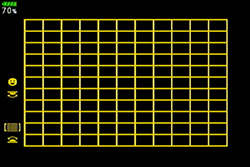
- Turn the front dial to select the desired pattern of AF target area and press the [OK] button.
You can also set the face priority and eye priority by turning the rear dial. The available settings are (Face Priority On),
  (Face Priority Off),
  (Face & Eye Priority On),
  (Face & R. Eye Priority On) and
  (Face & L. Eye Priority On).
|
|
|
|
Subject-tracking Cluster Display
The Subject-tracking Cluster Display simplifies focusing on moving subject.
The focus area is displayed while the shutter button is pressed halfway down.

You can set the Subject-tracking Cluster Display with the following procedure:
- Set the AF target to
 All Targets and the AF mode to C-AF.
 - Set the AF Area Pointer to On2.
Press the [MENU] button. In Custom Menu, select
  AF/MF. In AF Area Pointer, select On2 and press the [OK] button.
 - If you press the shutter button halfway down while shooting images, the cluster area is displayed.
How do I link the Single Auto focus point to the spot metering.
With the E-M1 Mark II camera the position of the single AF target and range of spot metering can be linked. The default setting is linked, so a setting change is not necessary.When using this combination, Face priority AF is not available.
To unlink the spot focus point from spot metering, uncheck any one or all three of the spot metering modes in ![]() Spot Metering in Custom Menu Gear E3. Uncheck any one of the boxes by highlighting the mode and press the OK button. Press the Menu button when complete.
Spot Metering in Custom Menu Gear E3. Uncheck any one of the boxes by highlighting the mode and press the OK button. Press the Menu button when complete.


