I like old windows. You know the type; the grid-style with several lites often found in historic colonial homes. They have character. Some time ago I picked one up at my local landfill. It was in excellent condition and I was looking forward to using it as a frame for one of my prints. Not quite ready for it, I put it in my garage, and there it sat and sat and... Every time I looked at it I thought, "Oh yeah, I've got to do something with that window." But soon, another idea for its use crept into my head...
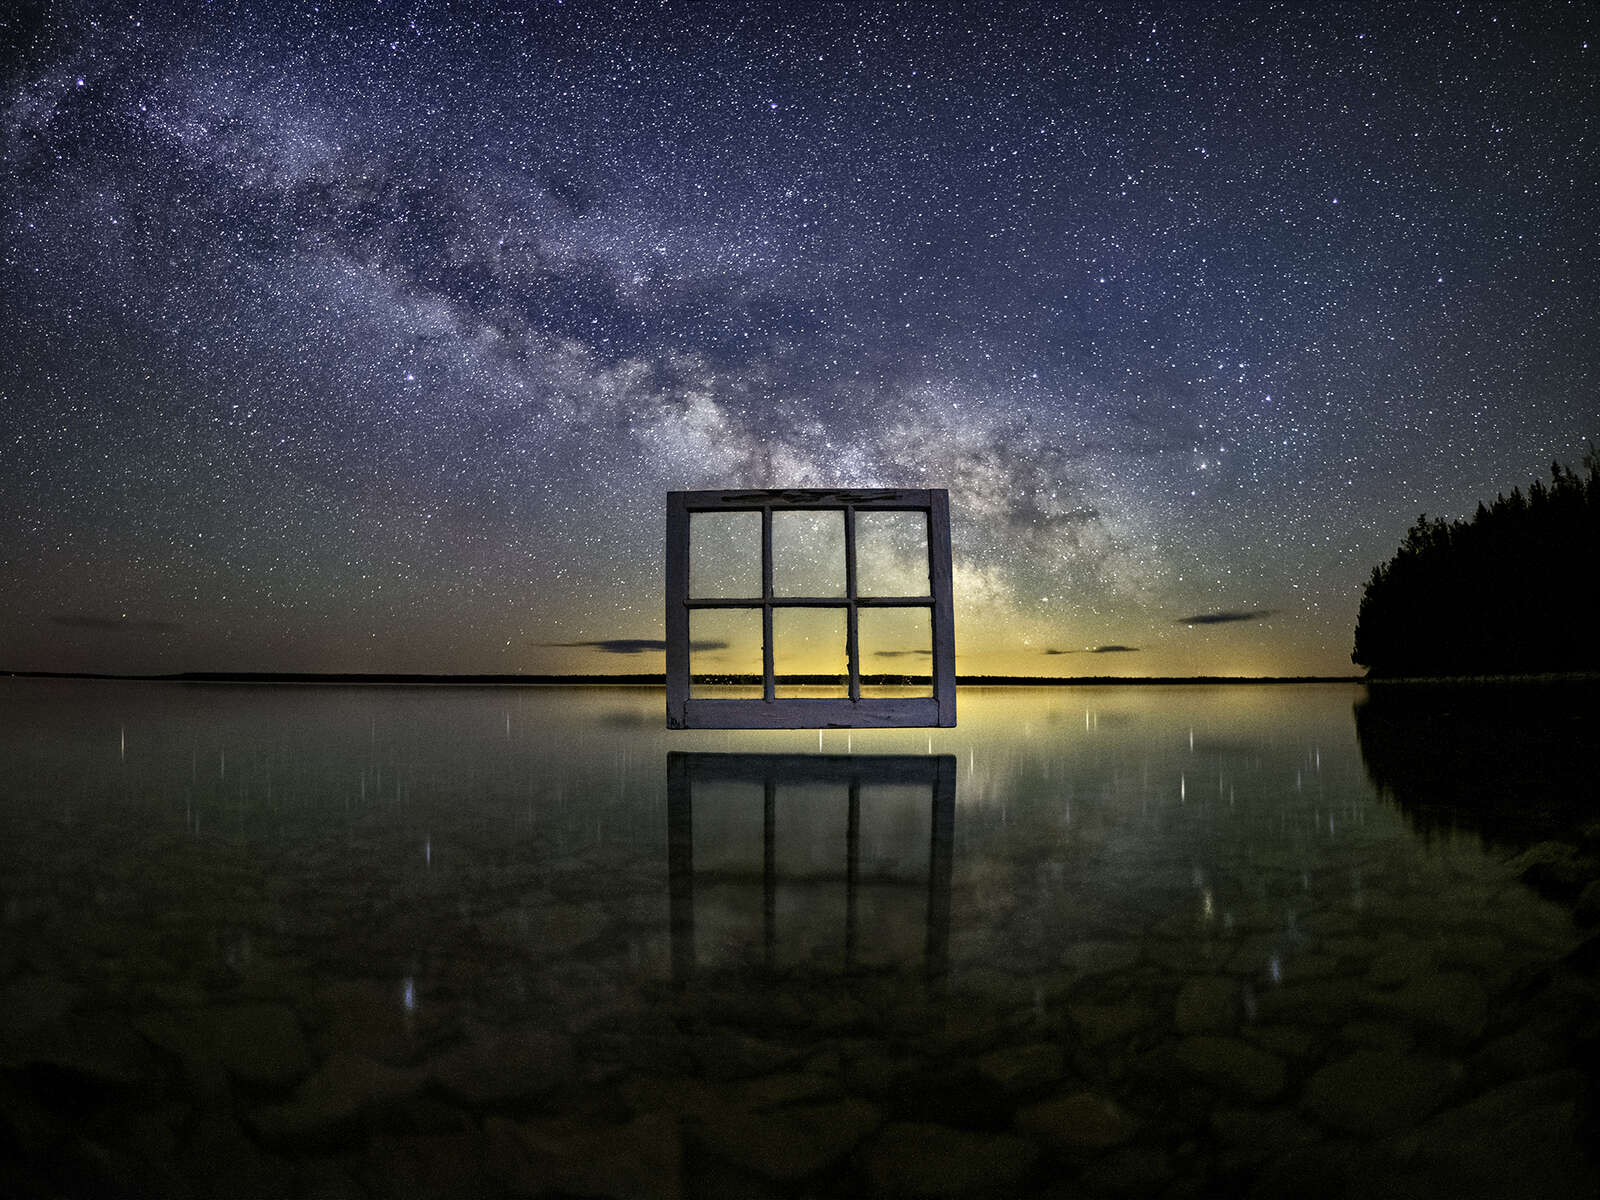
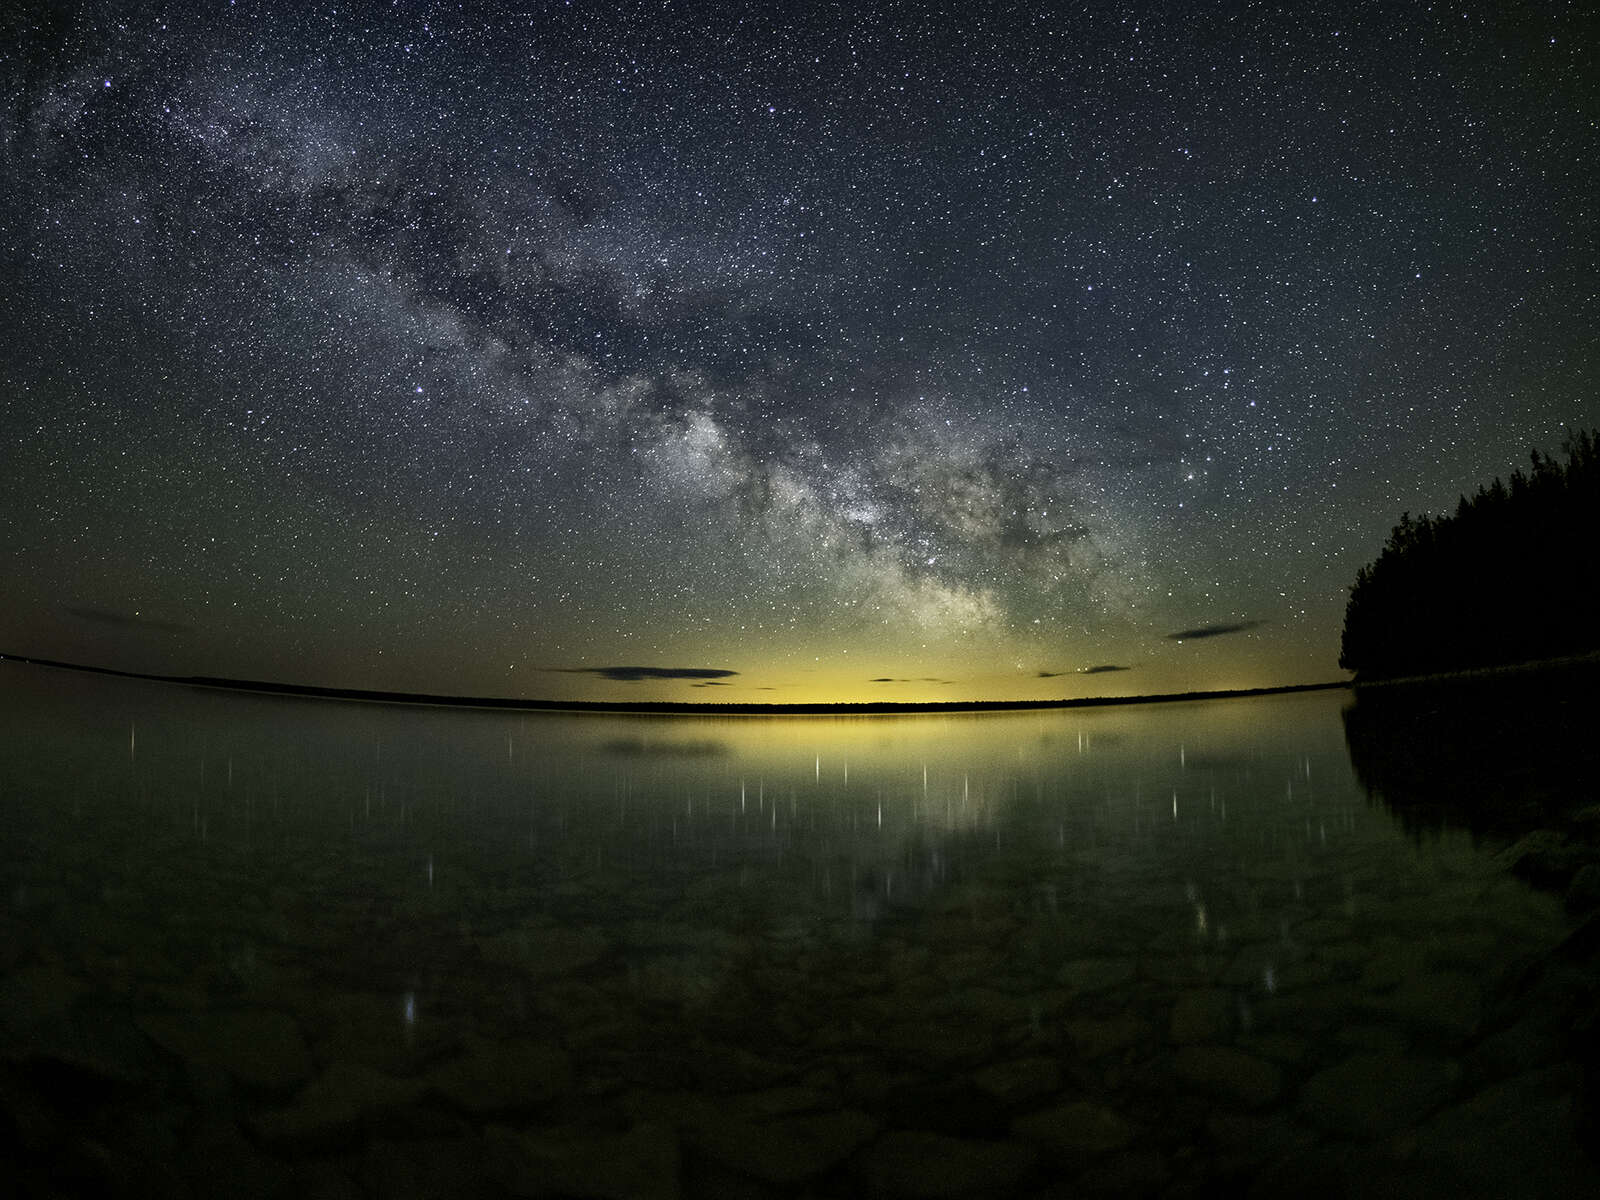
For those of us who live indoors (and I'm guessing that includes you), our windows provide one of our main views of the outside world. I wanted to create a concept shot with a window floating in the air through which we could view the world beyond. Now, this could be done by simply creating a composite image - photograph the window against a plain background and, using some Photoshop trickery, superimpose it over your scene. Well, that seemed too easy. I wanted the window to actually be 'floating' in the air. Unfortunately, my "use the force" skills are rather poor, so I would have to come up with a way of suspending the window in an outdoor scene. And, given my love of astro-landscape photography, I wanted this project to involve the night sky.
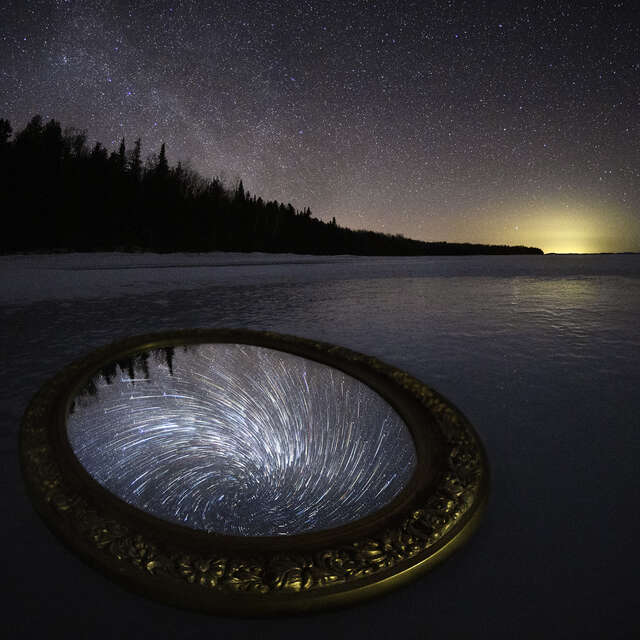
20s | F1.8 | ISO 3200
This 'floating window' idea had been in my head for awhile. The challenge was coming up with a way to make it as authentic an image as possible.
My Anti-Gravity Device
Like most of my concept shots the ideas come long before the actual execution. Overall, this wasn't a difficult one to create. It would require two separate shots - one with the window, and one without. The real challenge was coming up with a way of suspending the window. This is what took the most time. I needed something that would be easy to transport and construct on location. I thought of building some type of large stand using lumber, but that seemed like too much work.
As I was rooting around in my garage for inspiration I came across some old easels that I hadn't used for years. Suddenly the light bulb turned on! They were light, fairly tall and very easy to transport. All I needed to do is hang the window from a board suspended between the two easels. I found a piece of 2x2, a small length of chain and a few screws to fasten it all together.
Prepping the Shoot
If I was going to go to the trouble of trying to make this idea come to fruition, I needed to increase my chances of success. That meant scouting out a possible location, and then getting the timing right for my night time shoot. For each of these, an app would make the task easier.
I had a location in mind already; a spot by the water, about 30 minutes from where I live, with a nice view toward the southeast. I headed out a few days before the actual shoot and when I arrived I used the augmented reality feature of the Photo Pills app to see exactly where and when the Milky Way would be. Most of the core would be above the horizon by 1 am and I would have until about four in the morning before the sky would begin to lighten. This gave me plenty of time to shoot.
None of this planning would make any difference if I didn't have favourable skies. I use the Clear Outside app and website to help me plan my astro shots. It provides a very detailed weather forecast along with information about the moon. Based on this, I determined that I would have excellent conditions on the following night.


Taking the Window of Opportunity
People often ask how I am able to stay up so late to capture my astro shots. The answer is, I don't! When I want to go out shooting, I go to bed early in the evening for a nap and then head out around midnight and shoot until dawn. This definitely messes up my sleep schedule, but since I was lucky enough to never have a job that involved shift work, I figure I'm making up for it now.
Upon my arrival at my chosen location I fired off few test shots. Everything looked good. I purposely selected a spot with a fairly simple backdrop. This would create a more minimalist composition and clearly focus the viewer's attention on my main subject, the window.
With the camera in place I began setting up my 'anti-gravity device'. Then a few more test shots were in order and a bit of tweaking with the camera position. One issue crept into the mix, or should I say, blew through the mix. The wind. A slight breeze was making the window swing a bit. This would be a problem during a long exposure. After a bit of head scratching, I opted to use a few rocks along the bottom edge to keep the window in place. It worked!
In order to help reduce digital noise in my astro photos, I usually take a set of images, all with the same settings, and then stack them in post using Starry Landscape Stacker (Mac). I find the custom timer on my OM-D line-up of cameras the perfect way of getting this 'stack' with just one press of the shutter release. I programmed a total of 10 shots with a half-second interval and a one-second delay. I opted to use my OM-D E-M1 Mark III and the M.Zuiko 8mm F1.8 Fisheye PRO.
After shooting the 'window' sequence, I quickly disassembled the anti-gravity contraption and shot another set of images with just the plain background.

The Editing Process
With the shooting completed, the rest of the magic would have to happen in my digital darkroom. The first step in my workflow when I returned home was to get some sleep! (It's hard to pull an all-nighter at my age.) After a bit of rest, I imported my images into Lightroom and did some basic processing. These changes are then applied to each of the photos in a set and then exported as TIFFS to be stacked in Starry Landscape Stacker. That process produces an image with much less digital noise and more dynamic range.
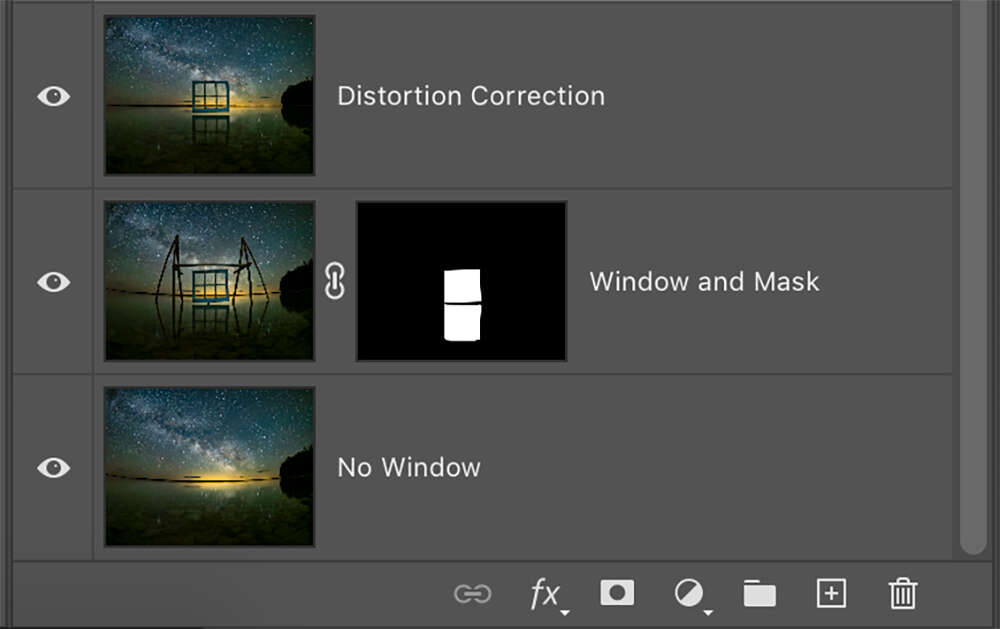
With the stacking process completed I now had two images to work with - one with the window and one without. These were imported as layers into Photoshop. A mask was added to the window layer and all parts of the image were hidden except for the window itself and its reflection. This process blends the two shots together making it seem as though the window is floating in the air.
Since I was using the 8mm fisheye lens there is some obvious distortion to the shot, especially noticeable along the horizon. The final step is to make a copy of the two image layers, merge them, and use the Warp tool to straighten out the horizon. Voilà, my window on the galaxy was complete.
No Time to Waste
The entire shooting process, including setup, taking test shots, stacking, and dismantling took less than an hour. This meant I still had plenty of darkness, and I didn't want to waste it. I brought along a backup idea, just in case the window scene didn't work out.
I enjoy the challenge of trying to light up a night scene. Usually that involves using some low level lighting to add some details and dimension to the foreground. This time I wanted the light itself to be a key subject in the shot.
I have a small decorative lantern in my office that is designed to hold a single tea light. I brought it with me, along with a few LED tea lights. With the window and supporting materials all packed up in my vehicle, I grabbed the lantern and began planning a simple creative selfie.
One of the reasons I love shooting near the water is because of the reflections when the water is calm. I wanted to capture some of the reflected light in this new composition. I placed the dimmest tea light I had in the lantern and stood it on the end of small spit of land. I took a test shot to see just how bright the light would be (even very dim lights can be overpowering during a long exposure). It was perfect.
With the custom timer engaged (this time with a longer delay so that I could get into place), I moved into position and tried to stay perfectly still for the 200 seconds of shooting. For me, this is the hardest part of a selfie at night. I then checked the shots and was pleased with the results. I felt that extra lights were needed so I moved the lantern into a number of different spots and shot a separate stack for each.
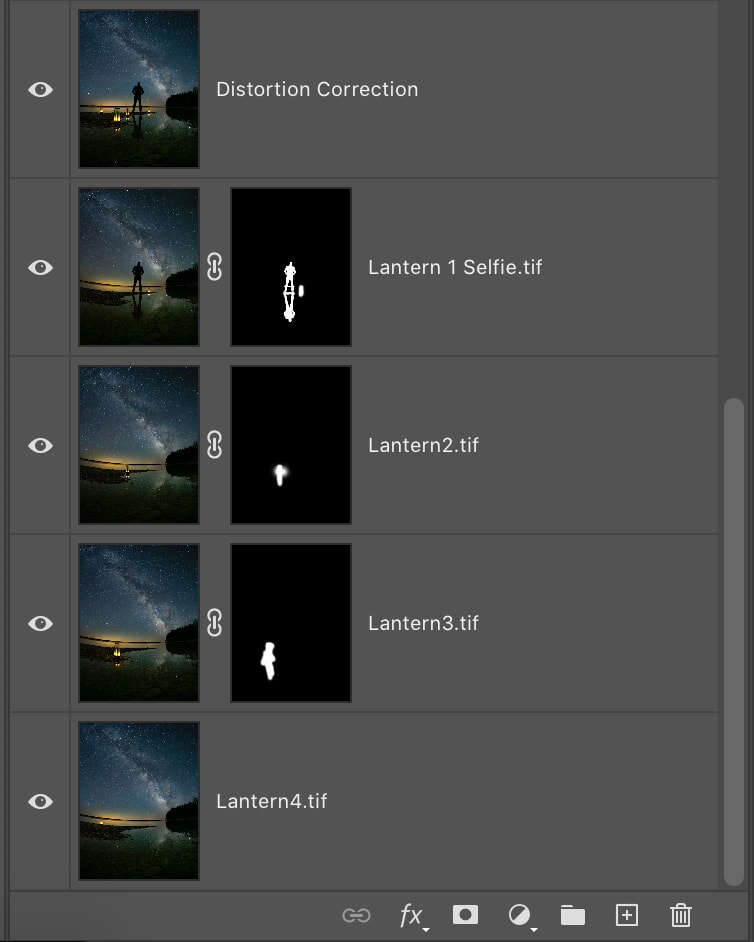
Processing the final image required similar steps to the window shot, but now there would be four layers instead of just two. I selected the final shot to be the base layer as the Milky Way was in its highest position and the water was so calm that it was creating beautiful reflections of the stars.
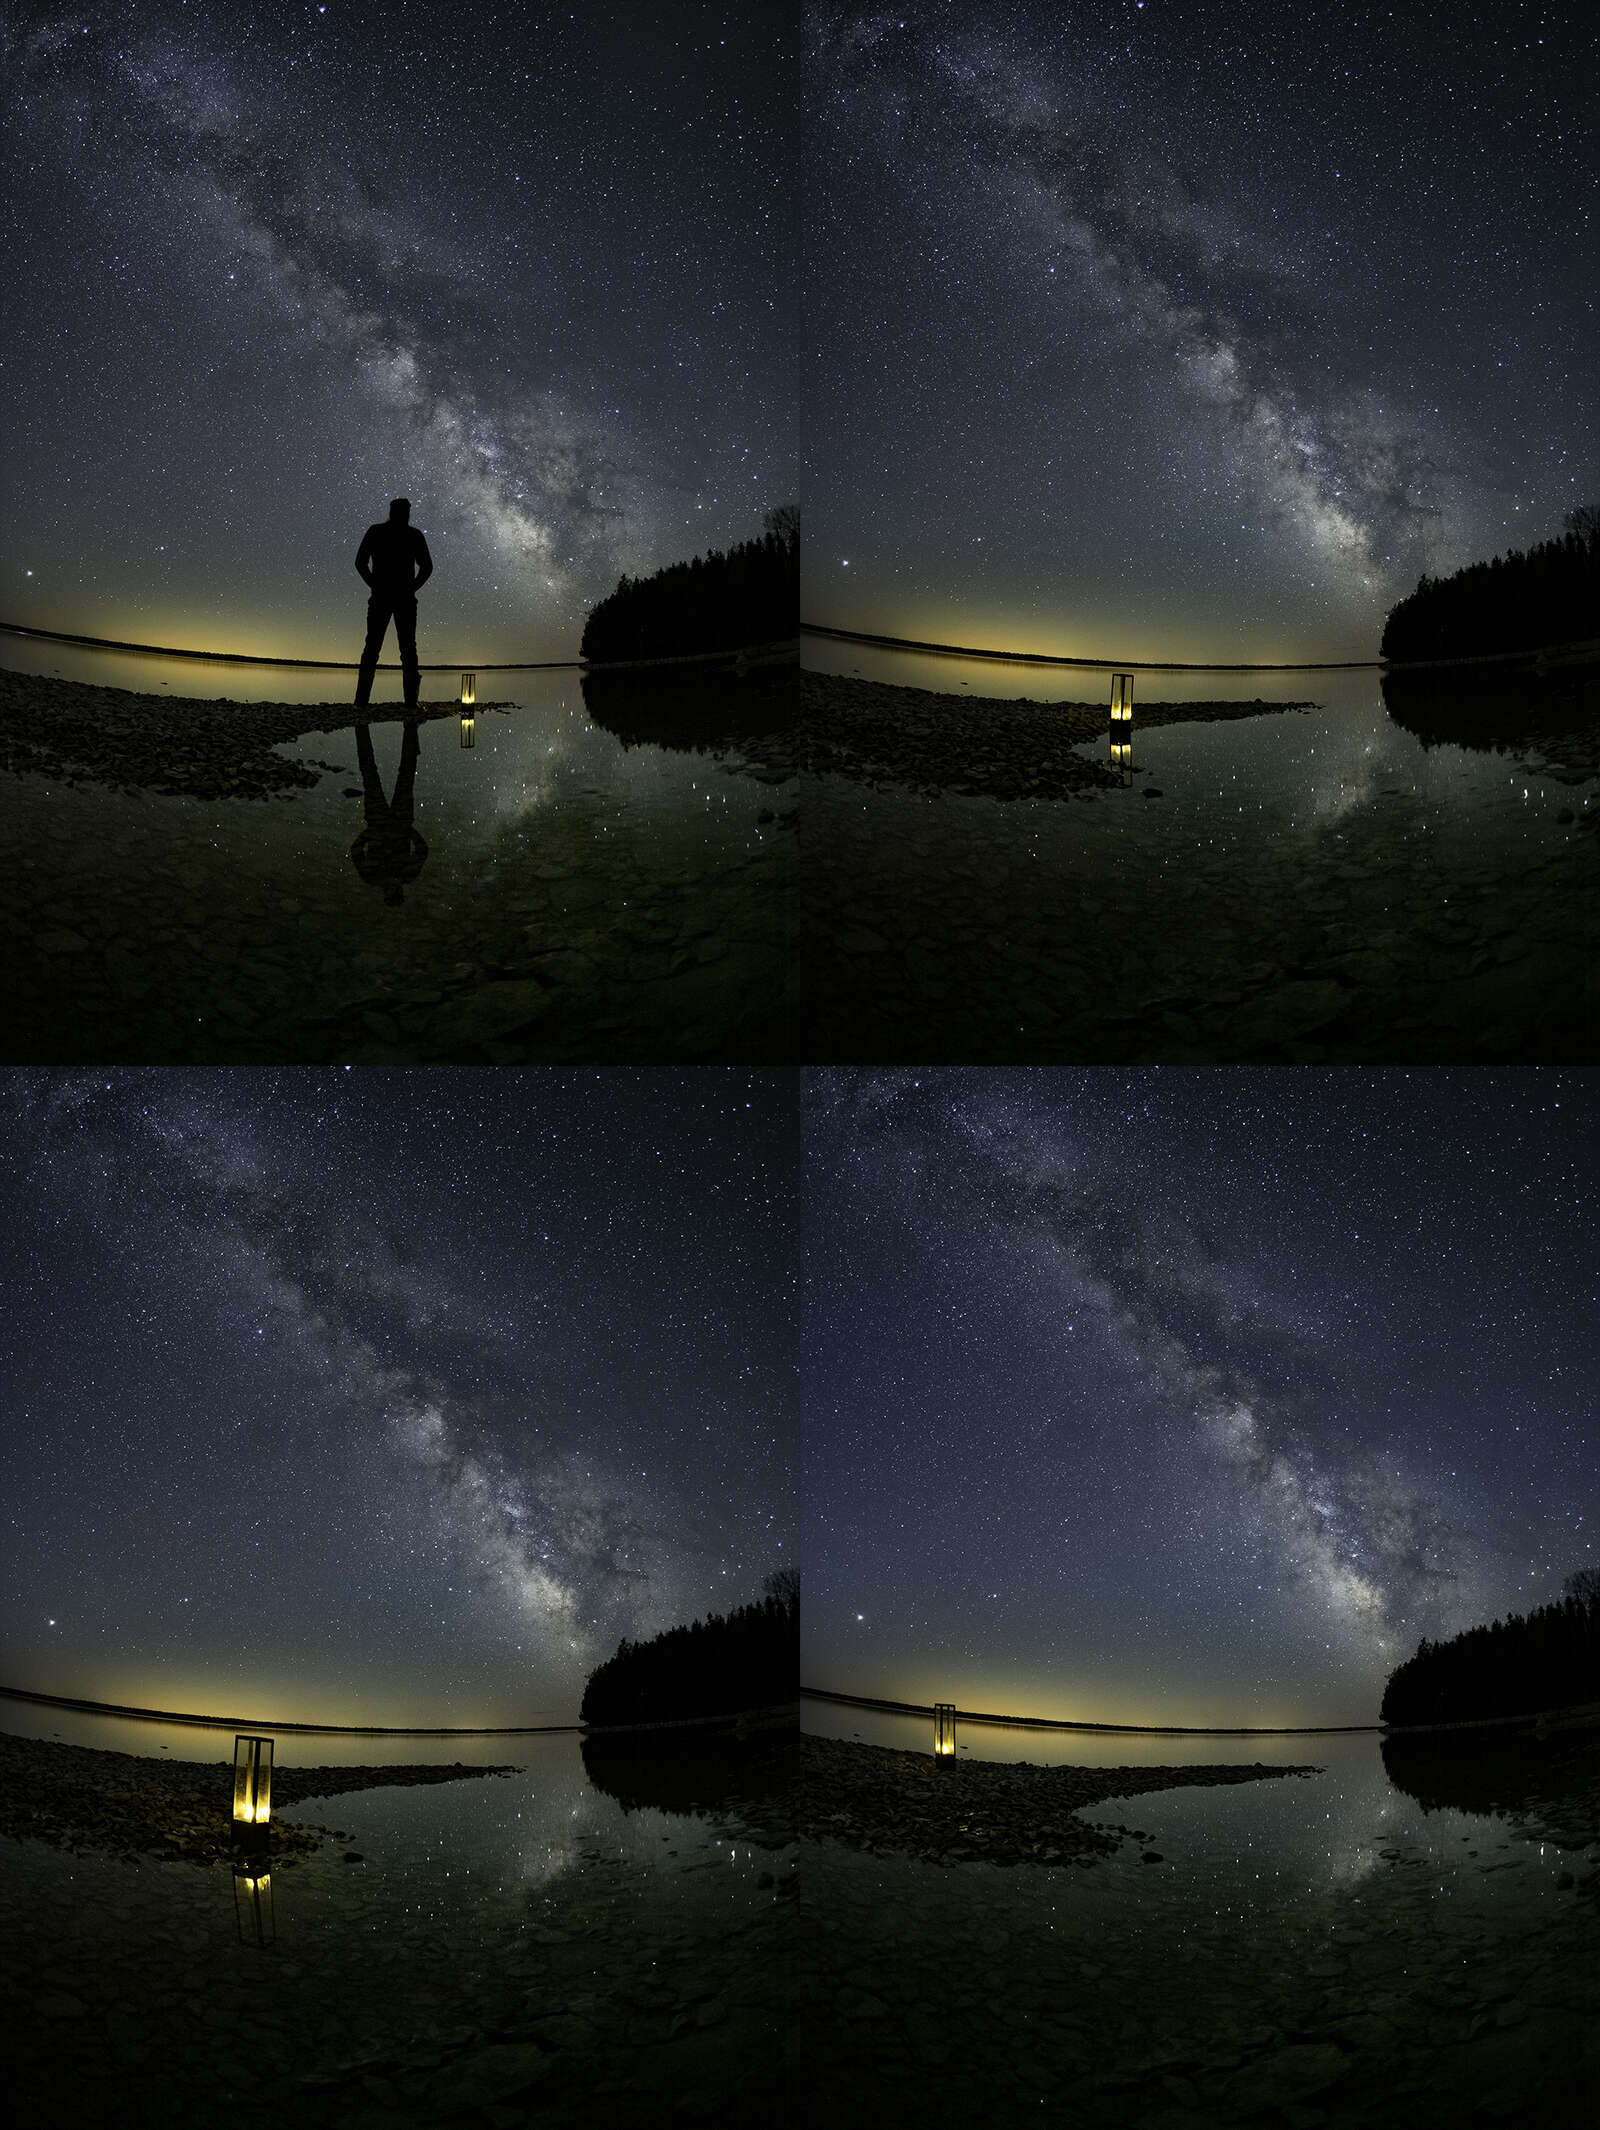

OM-D E-M1 Mark III | M.Zuiko 8mm F1.8 Fisheye PRO
20s | F1.8 | ISO 3200
Final Thoughts
There is something about shooting at night that brings out a bit more creativity in my photography. Perhaps it's the longer stretches of time with consistent lighting, or maybe it's because no one else can see the weird things that I'm up to. Whatever the reason, I love the challenge of thinking up a new idea and coming up with solutions to bring the image to reality. I hope this may inspire you to try something similar.
ABOUT PETER
Web: creativeislandphoto.com
Blog: creativeislandphoto.com/blog
Twitter: @creativeisland4
Peter has been a dedicated Olympus shooter for nearly 40 years, and has found a way to combine his passion for photography with his love of teaching to develop photography workshops with a focus on landscape, wildlife and astrophotography. Peter’s work has been published in a number of magazines including Canadian Geographic, Shutterbug and Outdoor Photographer. He maintains his own blog with an emphasis on tutorials that assist others in bringing their photography up to the next level.