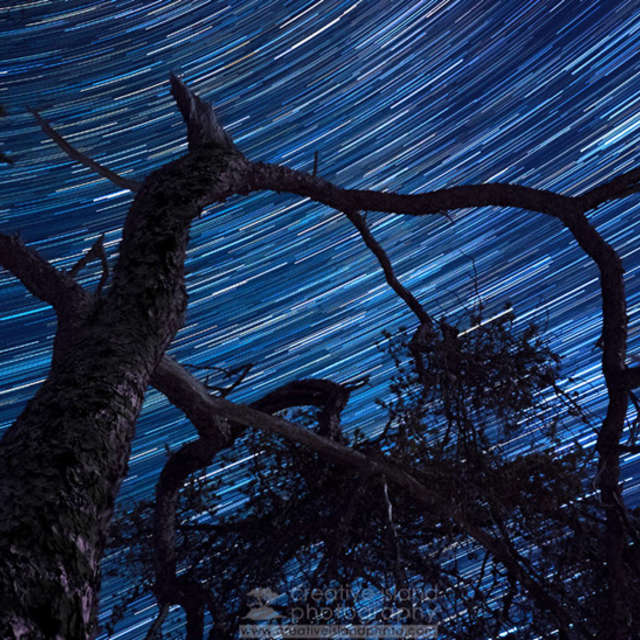
For many night sky photographers, there is nothing more spectacular than being able to see and photograph the Northern Lights, or Aurora Borealis. In this field guide I’ll talk about what are the Aurora Borealis, how to find them, how to photograph them, and I’ll also provide some extra tips and suggestions along the way.
0.8 sec | F/2.0 | ISO 2500
What Are The Northern Lights Aurora Borealis?
According to the Norwegian Centre for Space Weather (NOSWE), the Aurora “is a natural phenomenon caused by high-speed electrically charged particles bombarding Earth’s atmosphere. As a result of this bombardment the oxygen and nitrogen atoms in the atmosphere emit light which we then see as the aurora (a similar process happens in neon light tubes).”
These particles originate from the Sun and are brought to Earth from the solar wind. As this solar wind “blows towards the tail of Earth’s magnetosphere, the resulting pressure in the tail can energize some particles and following Earth’s magnetic field back to the polar regions, they reach the atmosphere causing the usual night time aurora. The regions where the particles finally hit Earth’s atmosphere causing aurora are called the auroral ovals, located around the northern and southern geomagnetic poles.”
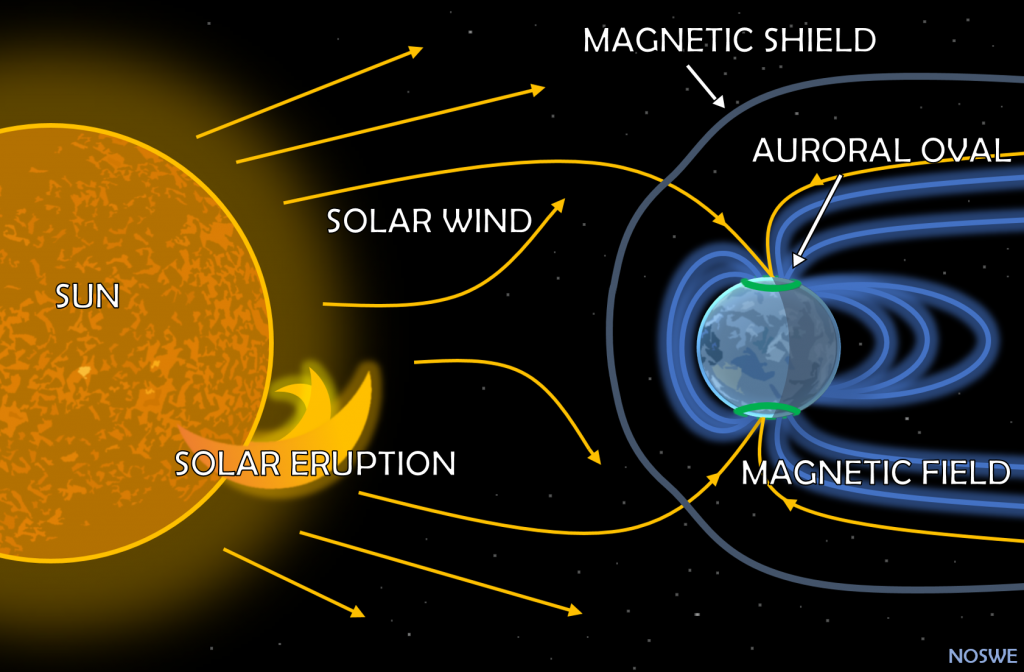
We use the term space weather to analyze the solar winds, where high speed streams caused by solar eruptions are needed. These eruptions in the Sun generally take 1 - 3 days to reach Earth. The larger the eruption and disturbance in the solar wind, the larger the auroral oval expands, and the further south we can see the aurora in the Northern Hemisphere.
Changes in the level of solar activity follows an 11-year cycle, and we are approaching the peak cycle for aurora activity, called the solar maximum, which will be in July 2025. As we continue to approach the solar maximum, we will be seeing more intense and more frequent aurora.
Depending on the disturbance in the Earth’s magnetosphere, auroras can be very faint where only the camera can see it, or very bright and clearly visible by the human eye. Most often they are green in color, but other colors including red, pink, and purple can appear and are the result of the energy absorption by different chemical elements of the atmosphere at different altitudes. Green and red come from oxygen atoms, while purplish colors come from nitrogen molecules.
Auroras occur high in the atmosphere at roughly 100km far above the clouds. (Site referenced: https://site.uit.no/spaceweather/what-are-the-northern-lights-aurora/)
How To Predict The Aurora
There are 2 factors we need to consider when predicting the aurora. The Earth Weather and the Space Weather.
Earth Weather
While the aurora can happen at any point in the year, the best seasons for photographing the aurora are autumn and winter because the nights are longer here in the Northern Hemisphere. The more hours of darkness you have the better the odds.
Contrast that to the summer solstice where there is no darkness above the Arctic Circle and the nights are much shorter below it.
The farther north you are, the better your chances of seeing the aurora. One reason why I lead aurora photo workshops in Lofoten, Norway is because of how far north it is, above the arctic circle with extremely long nights.
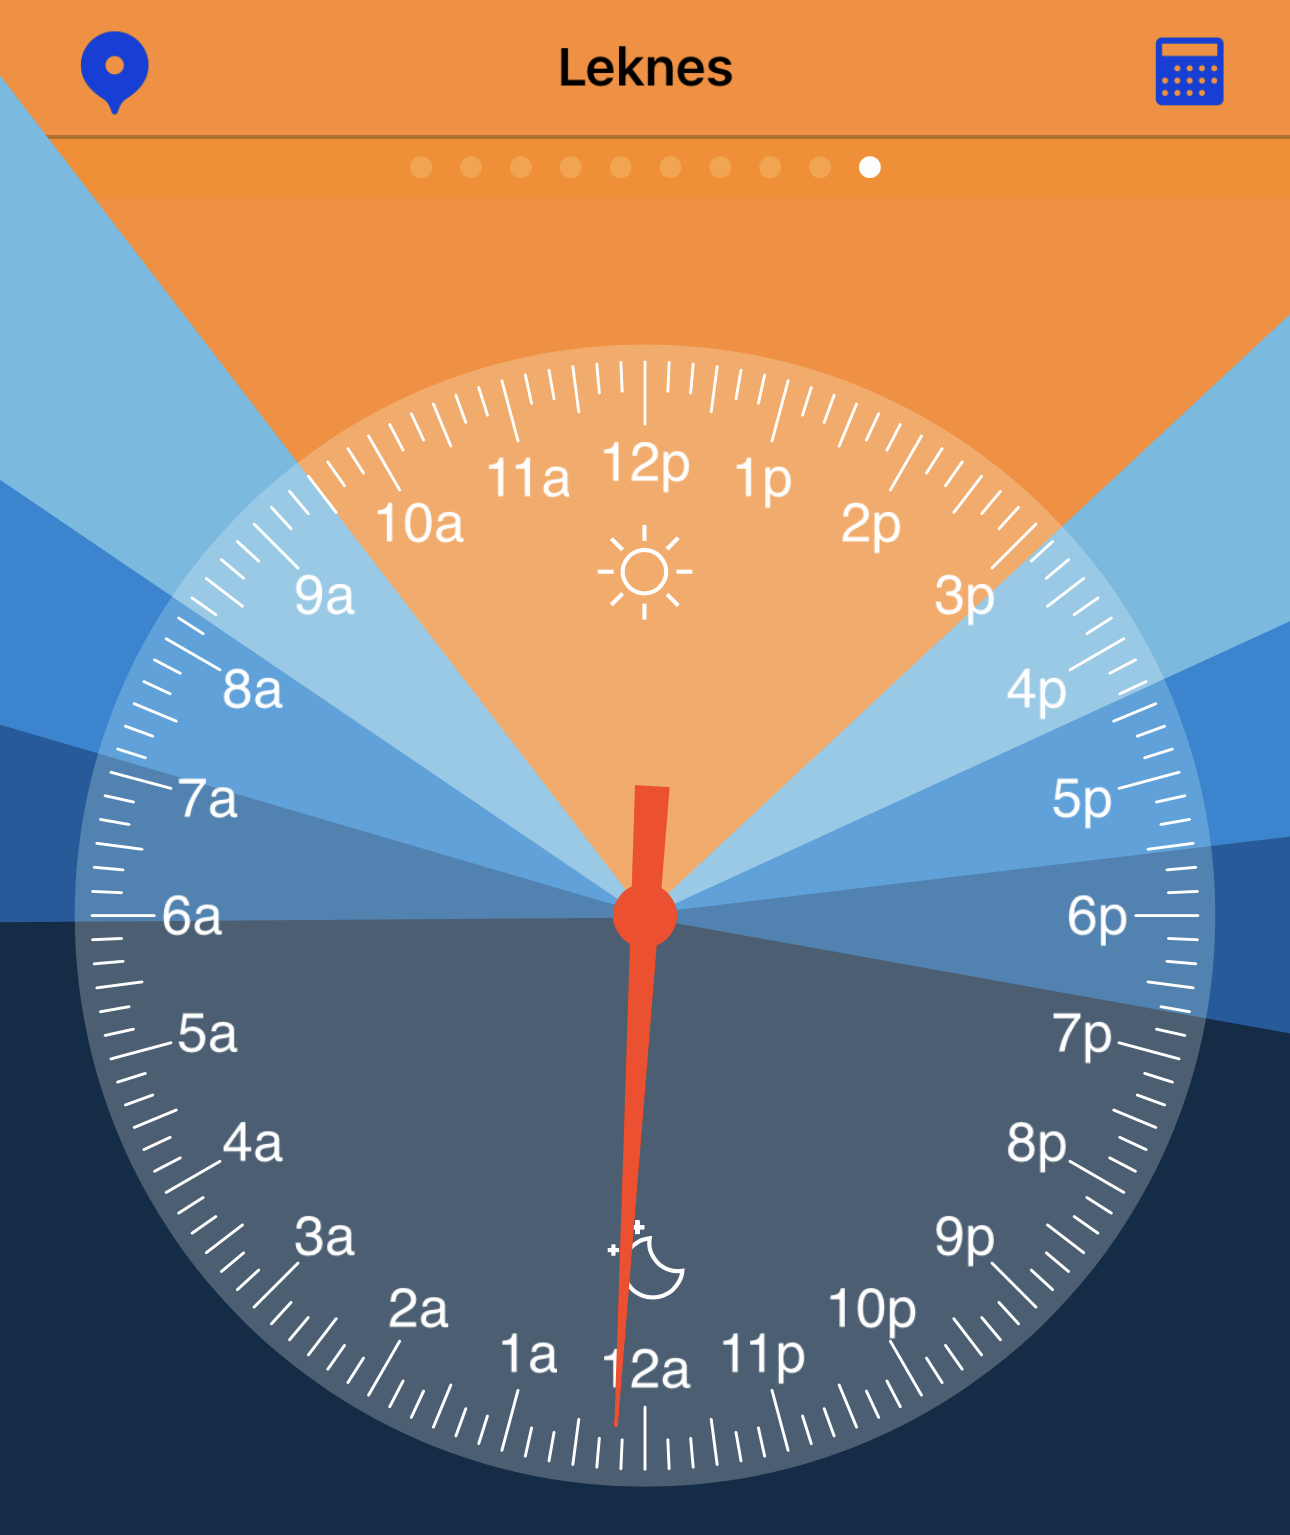
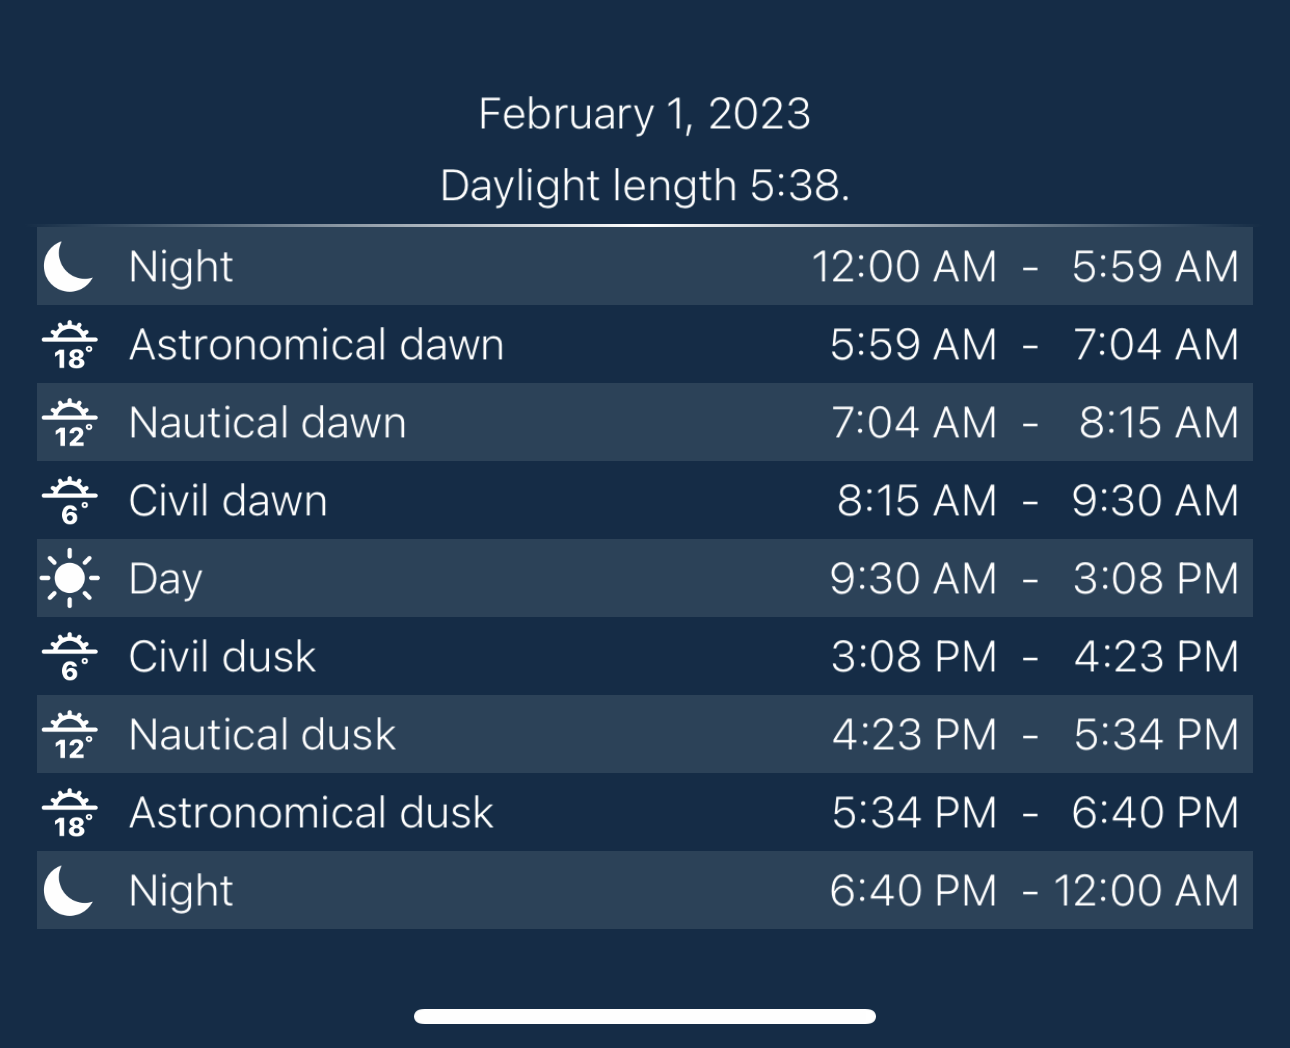
The above screenshots from the iOS app Day Light.One shows just how long those dark skies last on February 1 which was during my 2023 photo workshop there.
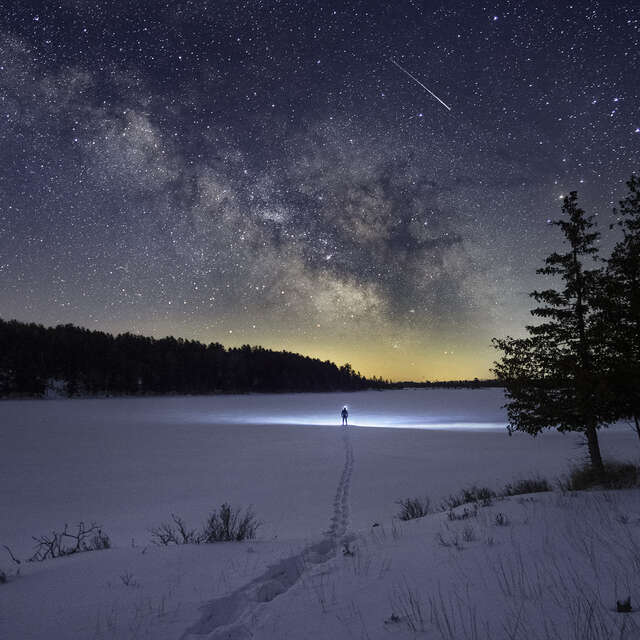
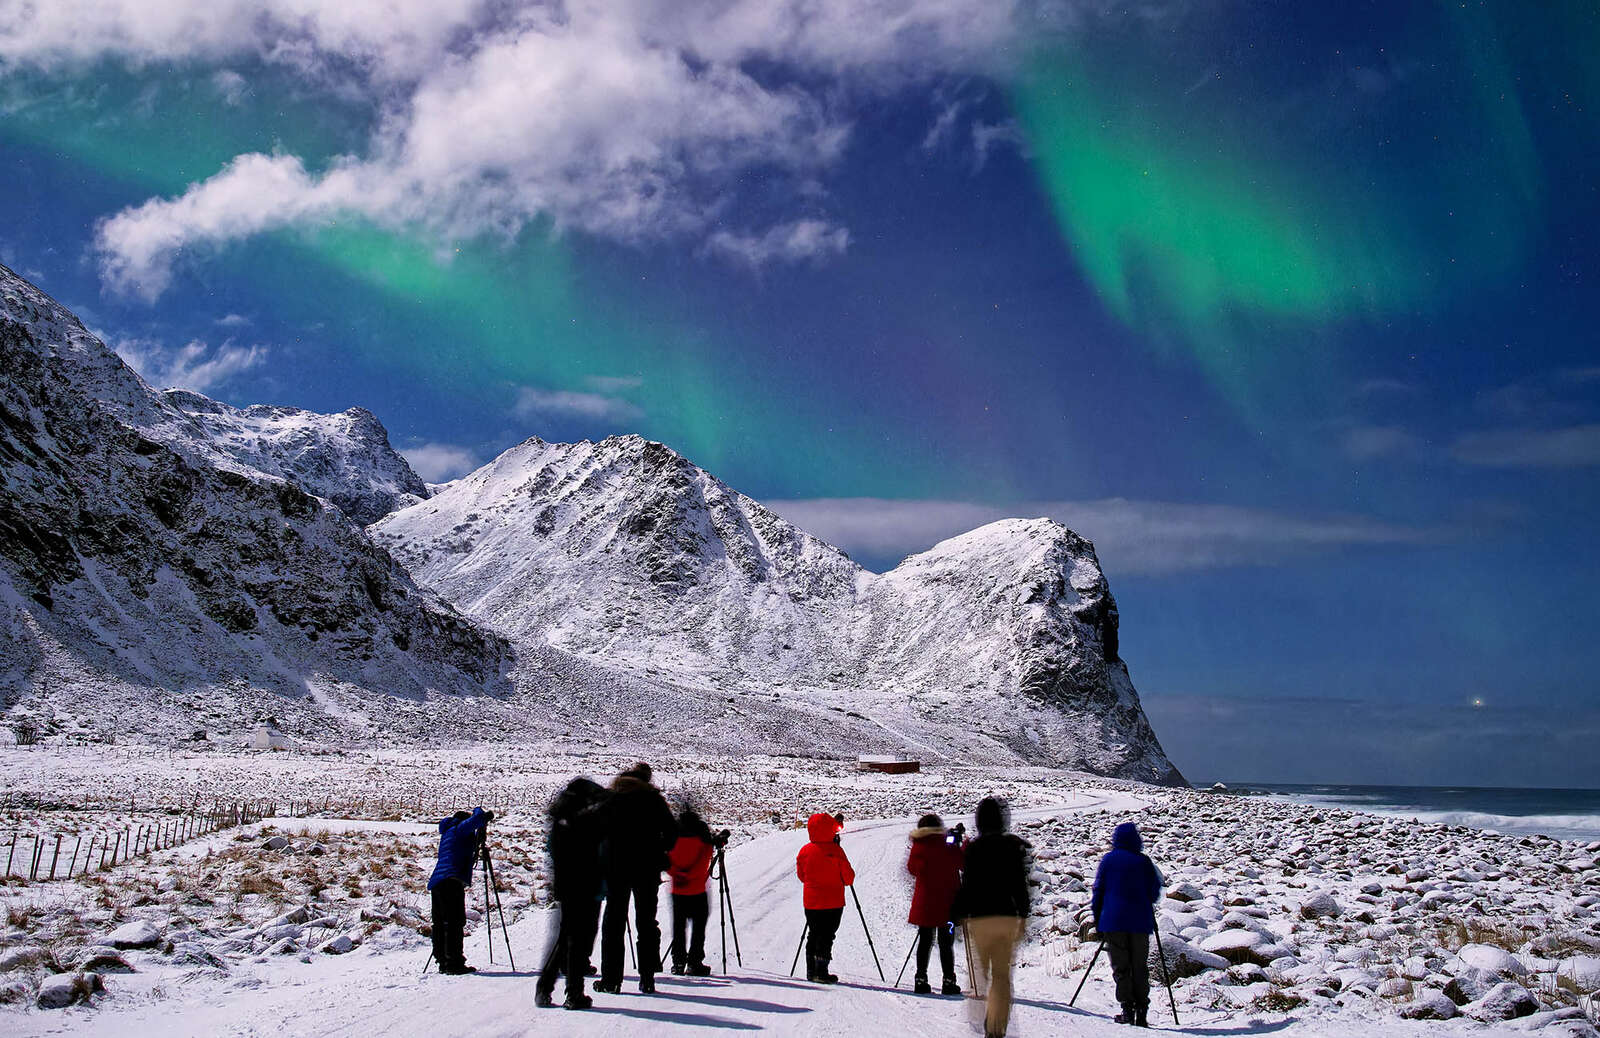
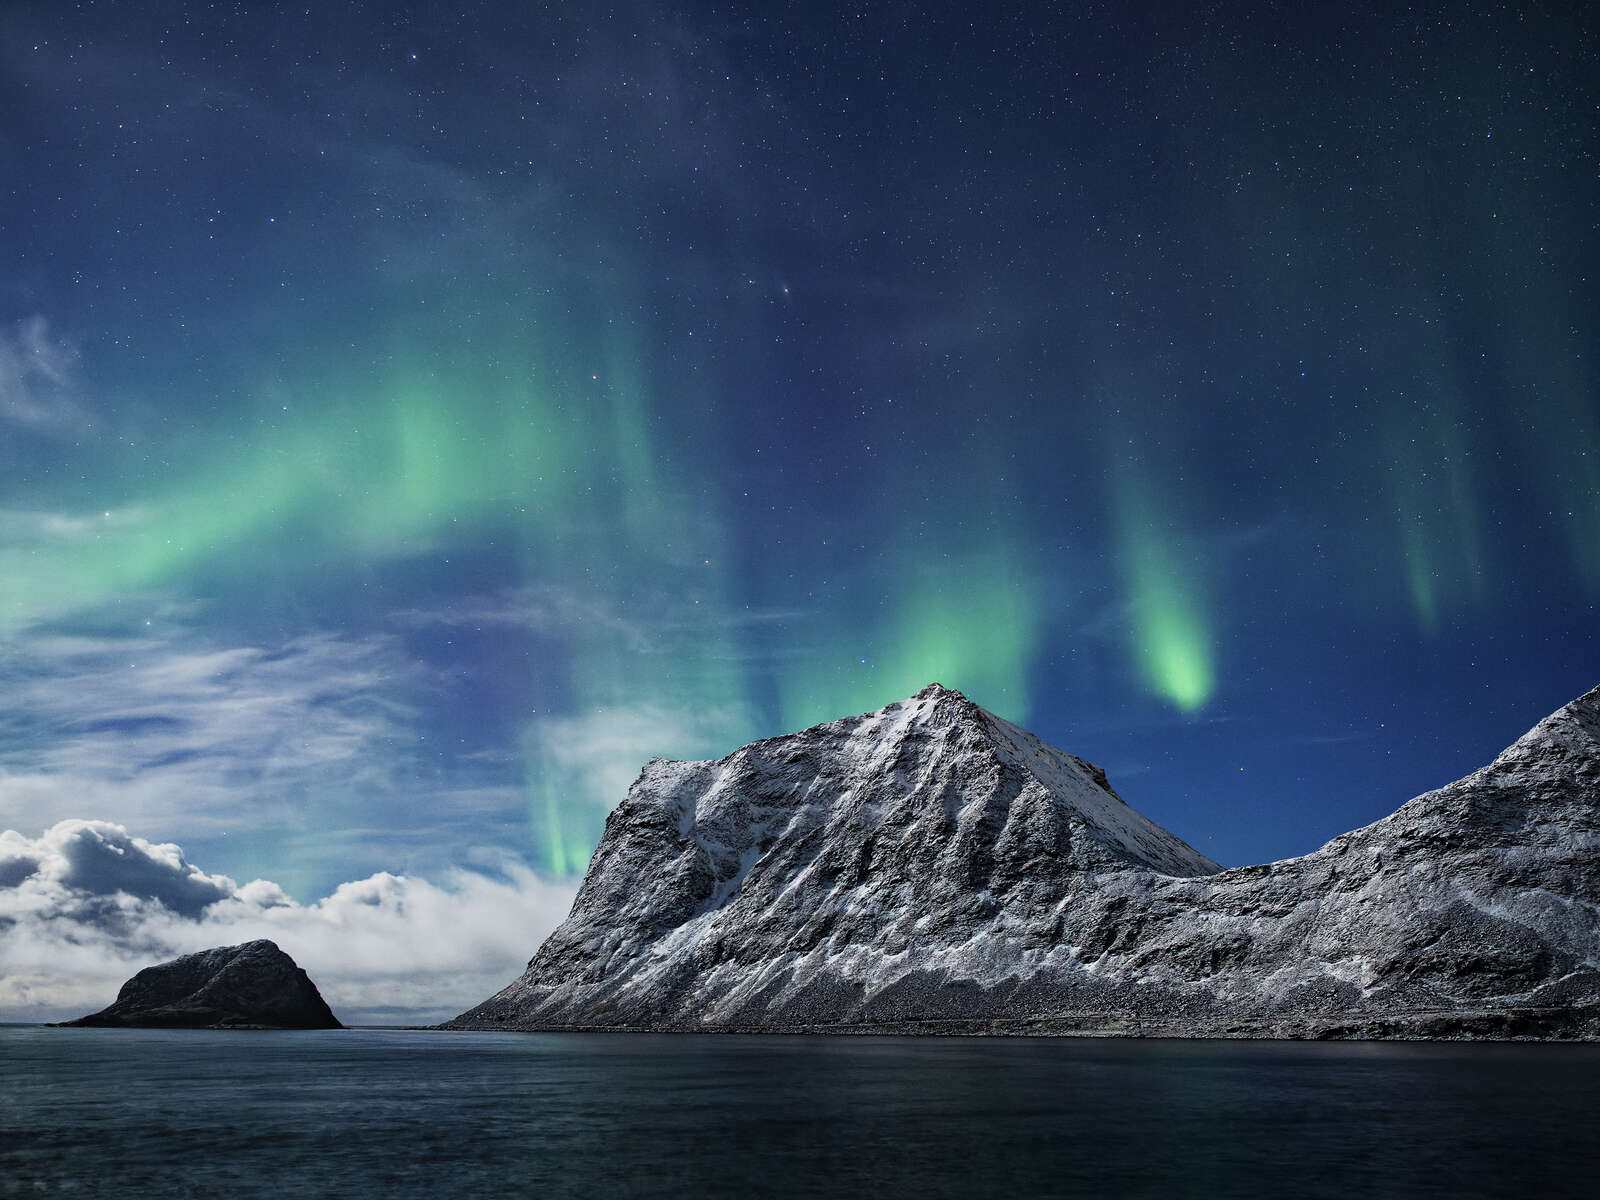
You will also of course need a clear sky to the north with no clouds to see the aurora. You may have some luck on partially cloudy nights, especially if there is a clearing towards the north as was the case in the photo above.
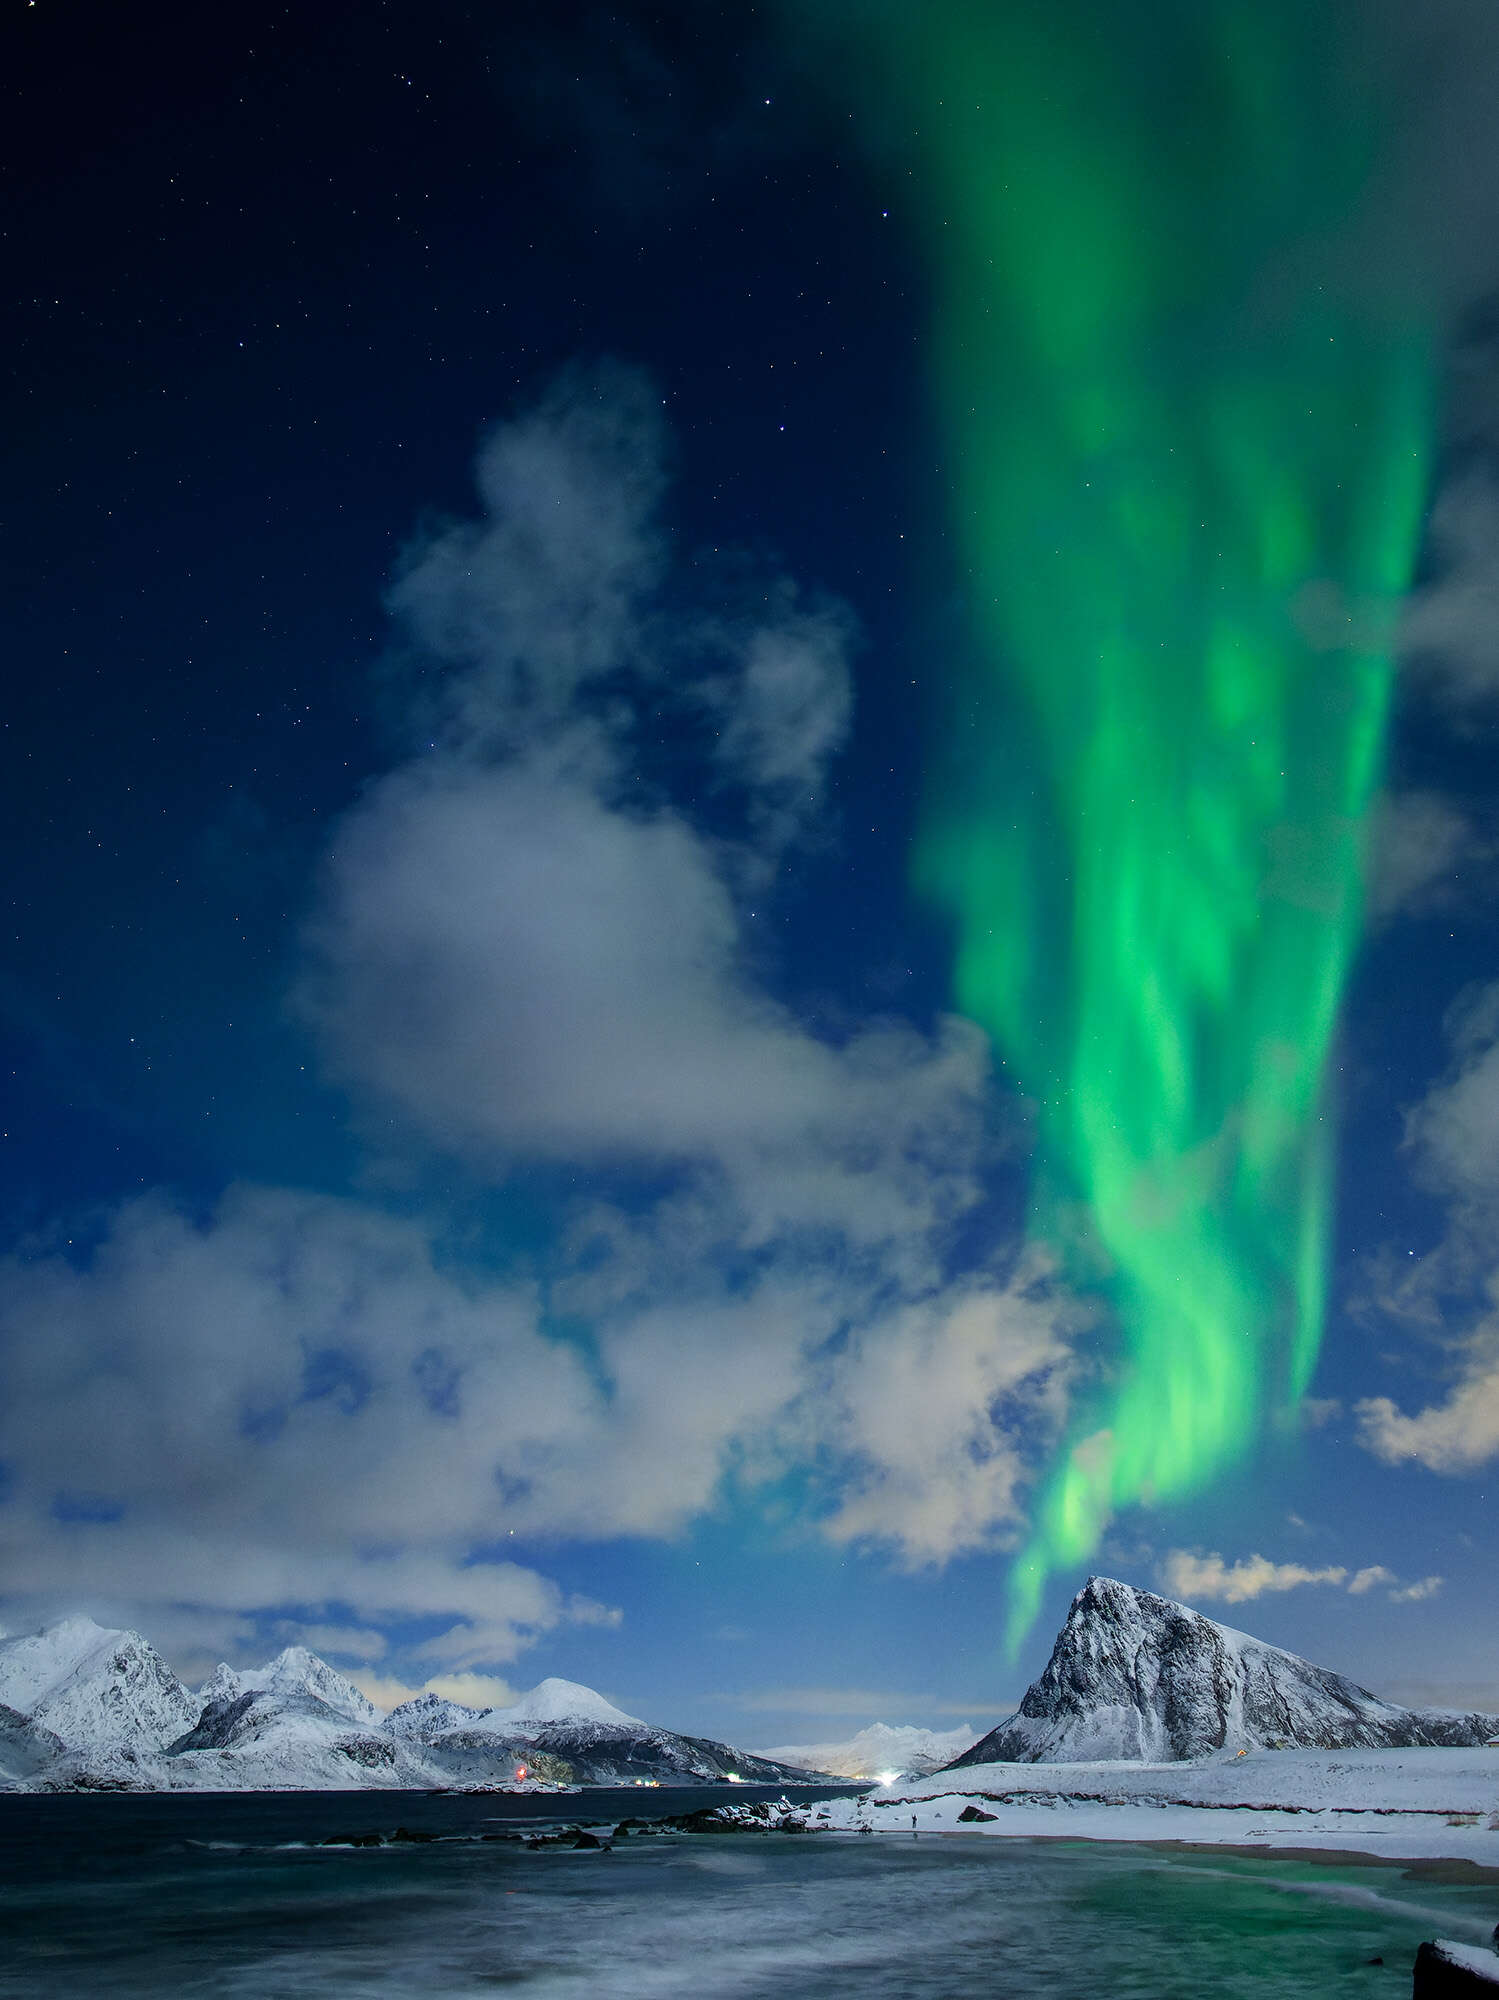
2.0 sec | F/2.0 | ISO2000
Space Weather
Space weather is concerned with what’s happening with the Sun. I look at 3 measurements when considering if a night is going to have a high probability of the aurora:
- Kp-Index
- the Auroral Oval
- IMF Interplanetary Magnetic Field (Bz)
The Kp-Index
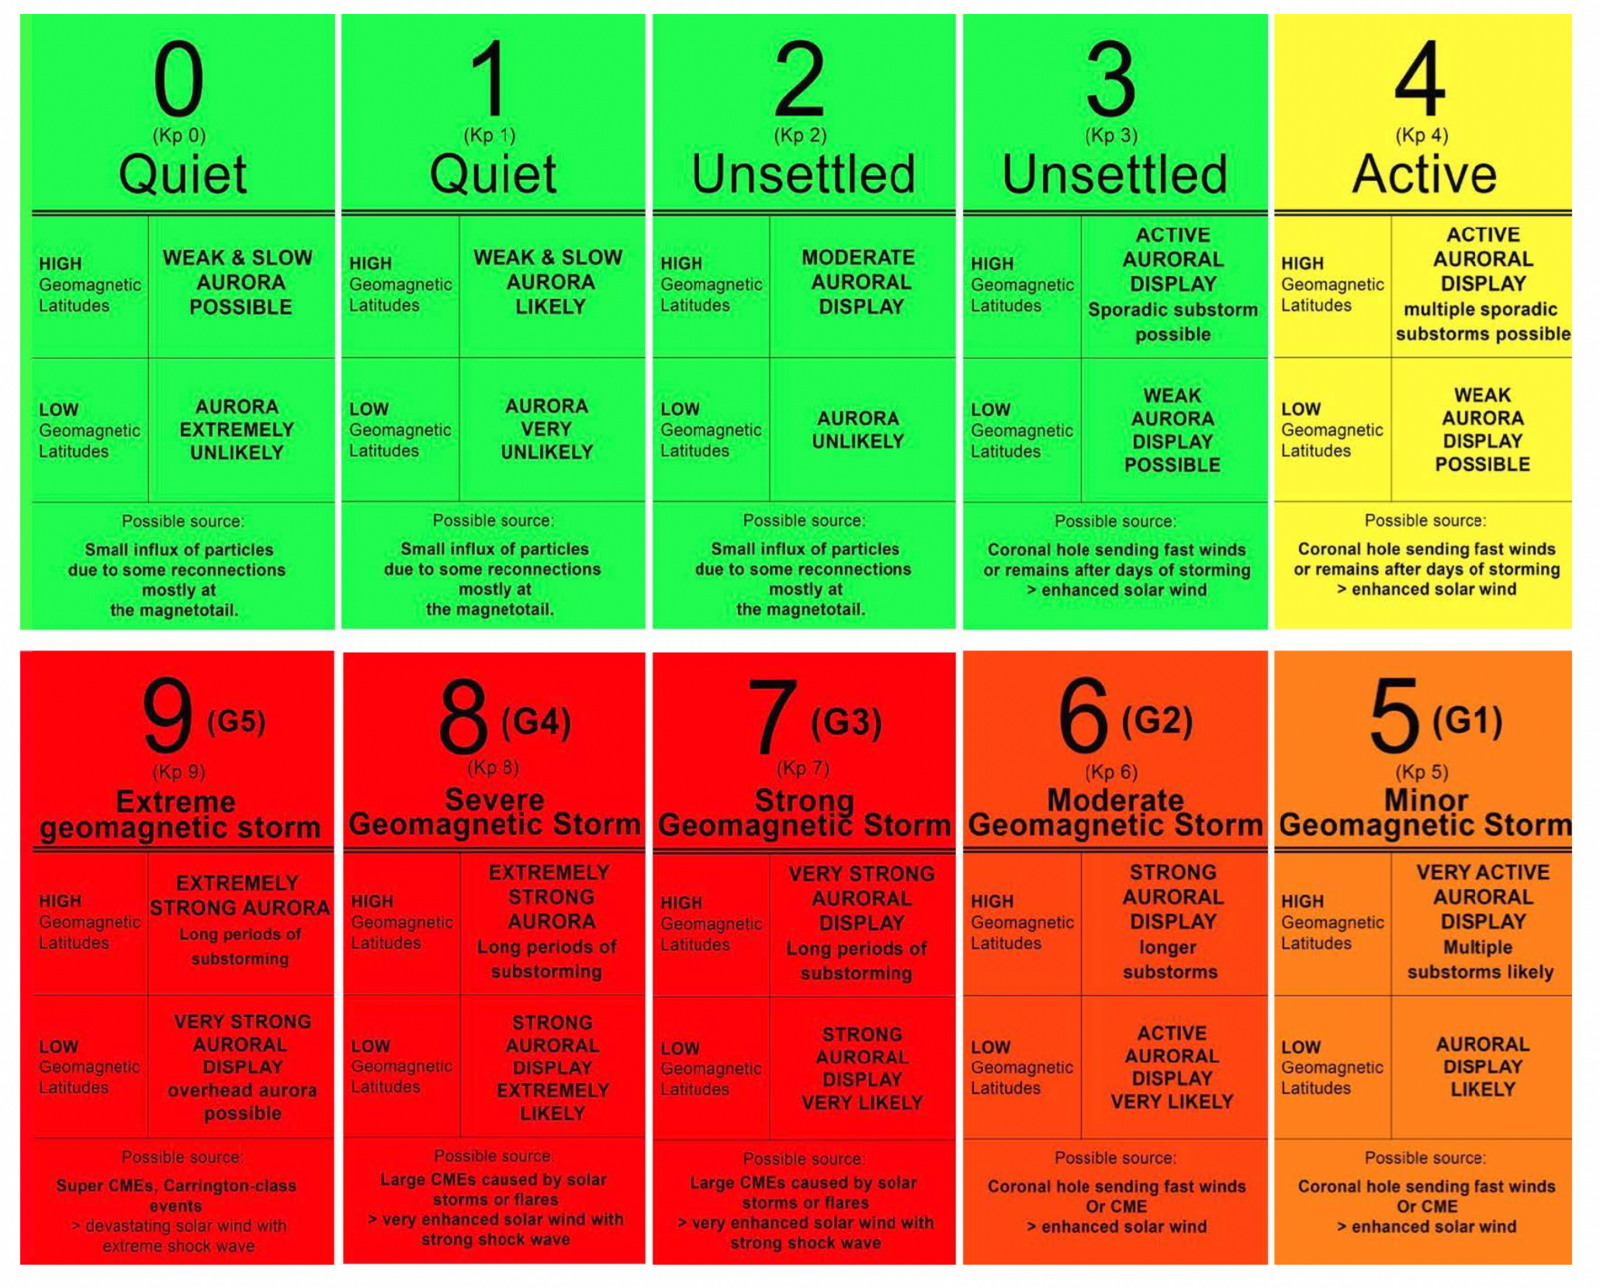
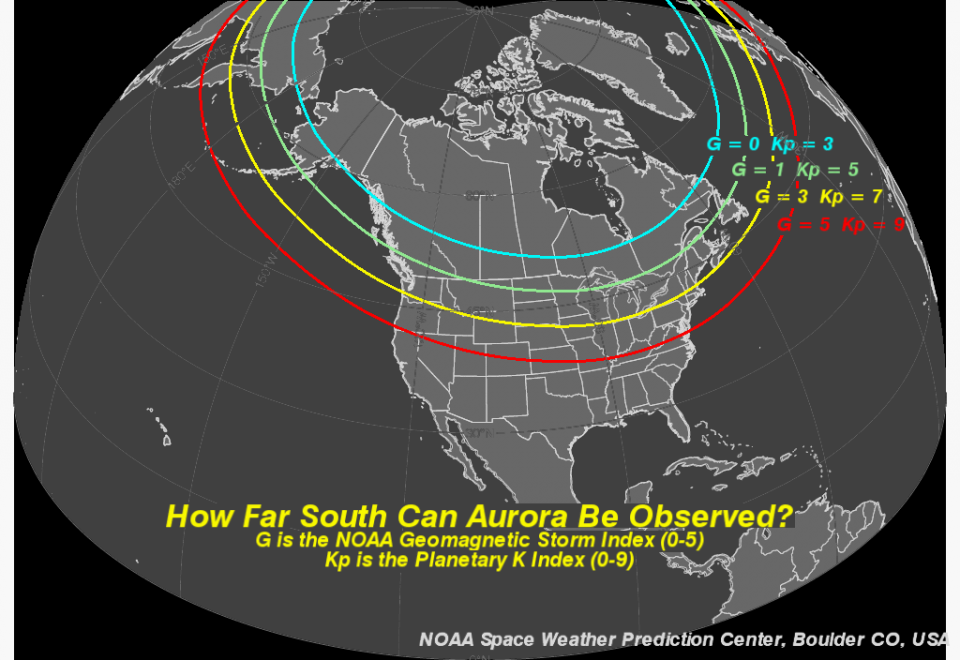
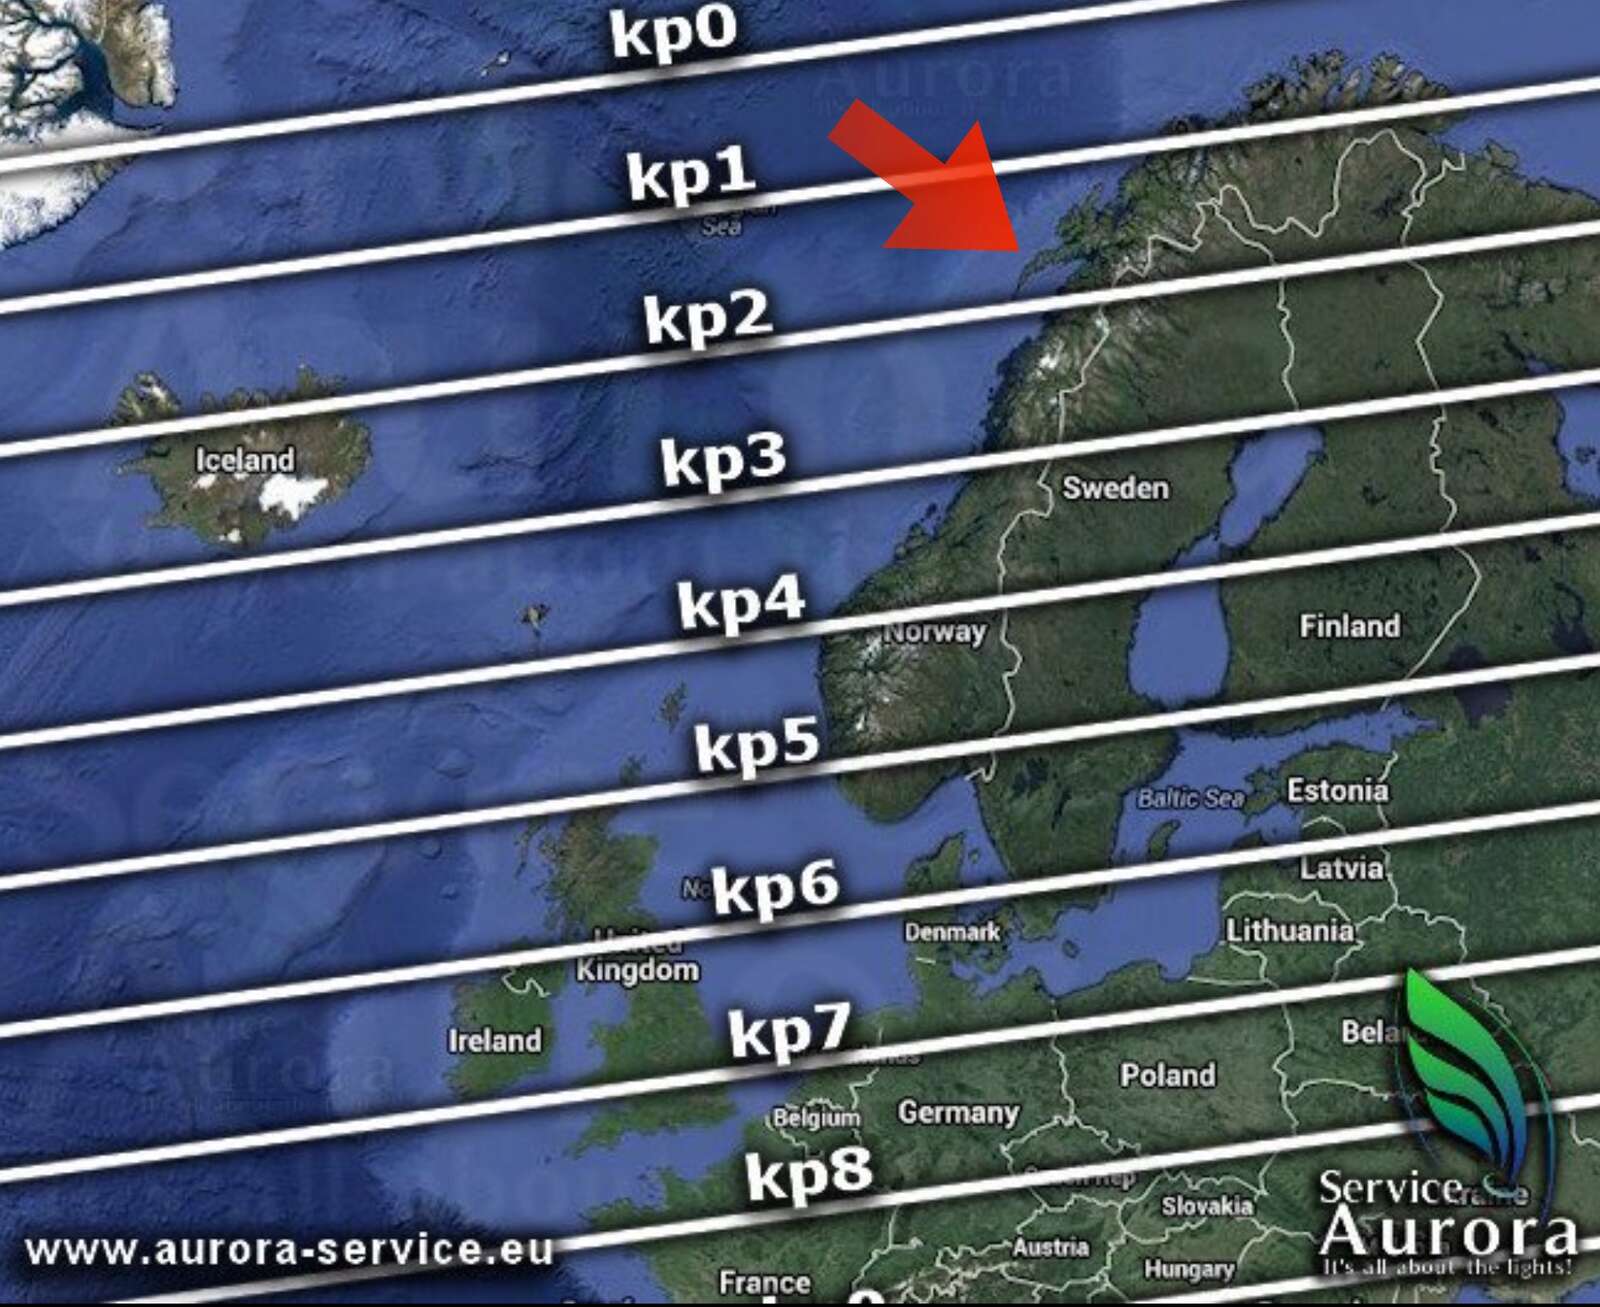
The Kp-index, which measures geomagnetic storm activity over 3-hour periods, gives you an idea of how far south you can potentially see the aurora. Where I live in Bozeman, Montana I need a Kp6 which is considered a moderate storm but in Lofoten, Norway which is just above the Arctic Circle you only need a Kp1 or Kp2.
However, having a high and appropriate Kp value for where you are is not a guarantee you will see the aurora and that is why I also look at other measurements too.
The Auroral Oval
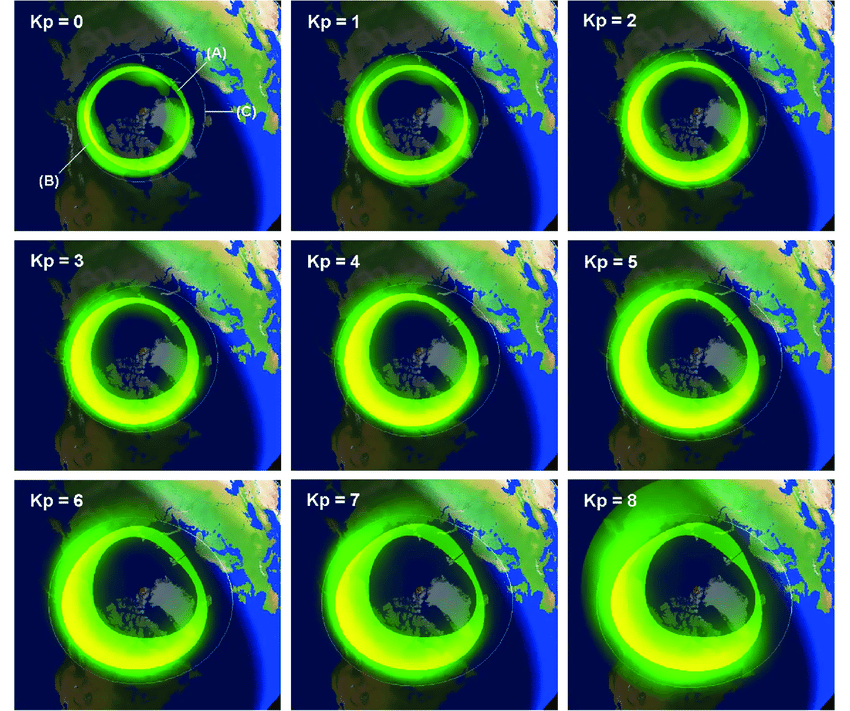
Another thing to check is the auroral oval to see if it is covering your area and to see the intensity of the oval.
The map of the auroral oval shows the estimated shape, position, and intensity of the potential aurora 60 minutes from now. The different colors of the auroral oval show how likely it is for the aurora to be overhead at the indicated location.
In the screenshot from the iOS app My Aurora Forecast & Alerts, we can see the auroral oval on one of the evenings I was photographing, with a very intense storm overhead and the aurora dancing around above us.
Green represents a low chance, green -> yellow is a moderate chance, yellow -> orange is a high chance, and orange -> red represents a very high chance.
The IMF Interplanetary Magnetic Field (Bz)
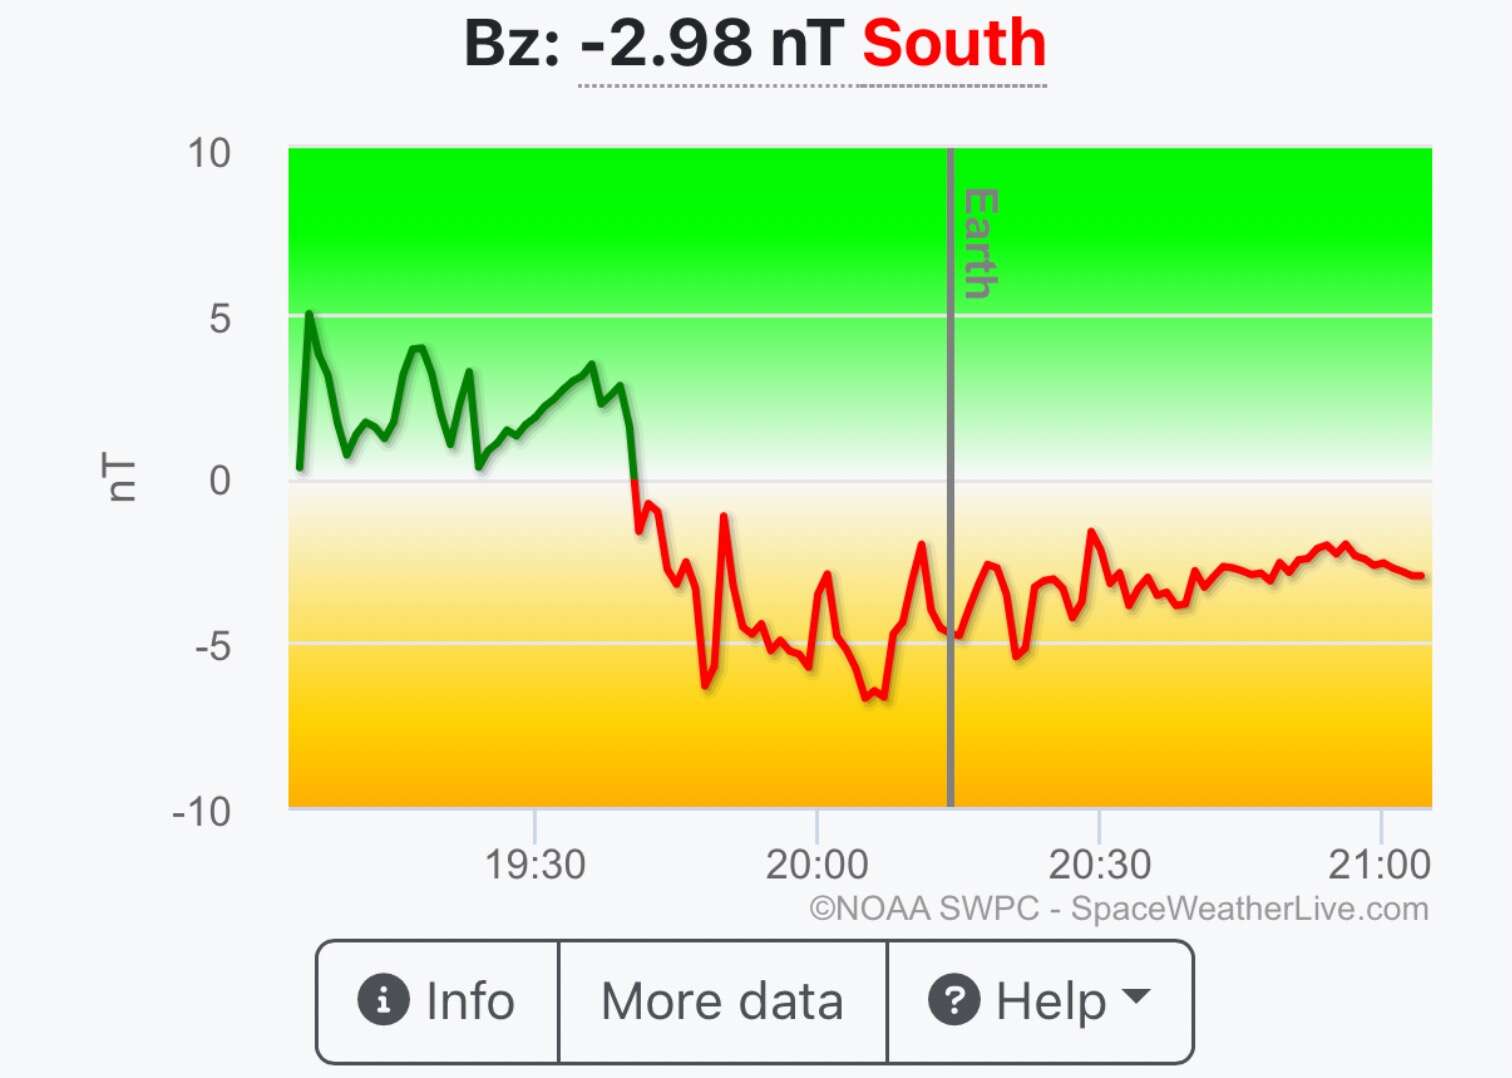
The most precise indicator you can check to for aurora activity is the IMF Interplanetary Magnetic Field (Bz). We want the graph to go to the minus - to the red - to be able to see the aurora, and ideally down to a minus 5 or lower.
When the north-south direction of the IMF is orientated southward (in negative numbers) it will connect with Earth’s magnetosphere which points northward. As described on spaceweatherlive.com, “Two opposite poles attract each other! A (strong) southward Bz can create havoc with Earth’s magnetic field, disrupting the magnetosphere and allowing particles to rain down into our atmosphere along Earth’s magnetic field lines.
When these particles collide with the oxygen and nitrogen atoms that make up our atmosphere, it causes them to glow and emit light which we see as aurora. Only during extreme events with high solar wind speeds it is possible for a geomagnetic storm (Kp5 or higher) to develop with a northward Bz.”
In screenshot from the SpaceWeatherLive app, we can see the negative Bz values I had during a time of great aurora activity one particular evening.
Real-time solar wind and interplanetary magnetic field data comes from the Deep Space Climate Observatory (DSCOVR) satellite. Once the solar wind and magnet field reaches the satellite, it gives us about a 15 to 60 minute warning (depending on solar wind speed) as to what will end up reaching Earth.
The vertical line labeled Earth in that graphic above shows what was happening at that moment, and the graph to the right shows what was to come.
Setting Out To See The Aurora
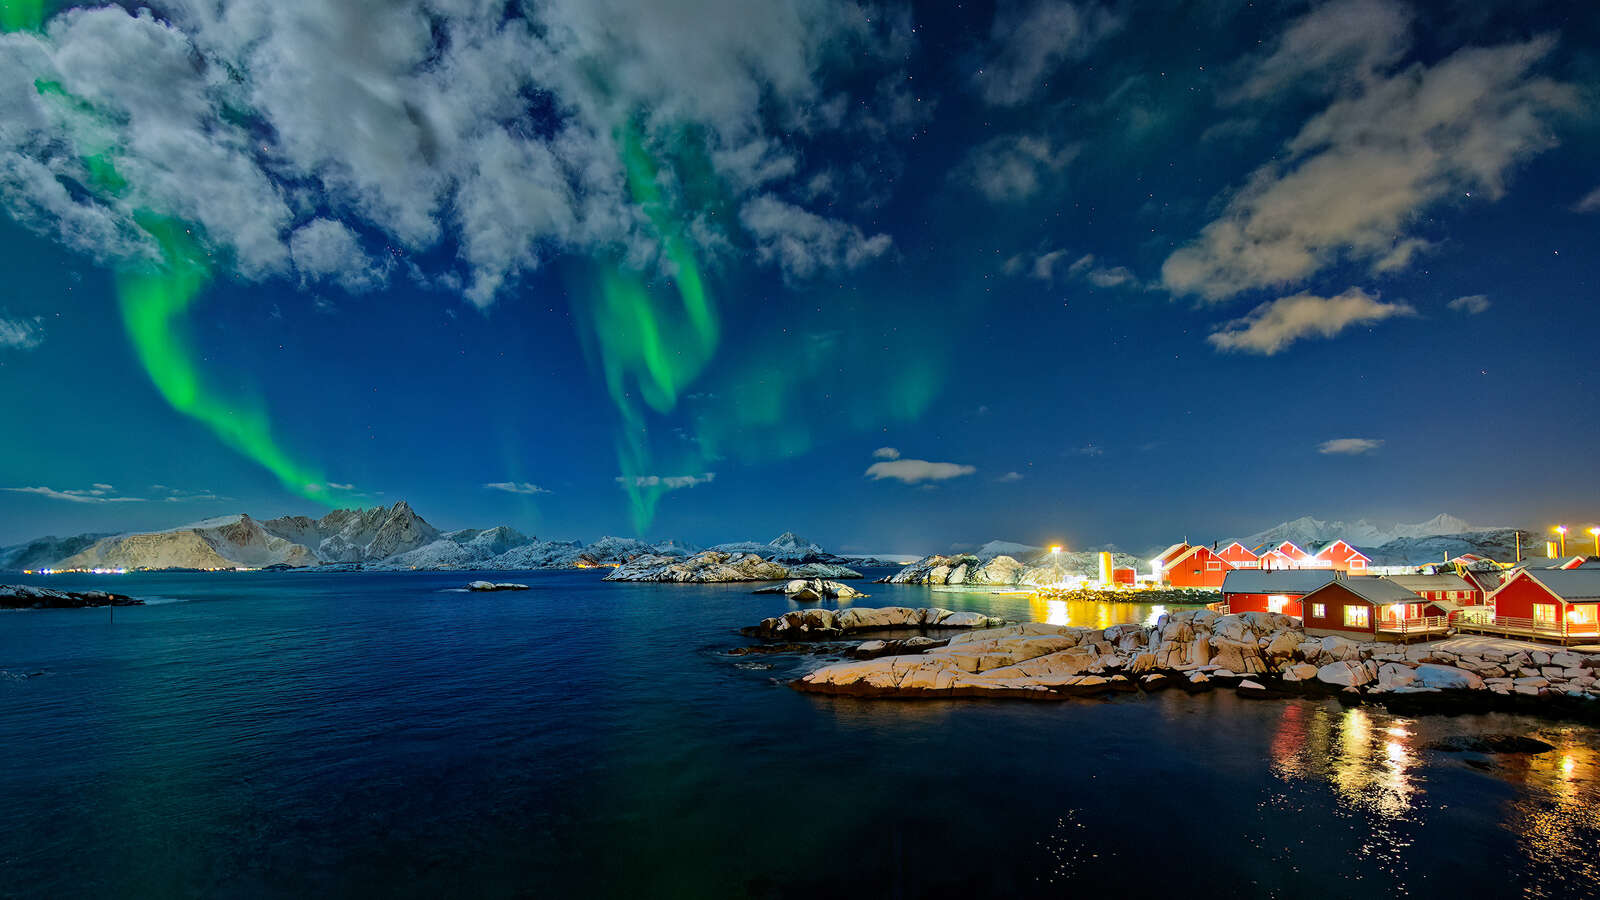
Let’s start with a couple basics. First it has to be nighttime to see the aurora. A night with no moon would be best especially for when the aurora is faint. However, during particularly strong solar storms you can still see and photograph the aurora with the moon out, which adds nice lighting to your foreground.
1.3 sec | F/2.0 | ISO2000
All the photos here in this article that were photographed in Norway featured a half to almost full moon and strong aurora activity. Second, you are going to need a clear sky, as the aurora is way higher than the clouds. Third, you’ll want to be in an area of as little light pollution as possible, especially for when the aurora is at it’s weakest.
On weaker auroras, you may not see it above you and will only see it if you are facing north. So make sure you position yourself where you are not seeing any light pollution to the north from where you are. Depending on where you live, this might mean driving some ways east or west to get a clear and less light polluted view of the north.
Speaking of the north, you will also want a wide open view of the north sky without much blocking your view, like a mountain or similar.
Camera Gear and Settings
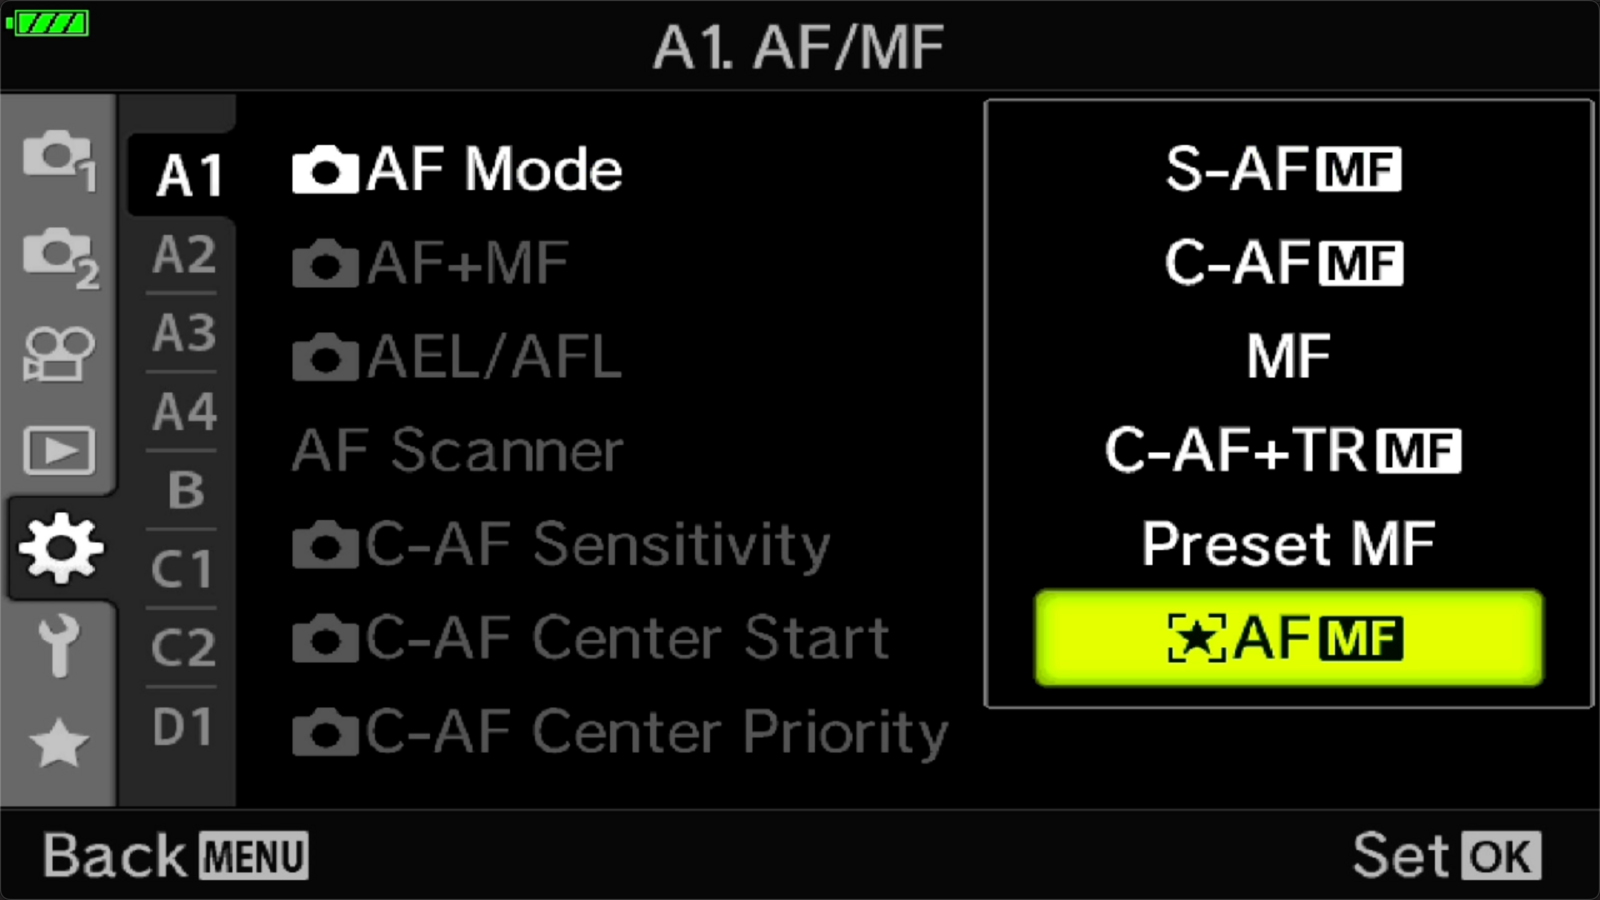
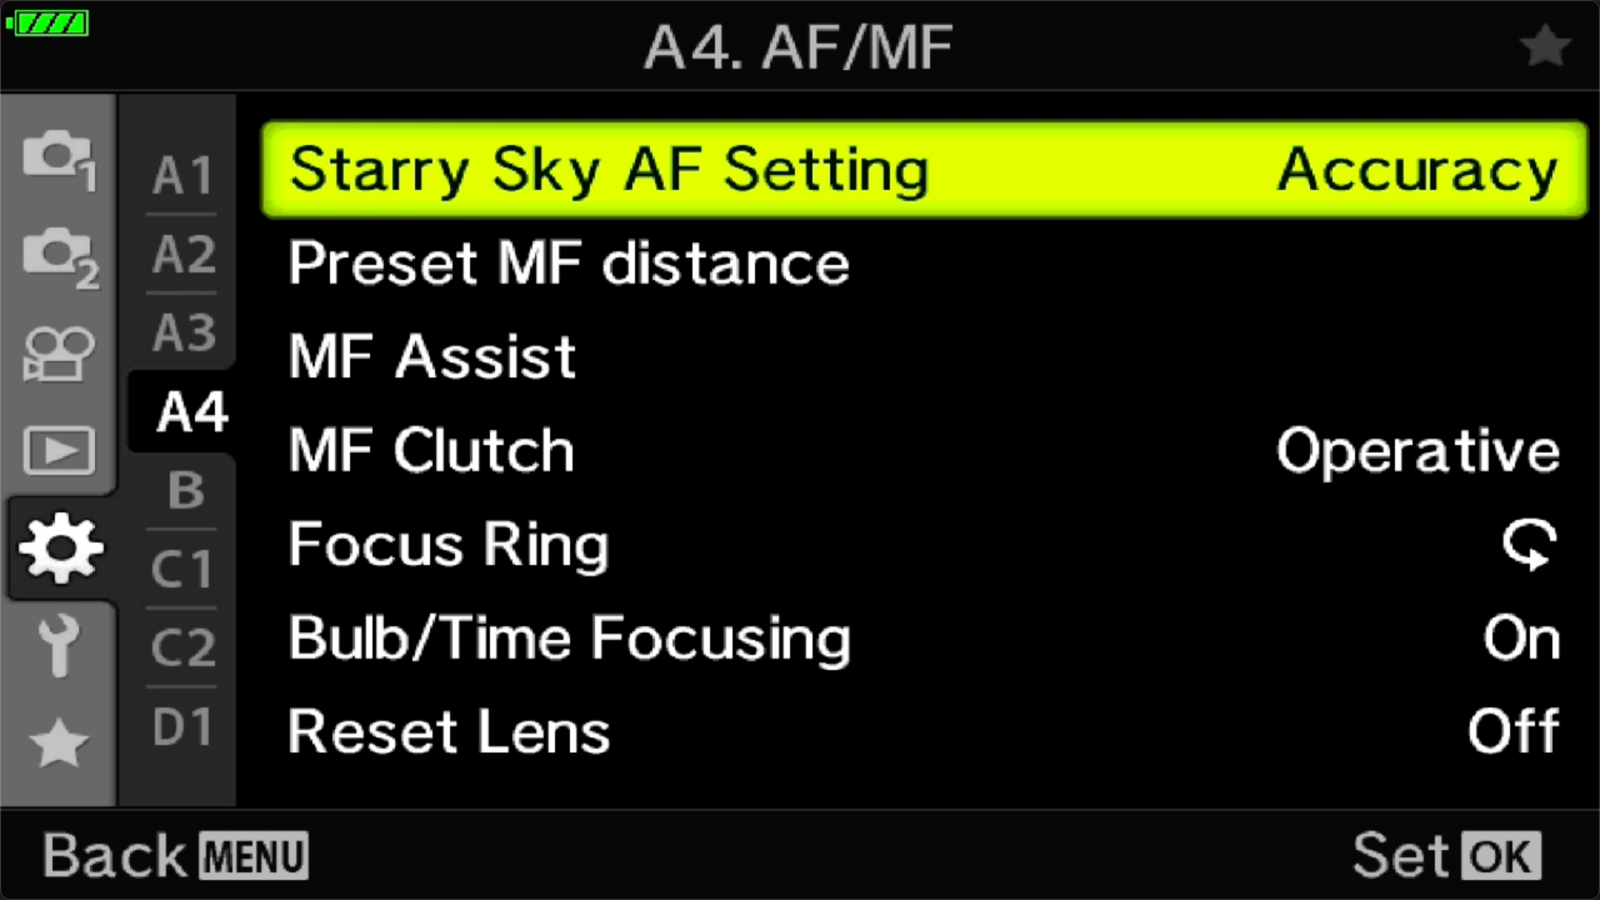
My favorite OM SYSTEM cameras to photograph the night sky are the OM-1, OM-5 and the OM-D E-M1 Mark III because all three of these cameras have Starry Sky AF making focusing on the stars a piece of cake. If you have sharp stars, you’ll have a sharp aurora. The screenshots below show the menu choices in the OM-5 where I set the AF mode to Starry Sky AF and the settings to Accuracy.
Some of my favorite night sky lenses are the M. Zuiko 12mm f2.0, M. Zuiko 8mm f1.8 Fisheye, M. Zuiko 7-14mm f2.8, the M. Zuiko 12-40 f2.8, and the M. Zuiko 17mm f1.2 PRO lens. In terms of camera settings, for best results be sure to be photographing in the RAW format, and keep your camera in the Manual mode.
Settings to start with:
- ISO 2000
- Aperture: wide open
- Shutter Speed: 2.5 to 5 seconds
- Custom White Balance: 4200

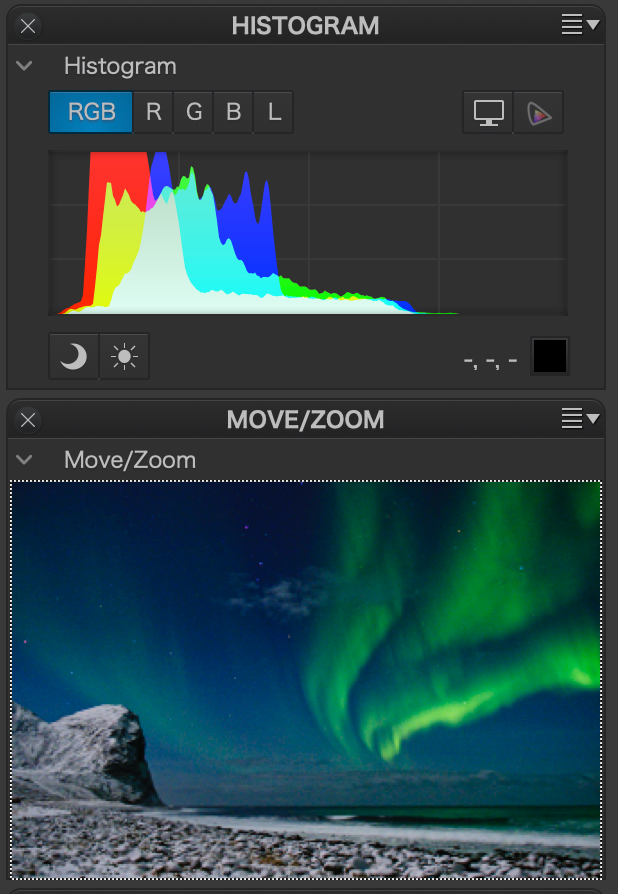
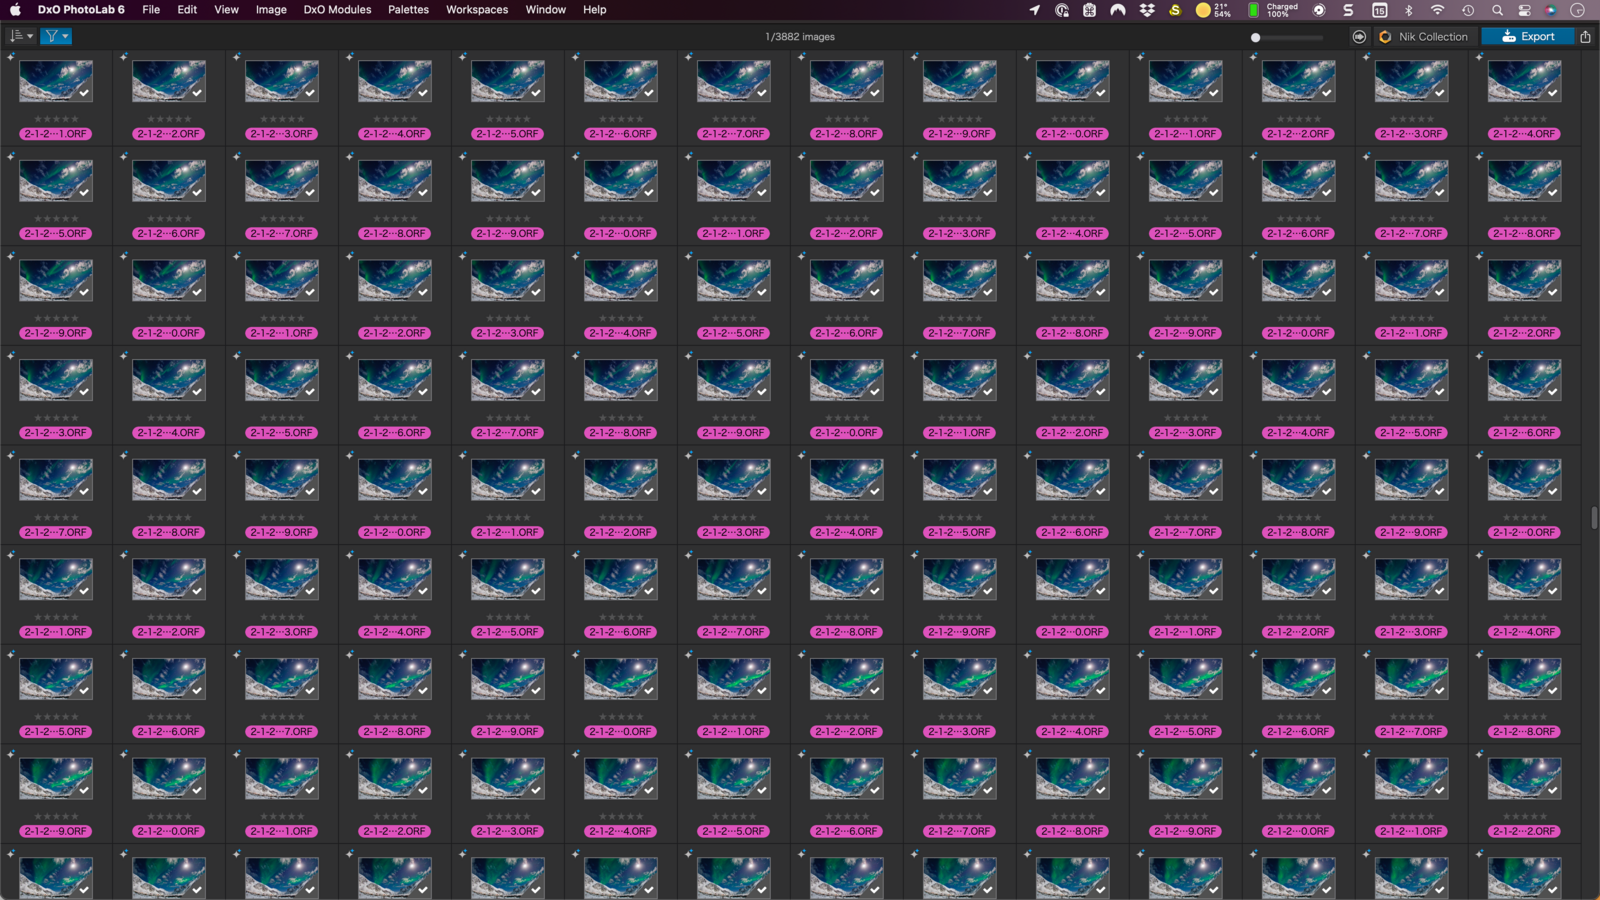
Be sure to always check your histogram to make sure you are not blowing out any of the highlights particularly in the aurora. Your histogram will not look the same as with a daylight photo, where most photographers expose to the right for proper exposure. Instead, you’ll see your histogram weighted on the left.
In the above screenshots from DxO Photolab 6, we can see on the left the histogram of my RAW file with no adjustments made. On the right we can see the histogram after editing. There is no need to bring the histogram to the far right, as there is no brilliant whites in my photo as it was taken at night. Plus by not bringing the histogram all the way to the right, I am protecting highlight detail in the aurora.
If the aurora is moving around fairly fast, you’ll want to use as quick of a shutter speed as possible. If it is not moving fast you might be able to get away with a longer exposure. You just don’t want to have the shutter open too long to then end up getting a blurry aurora from motion blur.
Also, for these short exposure times, you don’t need to turn on long exposure noise reduction. Any noise you have in your photo can easily be removed from today’s large choice of photo software programs, and you also don’t want to have to wait as your camera processes the noise reduction and you end up missing some aurora photos while waiting.
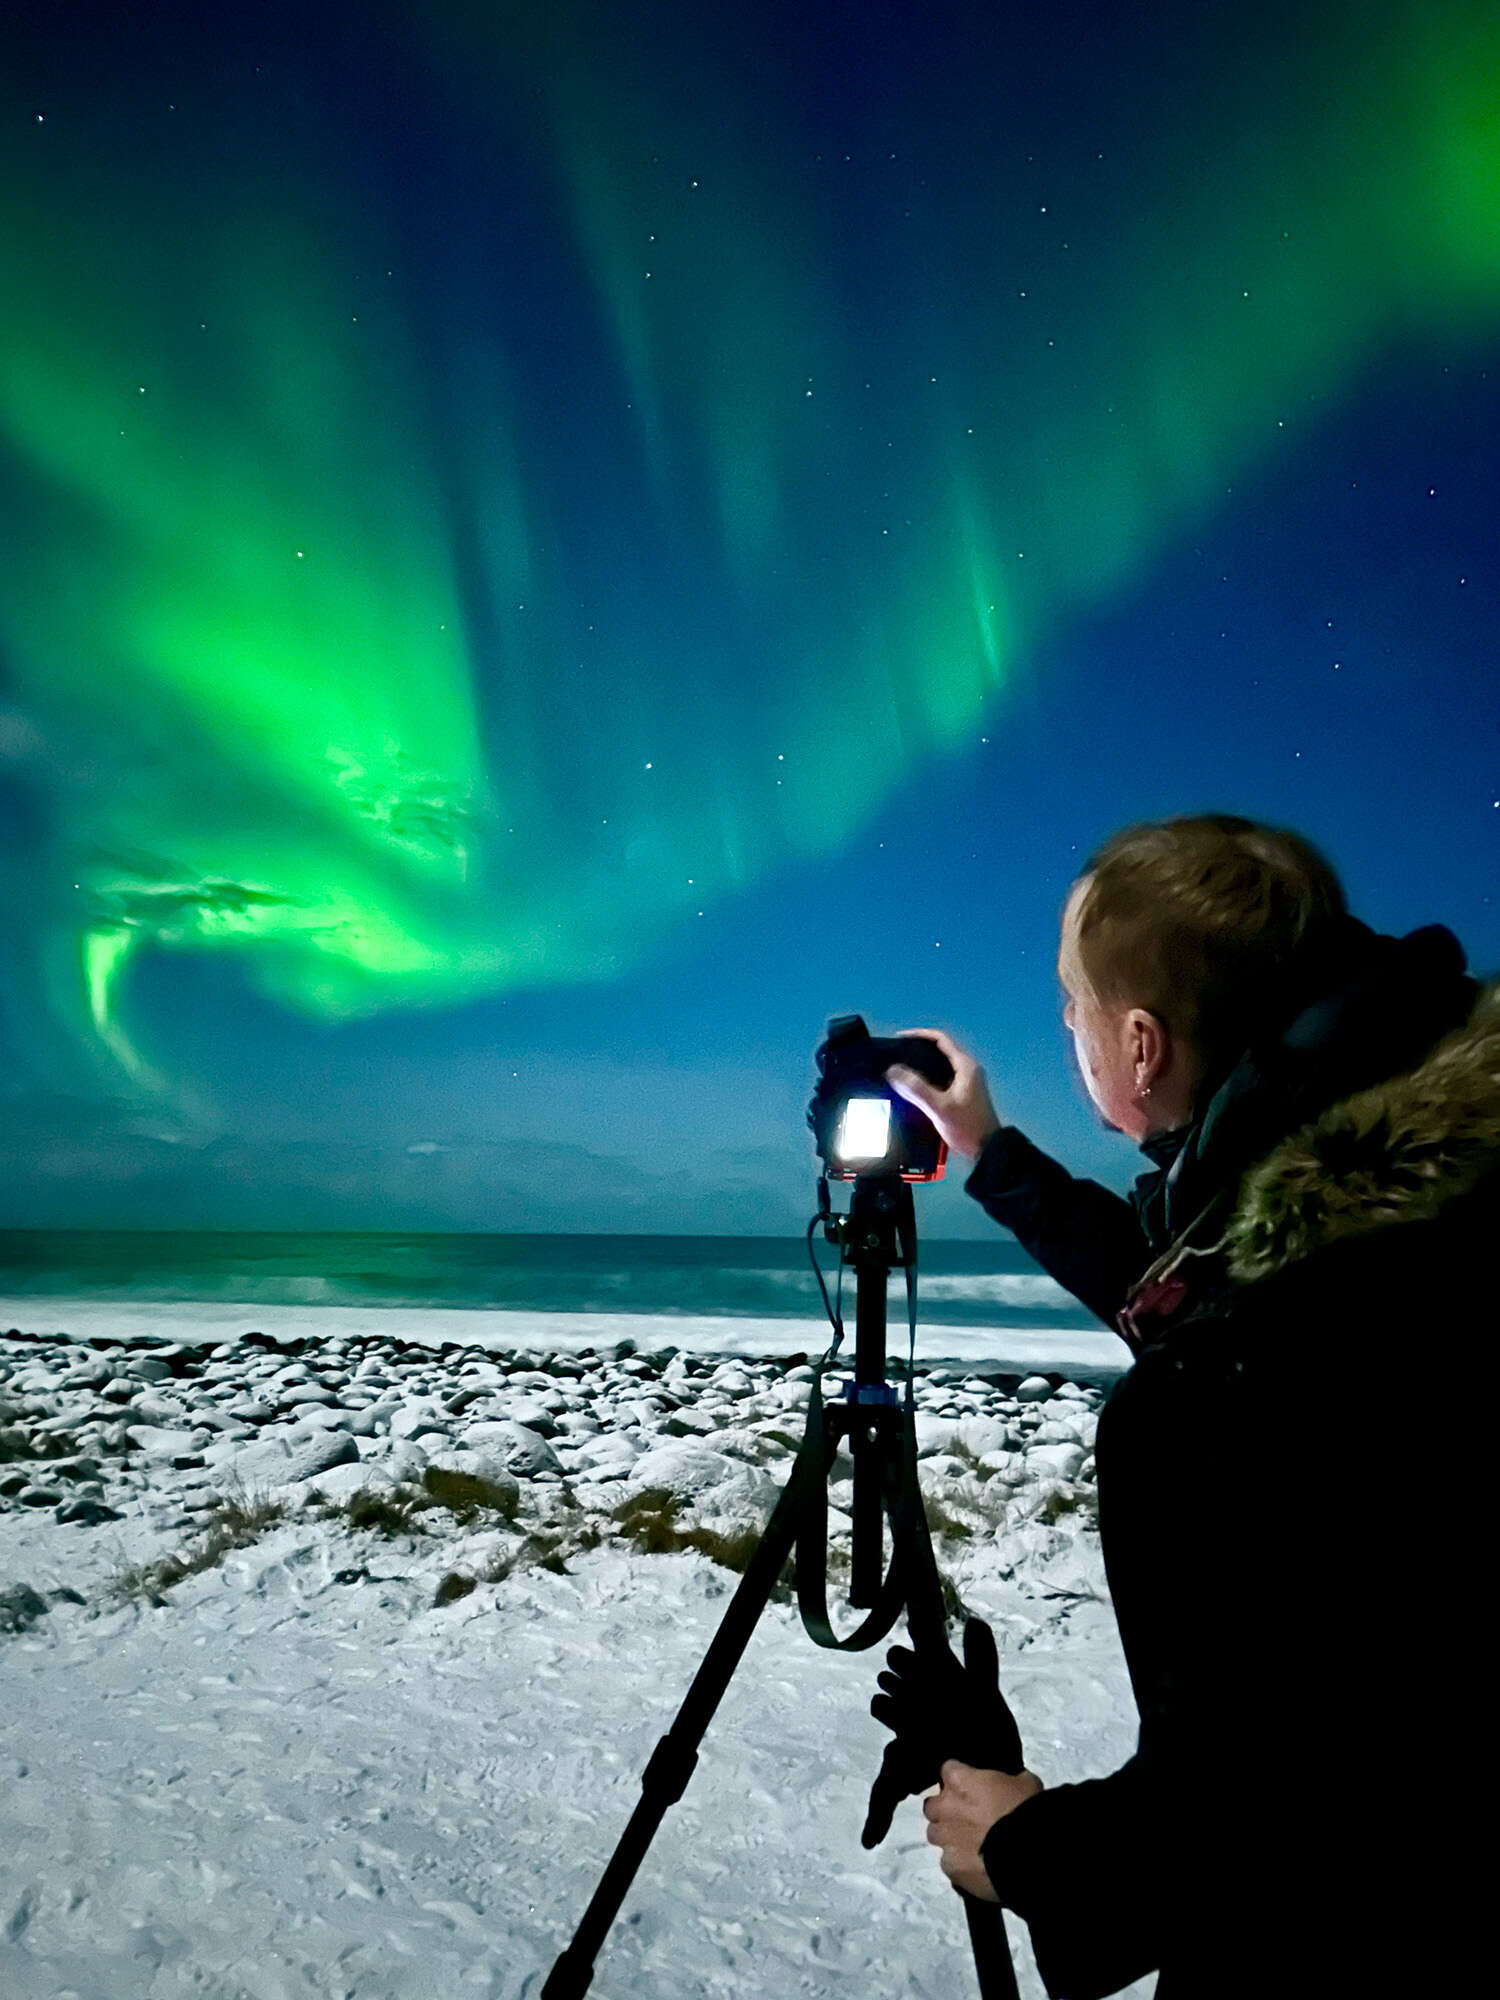
You will also want to also use a steady and strong tripod. In Norway in particular, we had to occasionally deal with wind and waves, both of which can ruin your shots with a weak and lightweight tripod.
Lastly can use the OM SYSTEM RM-WR-1 Wireless Remote Control for the OM-1 (it also works wired with other OM SYSTEM cameras), or if you don’t have it you can set the camera up for 2 second shutter delay so your hands are not on the camera introducing camera shake when you press the shutter button.
Compose Your Shots Based On The Aurora Activity
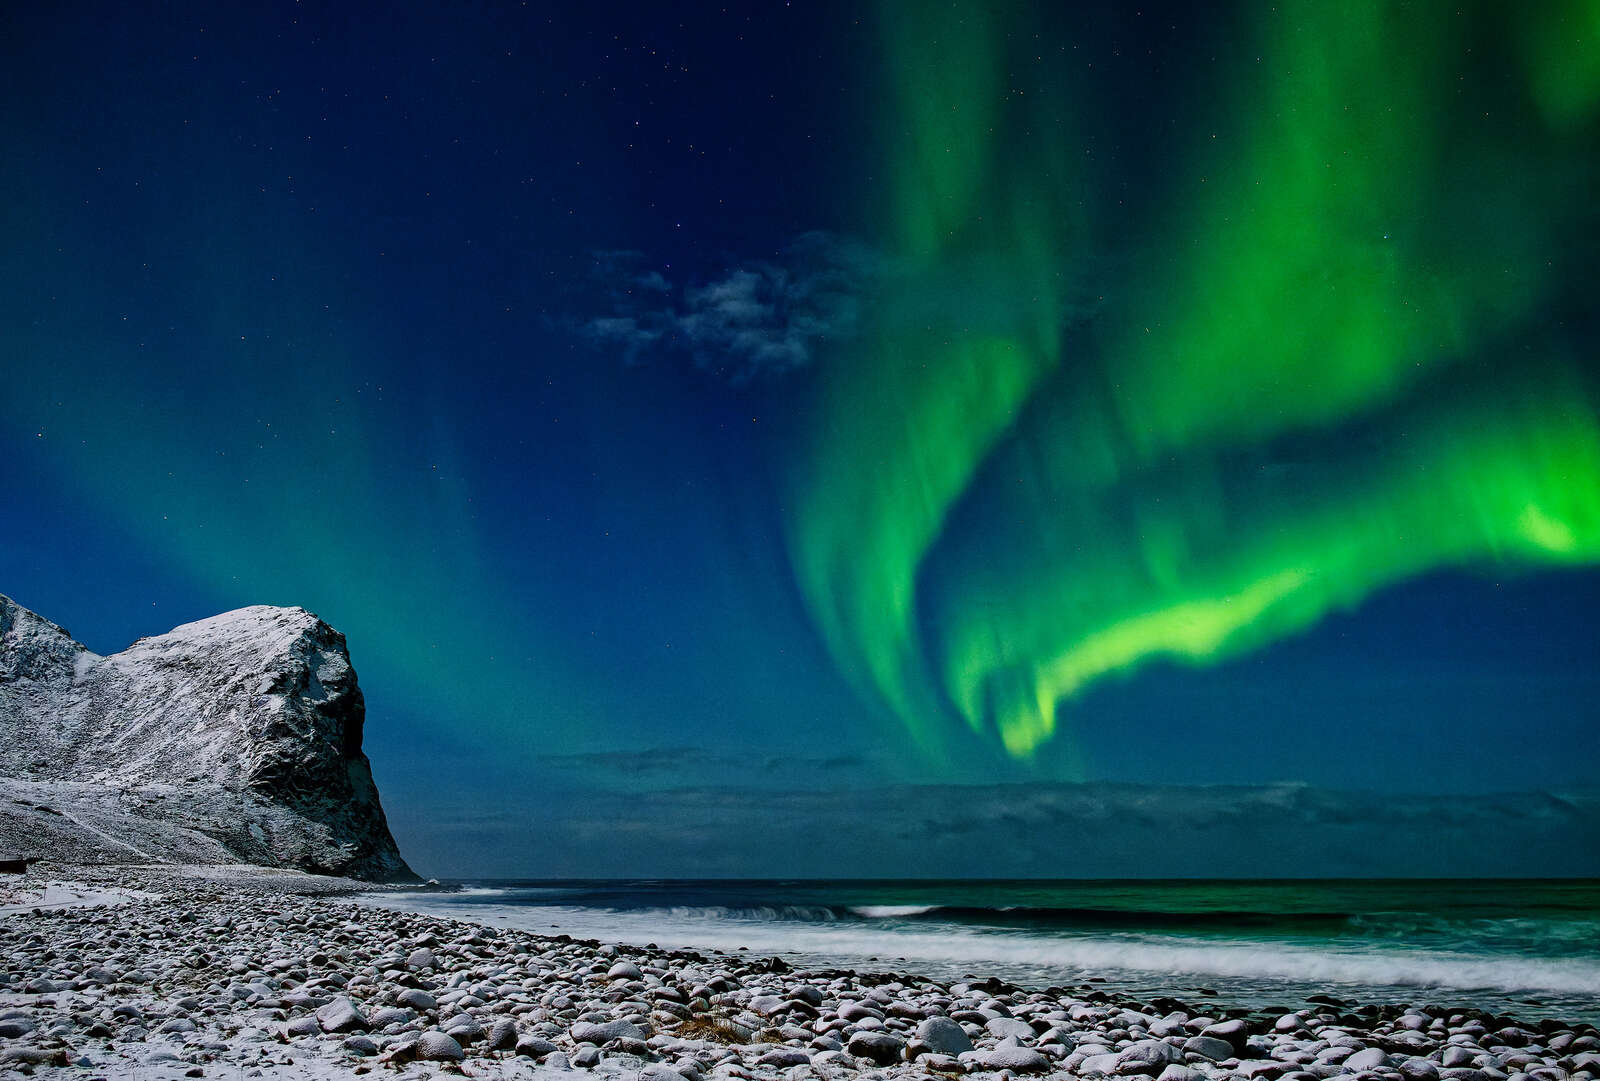
You will want to base your compositions on the aurora activity, with also taking your foreground into consideration of course. When the aurora activity is light and more northward, horizontal exposures usually work well.
2.5 sec | F/1.8 | ISO 1600
However, when you are photographing a particularly strong storm with the aurora overhead, you will want to switch to vertical compositions.
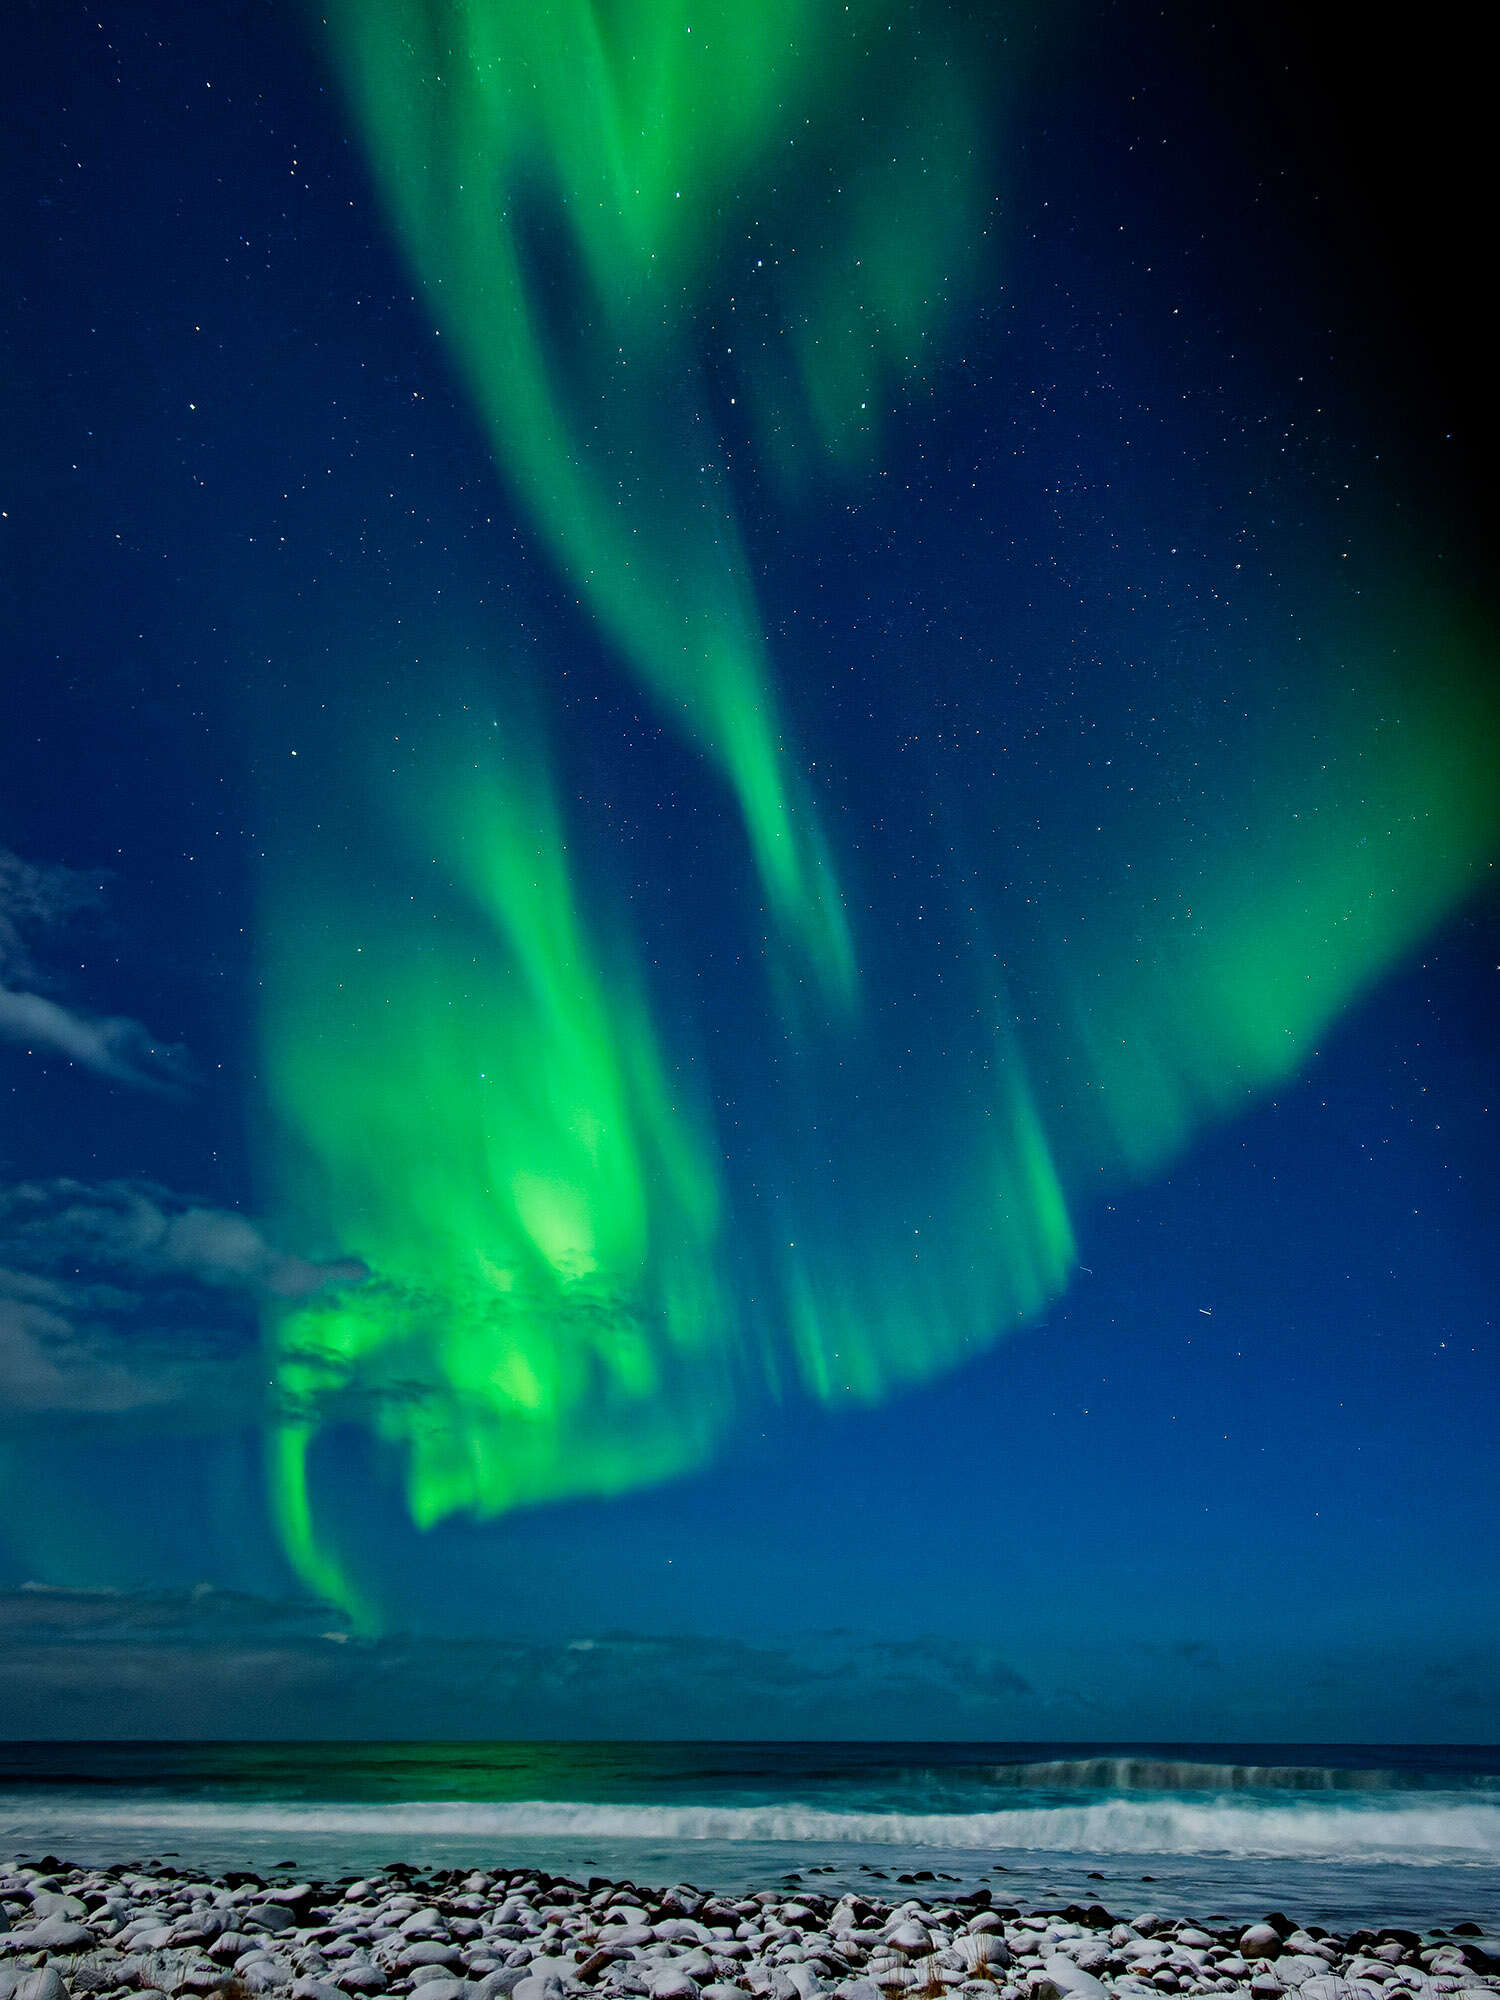
2.0 sec | F/2.0 | ISO1600
Shoot In Interval Shooting
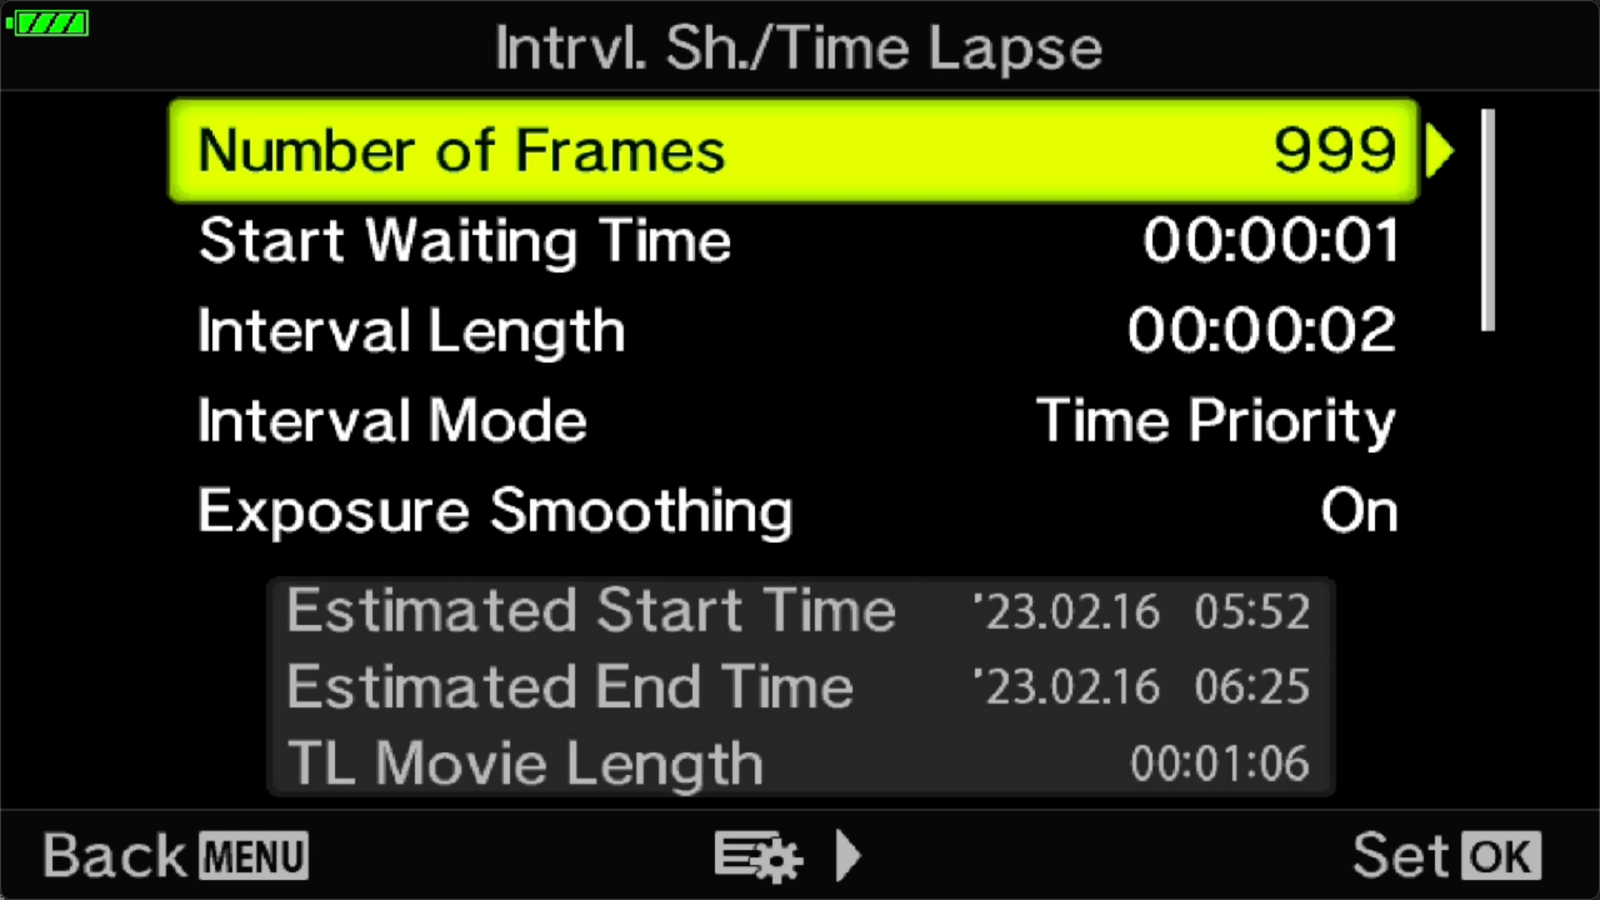
One thing I love to do when shooting the night sky and especially with the aurora is to shoot with the interval timer to take photo after photo after photo.
I’ll set it to take as many photos as it can because you don’t know how long the aurora will be visible. You can stop it at any time while pressing the Menu button between shots. You’ll have hundreds of photos with the aurora in all sorts of different positions so you can choose the perfect shot, plus you can build a fun time-lapse with all of those extra shots.
The screenshot shows my settings using the OM-5. Having the camera create an in-camera movie is so great to then be able to instantly see the results and even share it on social media right away.
When I get back home to my office, I prefer to process all the RAW photos for the best image quality. You can then use OM Workspace to create the time-lapse video, or you can choose other 3rd-party software to build it for you.
Here’s an example of one of the time-lapses I photographed in Norway:
Other Gear To Have
You’ll be possibly spending hours outside in the dark and likely in cold weather, so you do have to be prepared. Here are some items to consider bringing in no particular order: extra batteries, a lens heater if the cold and air moisture is causing fogging and condensation, warm clothing - I love battery operated heated vests and gloves and boot insoles, a chair, a thermos of hot coffee or tea, any snacks, bear spray if you are in bear country, waterproof clothing, and anything else you’d need to make your night more comfortable and enjoyable.
Conclusion
When everything goes right, there is nothing like seeing and photographing a fantastic aurora display and you are likely to never forget the experience. While taking your countless photos during the event, don’t forget to just take a moment to stop and look up and just enjoy what you are seeing and experiencing with your own eyes. And if you find you are in a great area but are having some bad luck with the weather or lack of the proper solar winds to create the aurora, I’ll leave you with one last tip and it’s called the Aurora Dance. While not scientifically proven to bring the aurora out, I have actually seen it work before in Norway and maybe it will work for you too. At the very least, it will keep your spirits up as you wait 😊.
Matt Suess is an OM SYSTEM Ambassador and teaches photo workshops worldwide. You can find him online at https://www.mattsuessphoto.com and on the socials at @mattsuessphoto