It’s a Sunday morning and you abruptly awaken to the harsh: *BEEP, BEEP, BEEP* of the alarm clock going off. While most sane individuals are still contently snuggled up in the sheets, you’re up and out the door into the 5am darkness; loaded to the brim with camera gear and coffee. Still groggy, the brisk morning air is refreshing and quickly wakes you up. The destination? A small storm water pond and old field… two environments most people wouldn’t bat an eye towards. This morning you are on a mission… That mission is to find as many dew soaked insects as you can, rushing to beat the sun before it pokes its head above the horizon and wakes the world up. You may be wondering, why have I painted you this picture? Well, this is a standard morning for an insect macro photographer. At these early hours of the day, you can find many insects that would normally be blasting through the sky at top speeds, dormant and relaxed. This allows for many opportunities to take close-up pictures of subjects that would normally be impossible to photograph to that degree.
My name is Rory Wills. I’m an amateur macro photographer with aspirations in Entomology and Wildlife Biology. I began my journey into macro photography in the fall of 2019 as a lockdown hobby and have been a dedicated Olympus user since the fall of 2020. I’ve fallen in love with Olympus products and my weapon of choice for macro photography is the OM-D E-M1 Mark II with an M.Zuiko 60mm F2.8 Macro lens. It seriously never leaves my side! Additionally, I shoot with a flash and light-diffuser combo to get very controlled lighting. Controlled lighting and soft lighting is invaluable for insect macro to avoid bright highlights from their very shiny bodies.
I’m going to share with you how I go out and shoot macro, and how this gear helps me do exactly that!
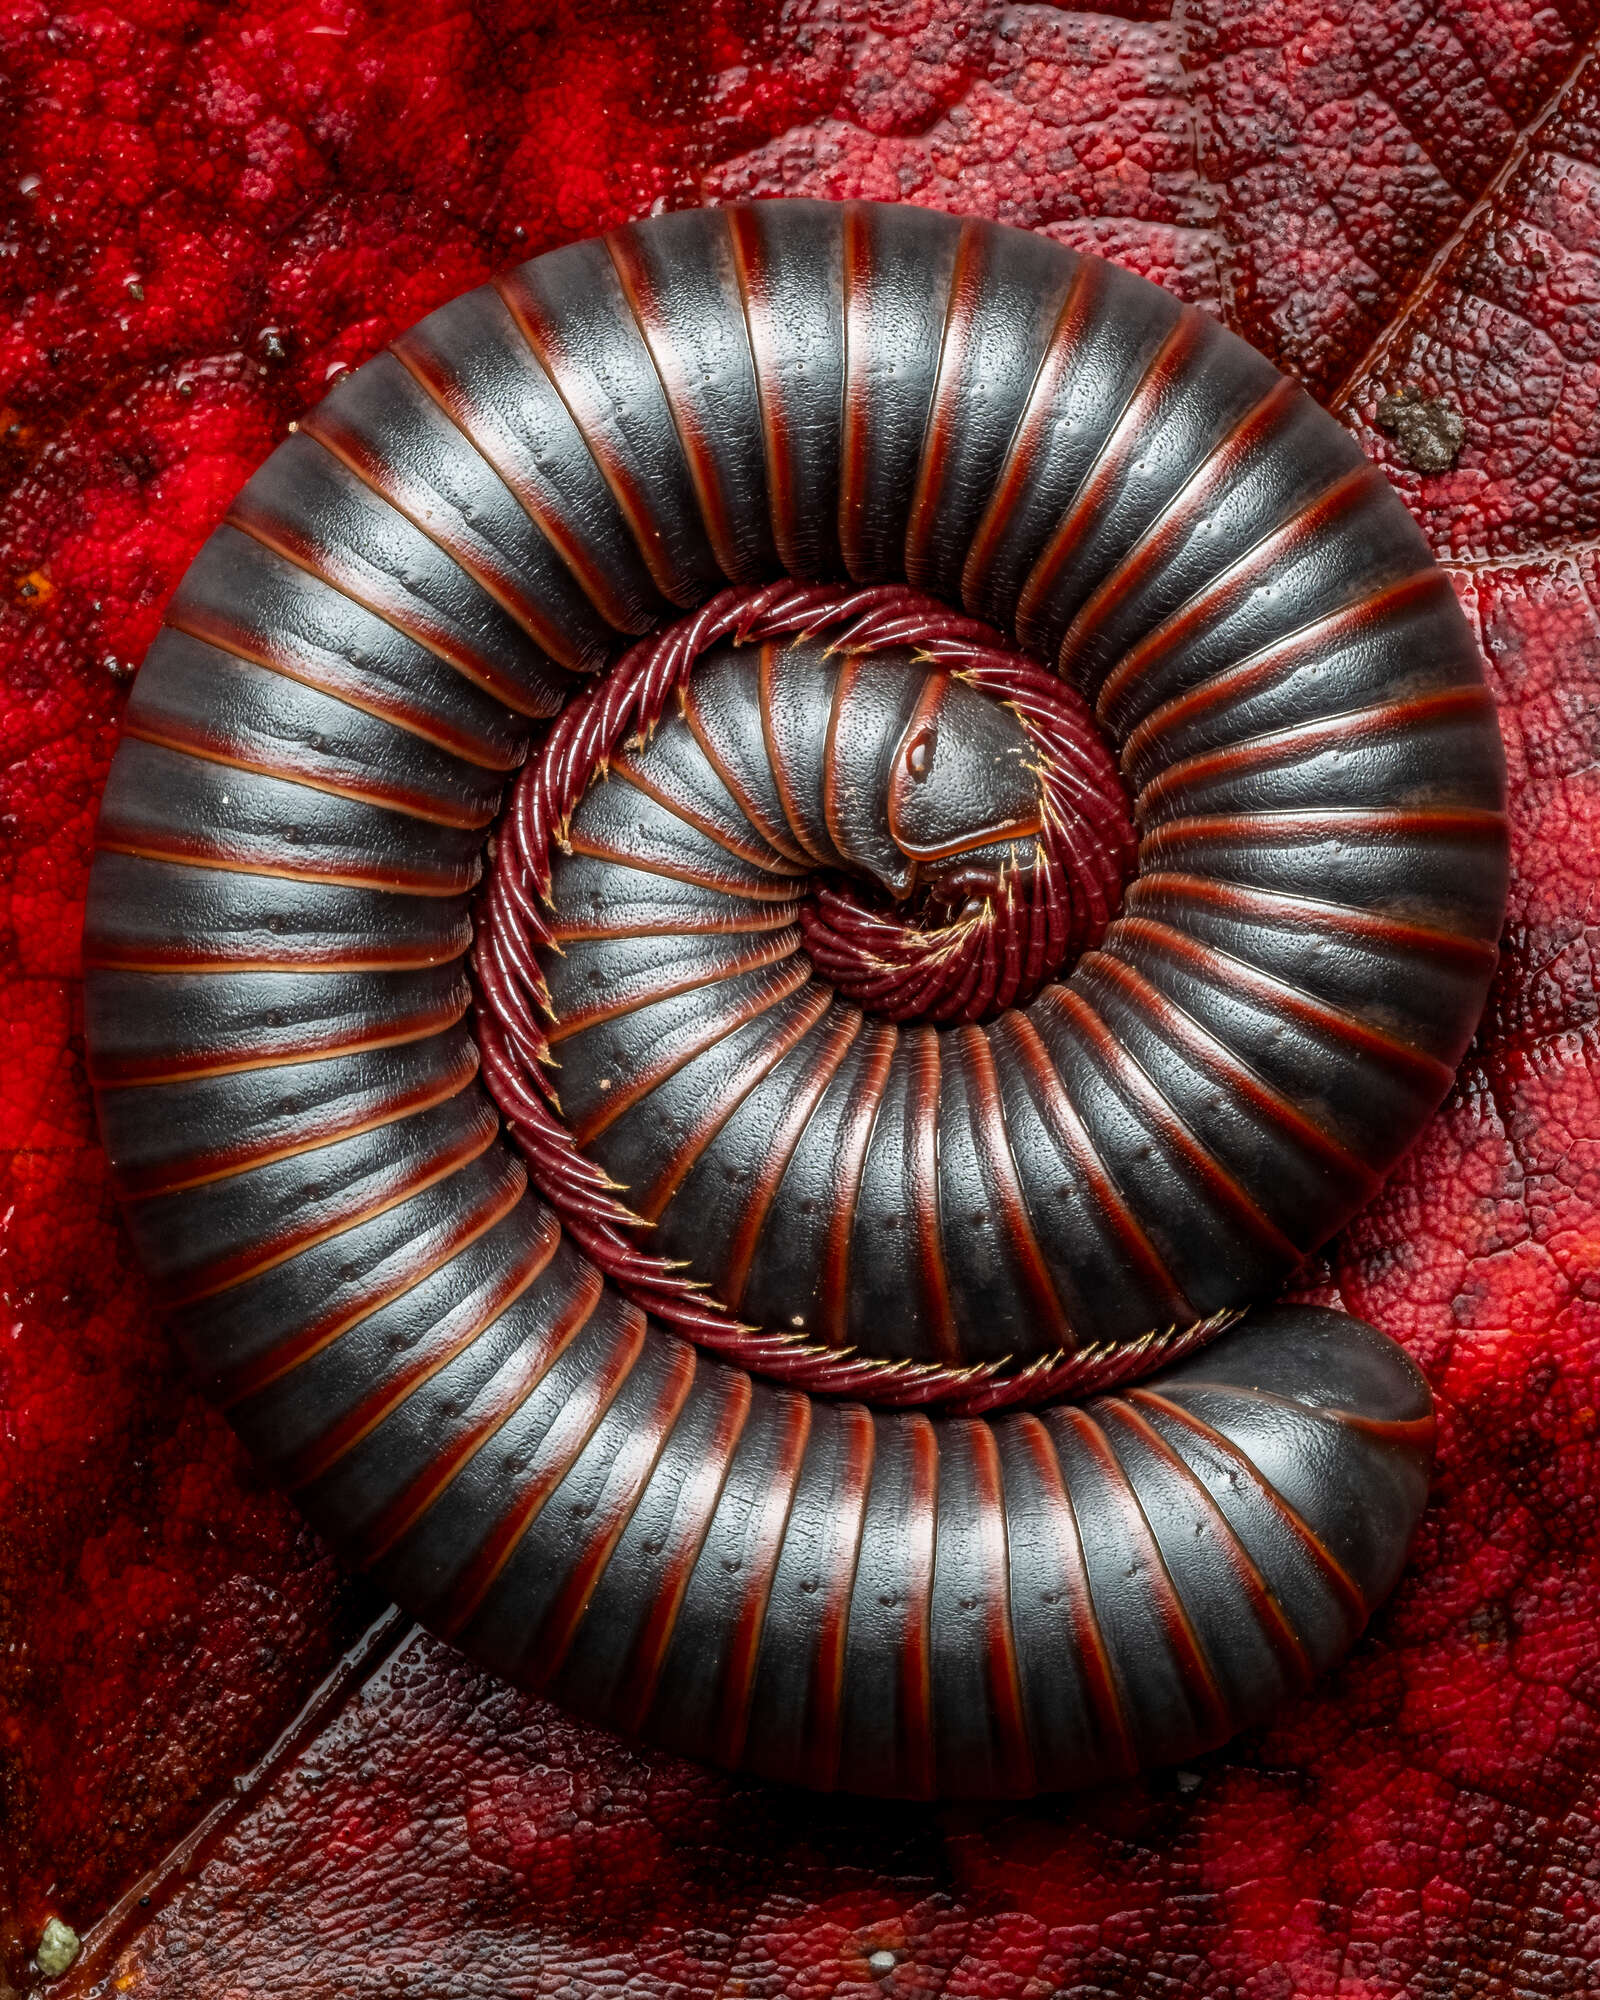
1/50s | F8 | ISO 320
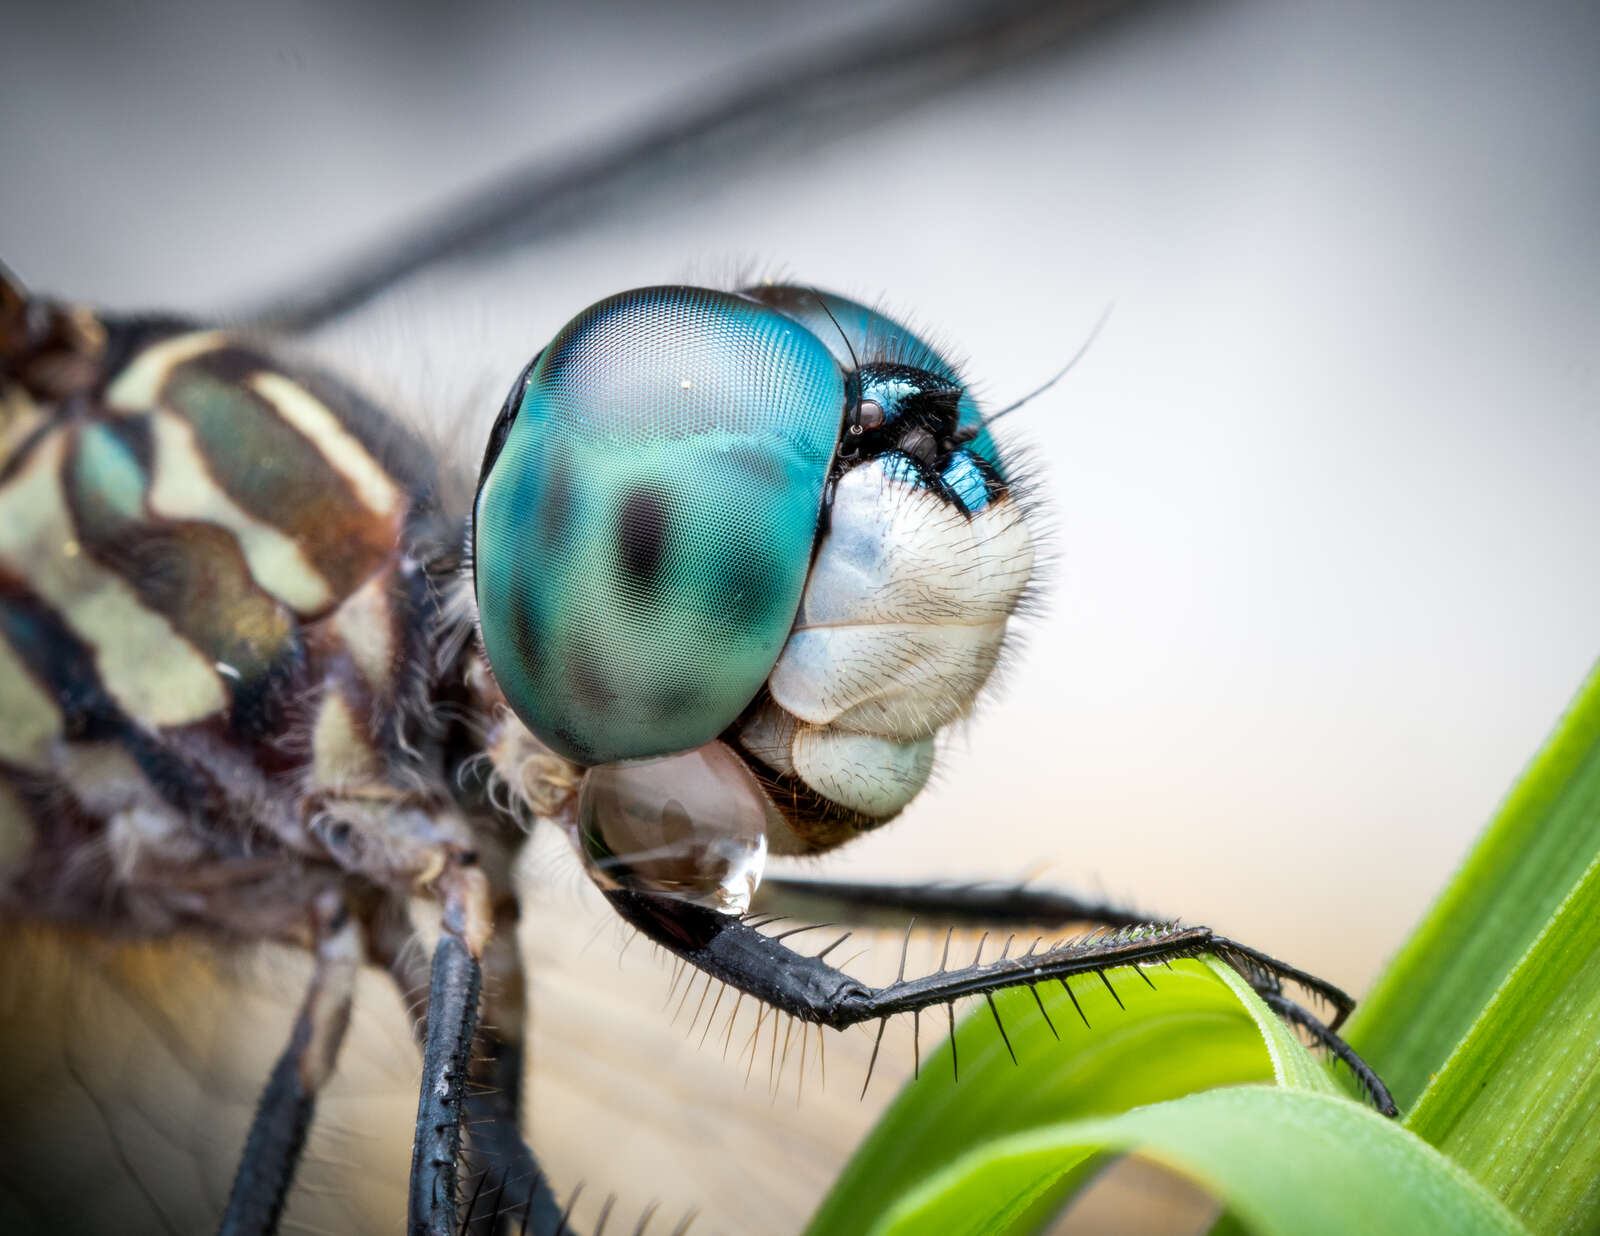
1/100s | F10 | ISO 400
Mornings as described above, have become my norm for the summer months. As a Canadian macro photographer, you have to make the most of the warm months before the harsh winters hits and all the bugs disappear. My macro photography focuses heavily on utilizing techniques such as Focus Bracketing and Focus Stacking to get the detailed shots I desire. By being at high magnifications, depth of field gets very shallow and Focus Stacking is a help to get large portions of the photo in focus. These techniques come at a cost: the subjects must be very still while I take multiple photos or the whole shot is toast. If you’ve watched an insect for any period of time, you’ll know the word “still” isn’t a very fitting descriptor.
Luckily, most insects are ectotherms and rely on the warm rays of the sun to heat up their muscles. By heading out on expeditions before the sun comes up, you can unlock the ability of photographing tricky groups such as flies, butterflies, moths, dragonflies, and damselflies without much chasing. These insects spend the night resting on grass and foliage and are relatively easy to find just about anywhere in the world!
So now that we’ve found an insect we want to photograph, what comes next? How do we translate this dewy insect into a photograph?
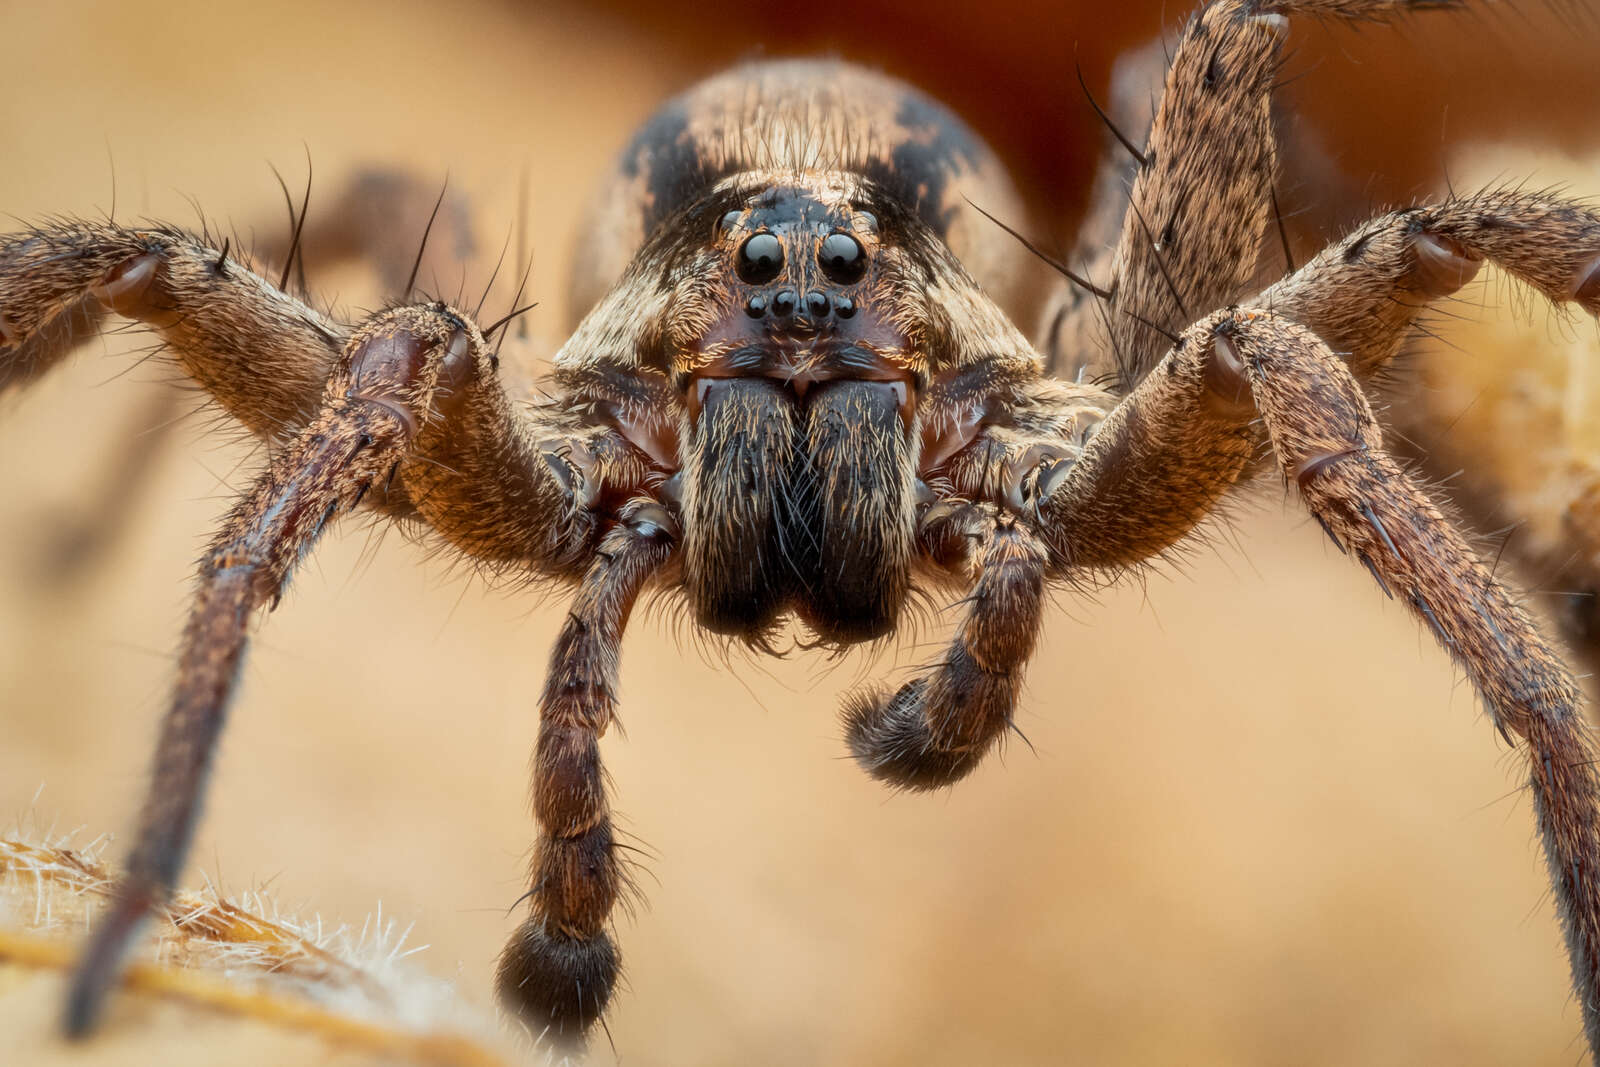
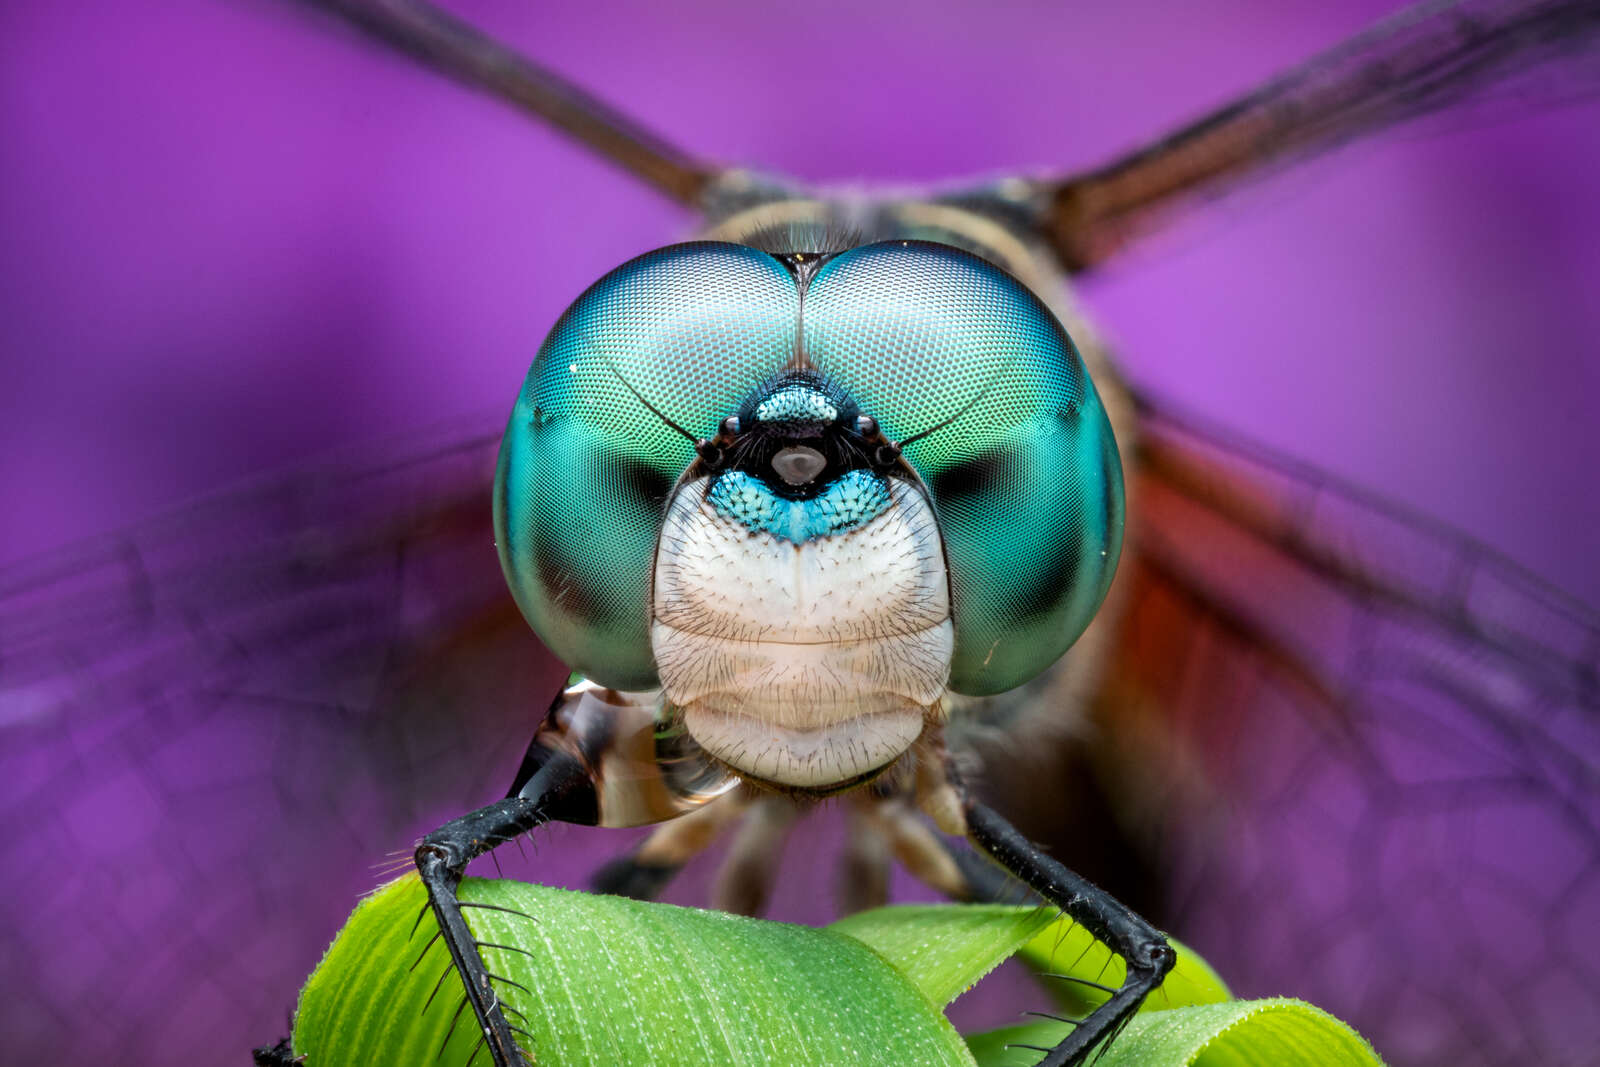
I start by carefully moving any vegetation that’s directly blocking my way and begin to visualize my composition. Compositionally, I like to get as close as possible to show off intricate details the naked eye can’t normally see. For this type of composition, you can think of aspects such as symmetry, angle, and background. Angle is a fun one to play with, insects can look very different depending on what angle you go for. Low angles can show off alien-like mouth parts and high angles can show off complex compound eyes or antennae.
Background is also a fun one to play around with to produce different colors and textures. Once downside to shooting with a flash is that most photos have a black background if there’s nothing behind the subject. You can simply hold a prop behind the subject to get different backgrounds. Some props to try out are old leaves off the ground, nearby flowers, or even something artificial like a color card or your friend’s shirt!

1/100s | F9 | ISO 320
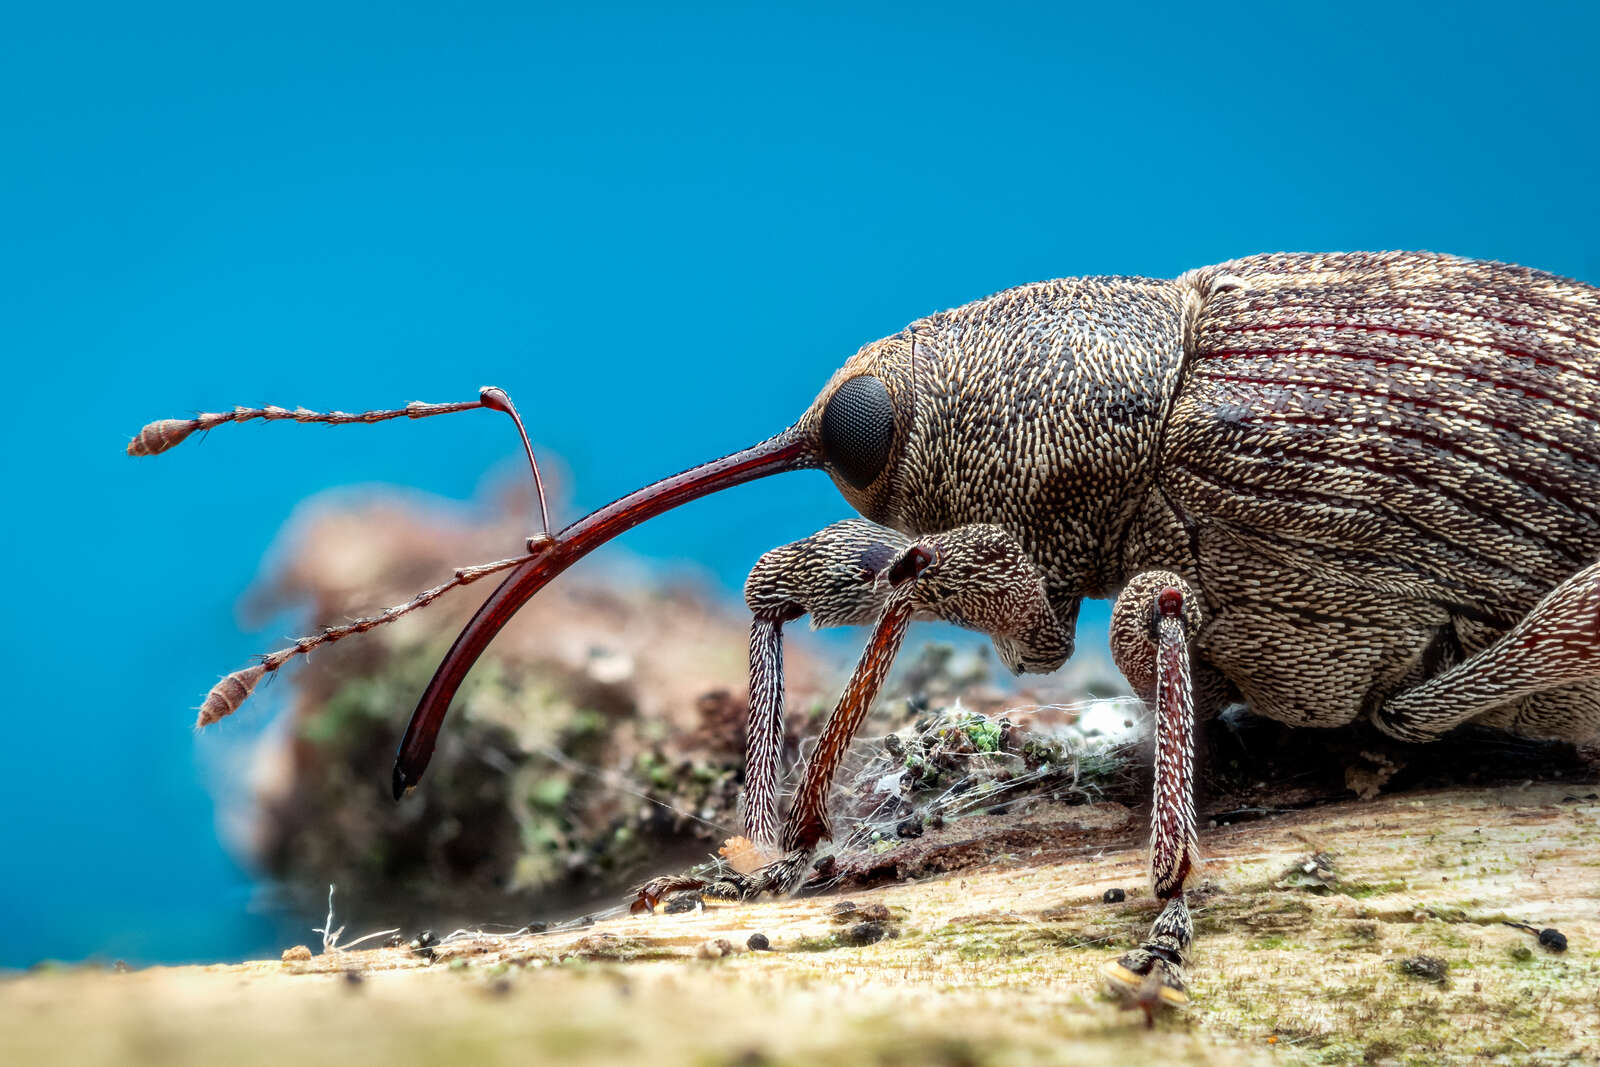
1/50s | F5.6 | ISO 400
Getting close to the subject is a breeze with the M.Zuiko 60mm lens. The 60mm is a macro lens with a full magnification of 1:1 (that’s the magnification I shoot at 90% of the time).
The lens has a unique handy Focus Limiter Switch on the left side. One click allows you to instantly reach a full 1:1 magnification, without any guessing. This means you don’t need to touch the lens barrel! I bring myself to 1:1 before shooting any insects and will back off the magnification if need-be. Additionally, this lens has a generous working distance of 7.4 inches at full magnification, which is extremely useful for photographing insects in cluttered vegetation.
As I mentioned earlier, my gear includes a flash and light diffuser which sticks out quite a bit around the front of the lens. Another benefit of the working distance of this lens, is that it gives lots of space for your external diffuser to not get in the way. You can keep your distance with the subject without needing to tamper with its natural environment AND still get a high magnification shot. From here its just a matter of adjusting your exposure and taking that gorgeous photo.
Another aspect of this lens I find incredibly useful is the splash and dust proofing. When I shoot macro, it can be massively helpful to get in a low position, such as on my stomach, to gain extra stability at those high magnifications. I utilize this often when Focus Bracketing/Stacking – the extra stability lets me use these features handheld without the need for a big and heavy tripod. The downside to this technique is that you are getting your lens down and dirty into the wet vegetation or mud which wouldn’t be possible without weatherproofing. Opportunities in insect macro photography can be anywhere at anytime and its reassuring to not have to worry about the elements getting in the way.
1/50s | F5.6 | ISO 320
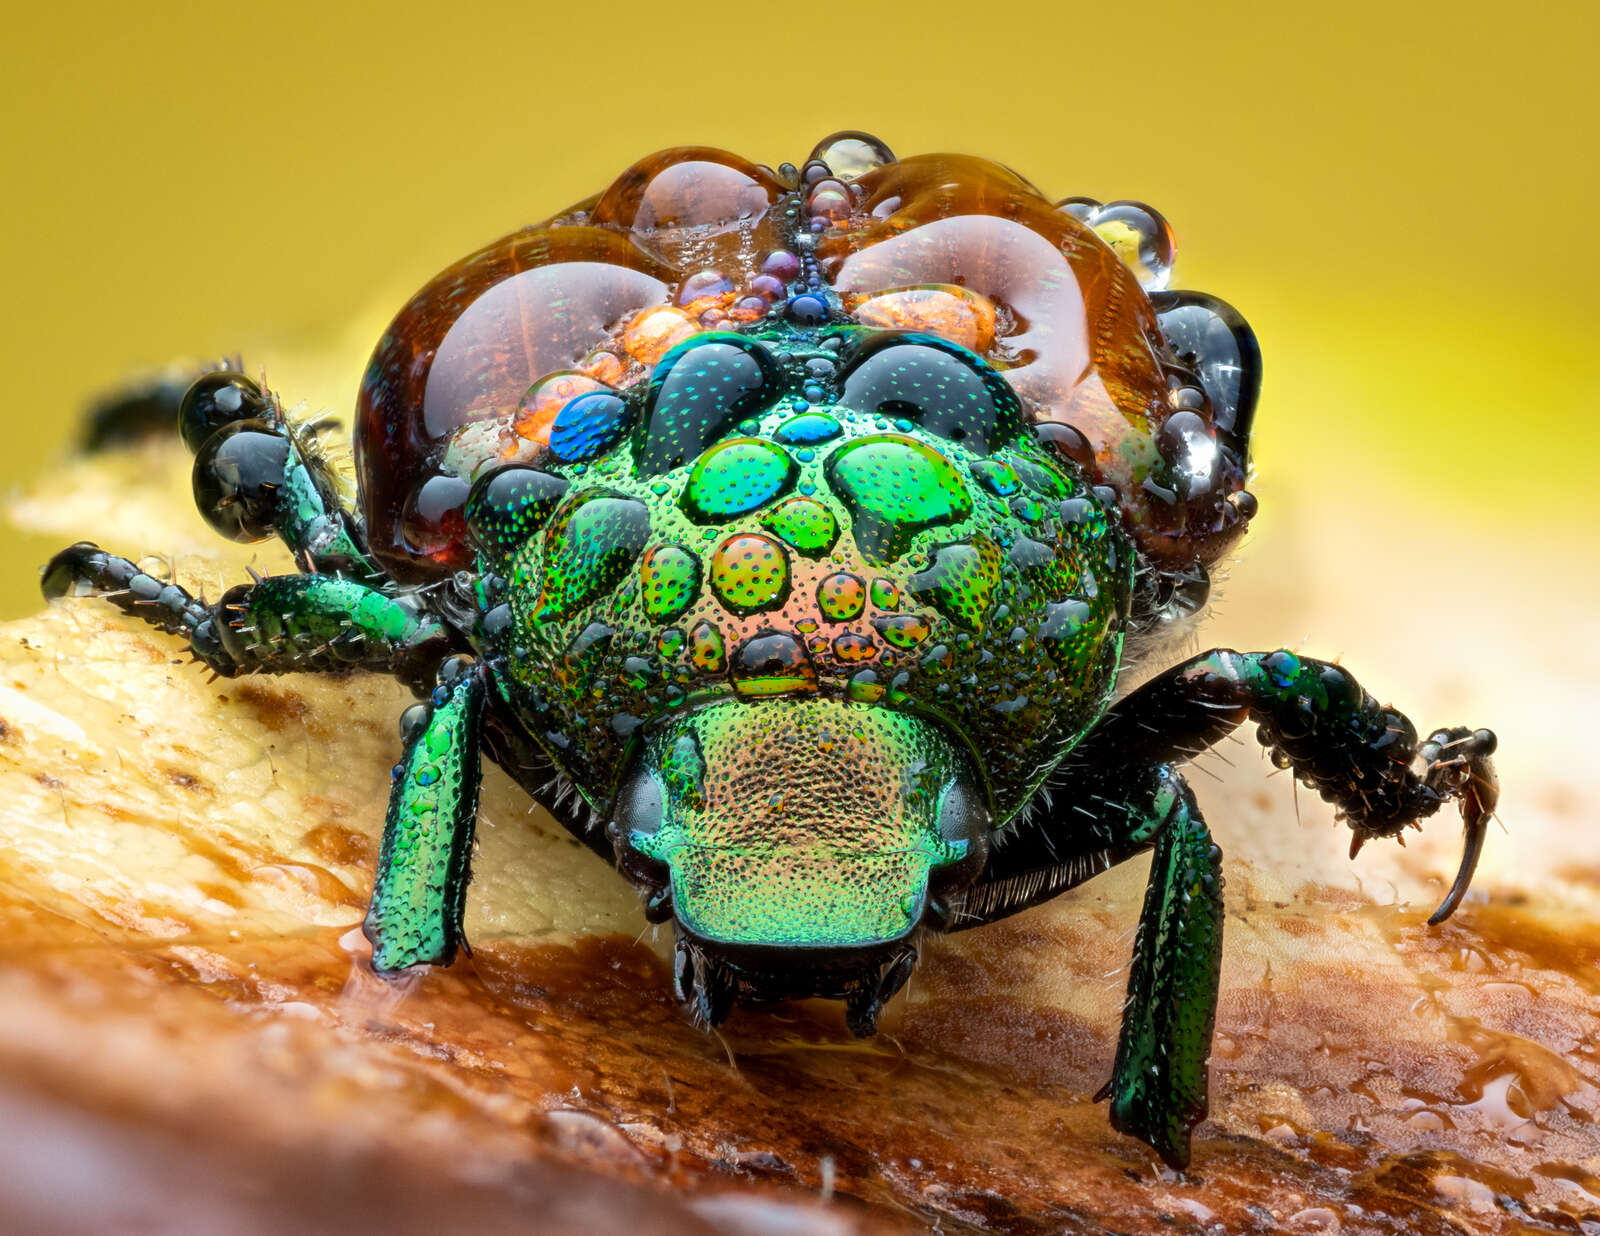
1/50s | F10 | ISO 320
Finally, I want to talk a little bit about Focus Bracketing and how I utilize it to increase the depth of field in my macro photos. I use the E-M1 Mark II camera body, so under Shooting Menu 2 > Bracketing you will find the options to let you do Focus Stacking or Bracketing. Focus Stacking takes up to 15 JPEG pictures in the camera and creates a composite image with a greater depth of field. Focus Bracketing takes up to 999 different RAW photos but it requires you to process the final stack with other software. I use the latter to retain as much detail as possible but both options are great, especially if you don’t want to buy additional processing software.
The most important first step to take when Bracketing is finding a subject that is still, any movement from you or the subject will result in a blurry final image or misaligned photos. The next step is to set your settings. As a small disclaimer, these are the settings I have found to be effective but its really important to play around with them yourself and experiment with what works best for YOU. I use an aperture between F5.6 – F8, a shutter speed of 1/50th, an ISO between 200-400, and a flash power of 1/16th-1/8th. In the Focus Bracketing/Stacking menu I have my focus differential set to 3 or 4 and the flash recharge time set to 0.2 seconds. The closer you are to your subject, the lower you will need to make your focus differential.
For a magnification of 1:1 on the M.Zuiko 60mm, a differential of 3 or 4 will rarely miss a frame. Also, the flash recharge time will need to be longer if you shoot at a higher flash power than what I mentioned above. Now for the fun part, taking the actual stack! I don’t like to use a tripod and therefore must stay very still while focus stacking to avoid any blur I might get shooting at the slow shutter speed of 1/50th. Nothing against tripods, but windows to focus stack an insect may be very small and taking the extra time to set up might cost you your shot. To compensate for stability, I usually lay on the ground and use my left hand as a prop underneath my camera. Now take a deep breath and click the shutter button! Voila, the output is a beautiful focus stack of a series of images to be turned into one later.
1/100s | F10 | ISO 400
Macro photography is a really fun branch of photography that truly has endless opportunities. So much of the life on this earth is miniscule and often overlooked by the general public. As much as some people would like to avoid insects, they are extremely valuable to all ecosystems and have vital roles in keeping the earth running as a machine. After all, its estimated there are a staggering 1.4 billion insects for EVERY person on this planet! Insects live in virtually every environment you can think of and come in every shape and size.
Picking up the M.Zuiko 60mm lens has allowed me to jump head first into this vast world of insects are showcase some of the stunning diversity I never knew existed. Every day comes with a new discovery whether that be in my backyard, out in the woods, in a field, or even just taking a stroll through the suburbs. Macro photography has taught me to slow down, be observant, and really appreciate this beautiful world we are all fortunate enough to live in.

Instagram: @rorymacro
Rory Wills is a macro photographer based in Guelph, Ontario. Since 2019, Rory has been expressing his love for entomology through macro-photography. He aims to help people gain a deeper understanding of the important, absurd, and intricate invertebrate world all around them.