Landscape photography is perhaps the easiest style of photography to get into. All you need is a camera body and a wide-angle lens. That's it. With those two pieces of gear you can start photographing urban, rural and wilderness landscapes. When I was twelve years old, that's what I started with. Of course, you will eventually want to build up your list of equipment to include a tripod, filters, a telephoto lens and a few other items. The one thing that you might overlook, however, is the fisheye lens. And that would be a mistake.
Fisheye lenses get a bad rap. "They are a specialty lens." "They distort everything." "They're not a serious landscape lens". Well, let's get the elephant out of the room. I don't really disagree with any of those criticisms. Fisheye lenses can certainly be considered a specialty lens, they can create very dramatic distortions and they are not my primary landscape lens. All that said, they can be the perfect option for some situations. With a 180° field of view, those situations are likely only to occur when a regular wide-angle lens just doesn't cut it. Let's look at some situations where it's been my lens of choice.
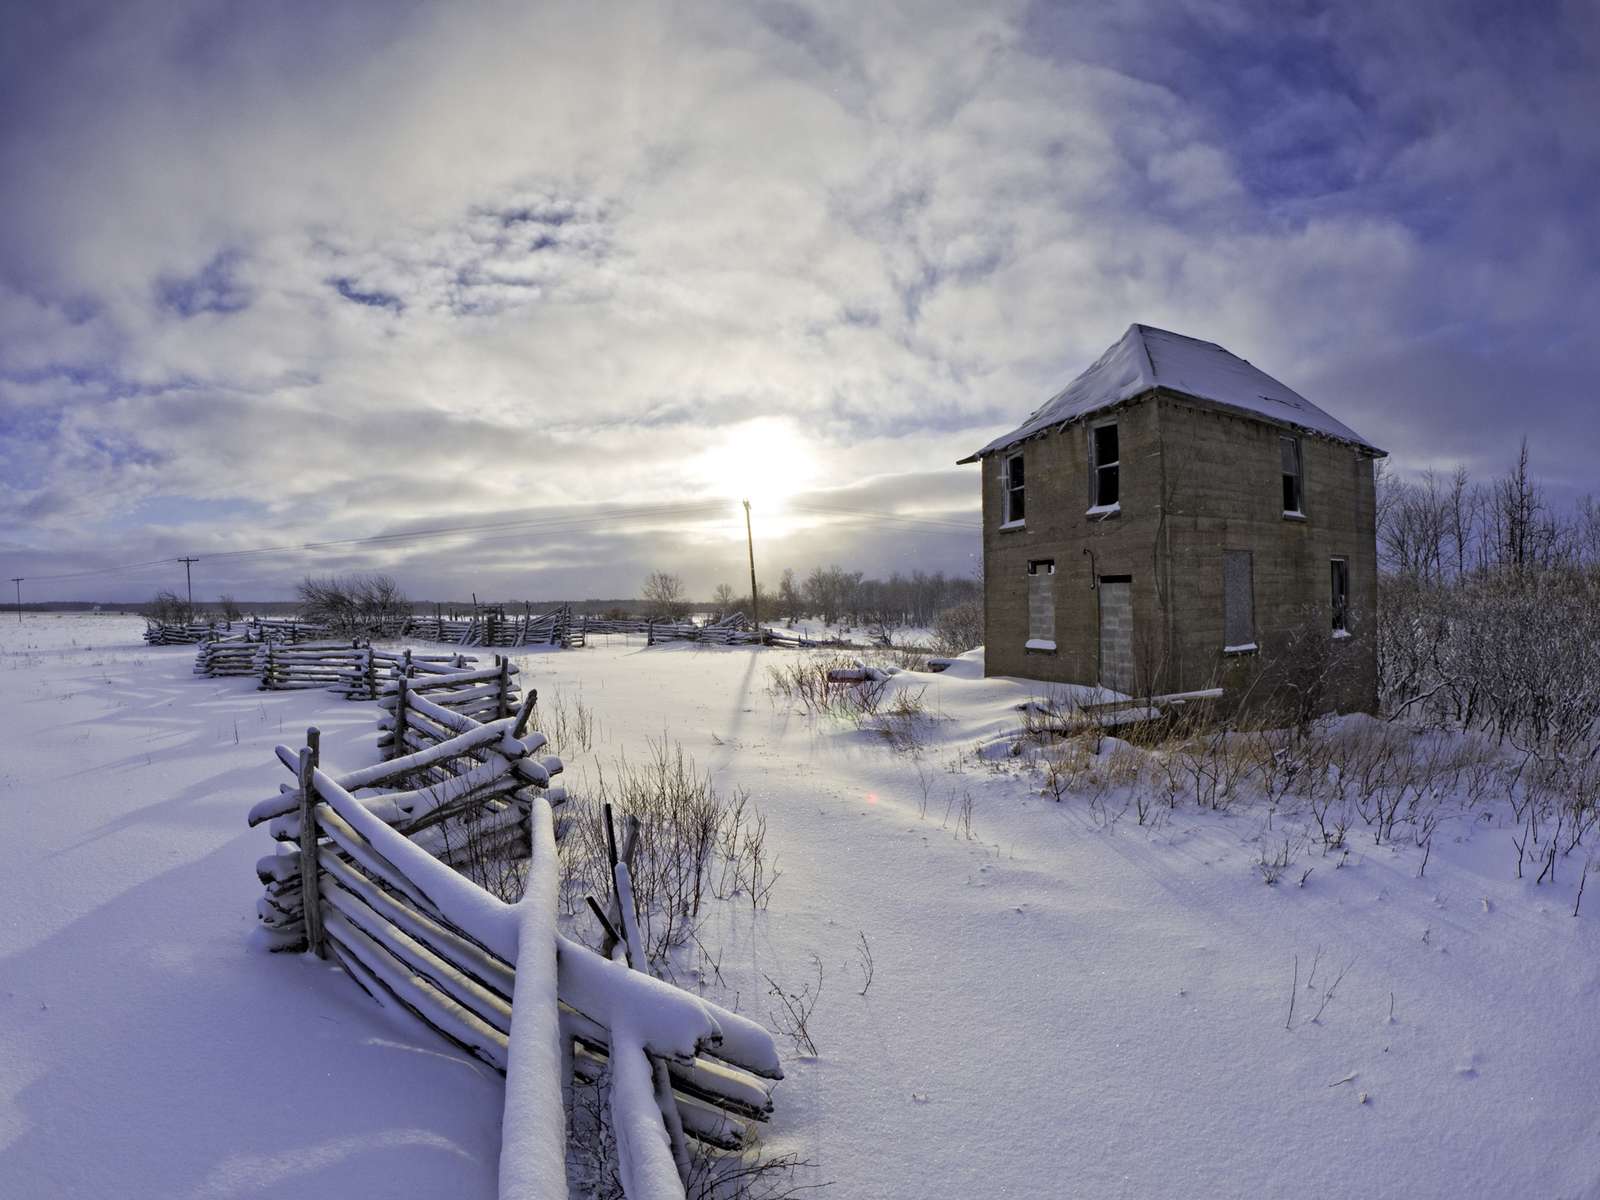
CENTER UP THAT HORIZON LINE
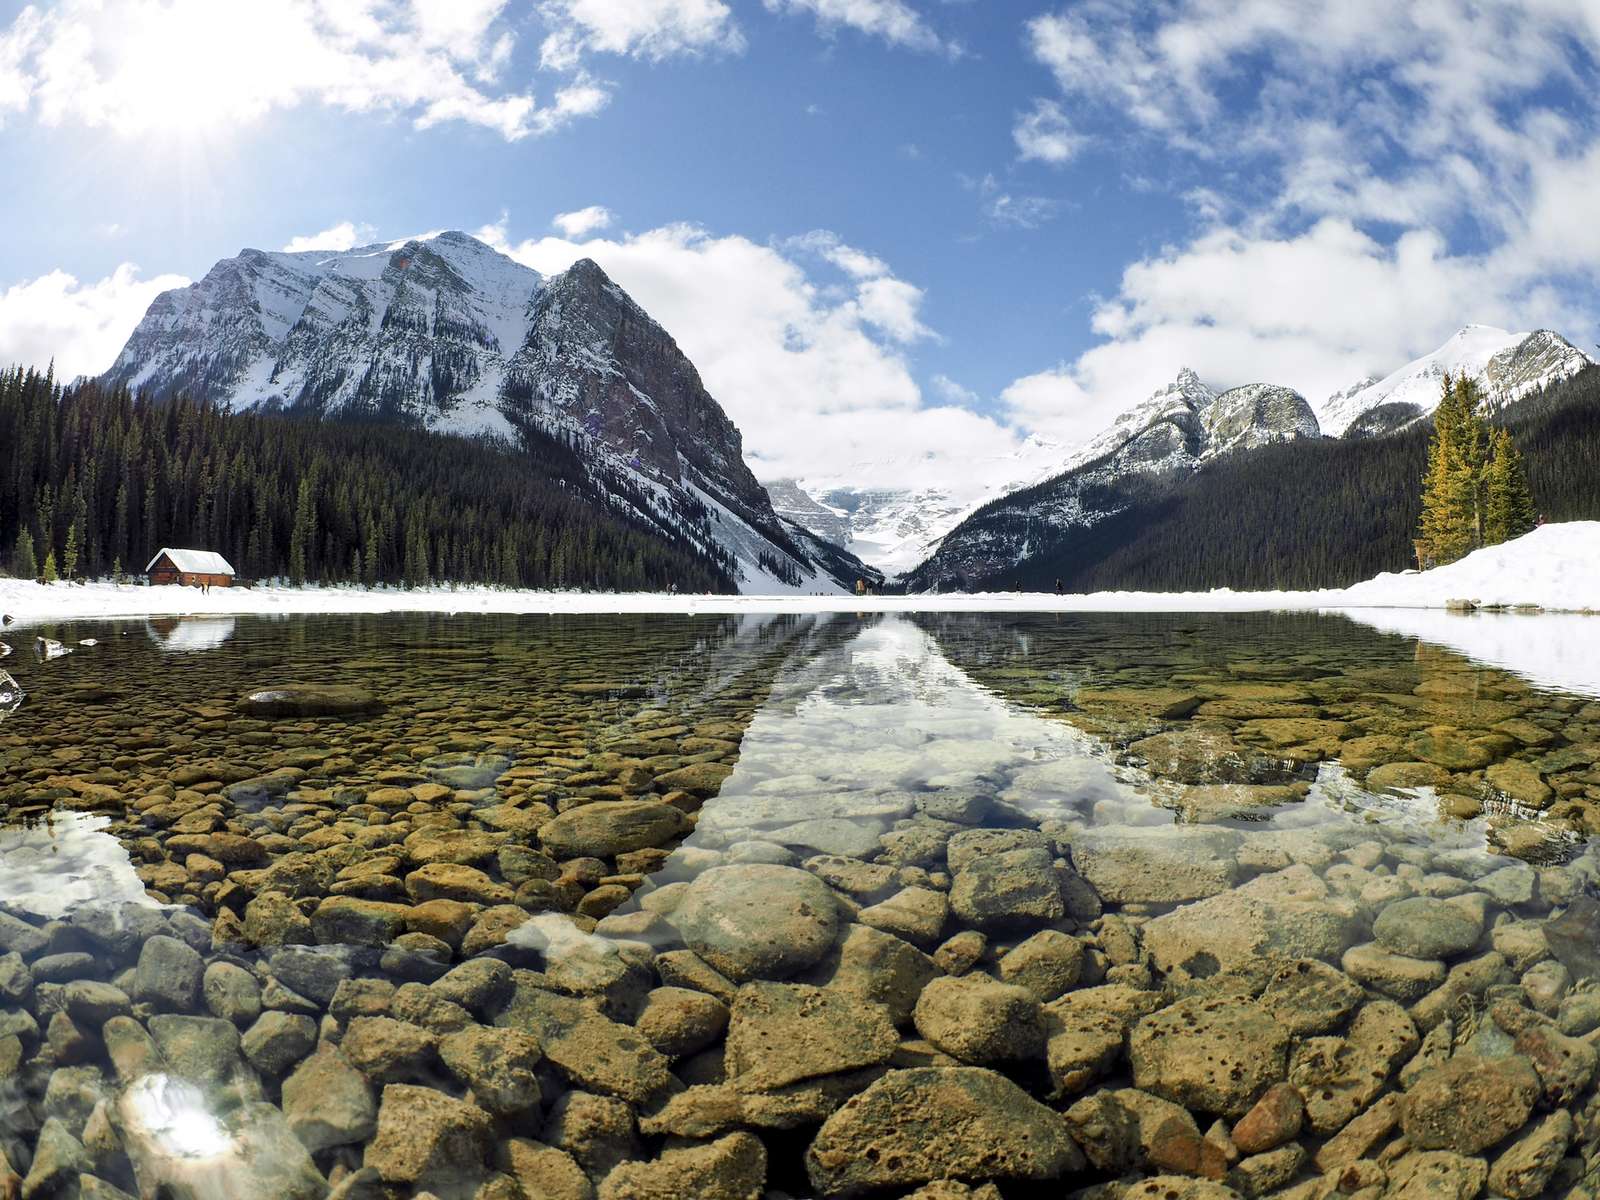
If you want to avoid the obvious distortions that fisheye lenses are known for, there is a very easy fix - place the horizon line dead centre. This doesn't mean that no distortion exists, it's just not as obvious. It works particularly well with irregularly shaped objects such as rocks, hills, clouds, etc. With more linear objects; trees, buildings, roads, bridges and the like, the curve becomes more pronounced the closer that object is to the edge of the frame or the larger it is within the frame. For example, in the sample images you will notice that the smaller trees near horizon line show no obvious curvature while the buildings that are a bit larger do show some.
One of the compositional rules that many landscape photographers follow is to never put the horizon in the centre (that whole Rule of Thirds thing). This, of course breaks that rule - sort of. When framing my subject I will try to put more weight into either the left or right half of the image and if possible into one of the corners. Another option is to crop some of the image in order to raise or lower the horizon - something I avoid if possible.
I find myself relying heavily on the built-in levels (both horizontal and vertical) on my Olympus cameras. It's a feature that I leave turned on almost all the time, regardless of which lens I'm using. (Am I the only one that struggles with maintaining a level horizon?)
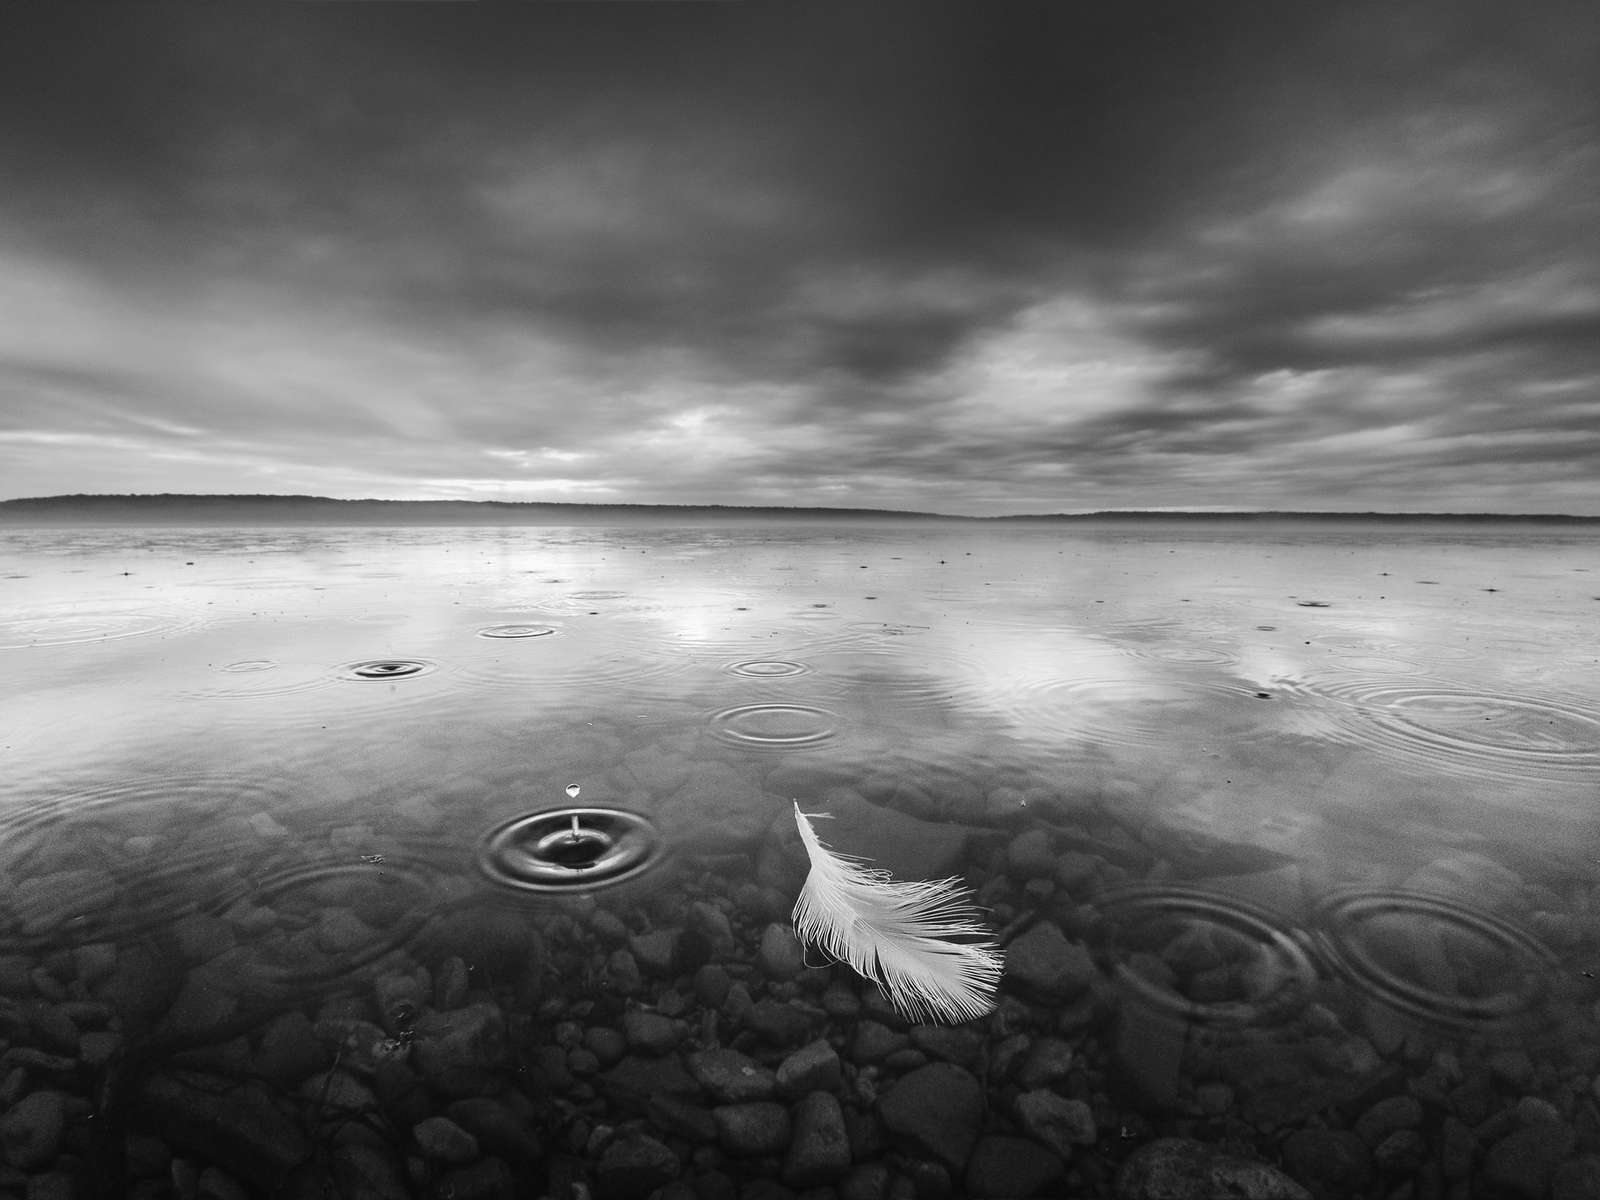
PURPOSEFUL DISTORTION
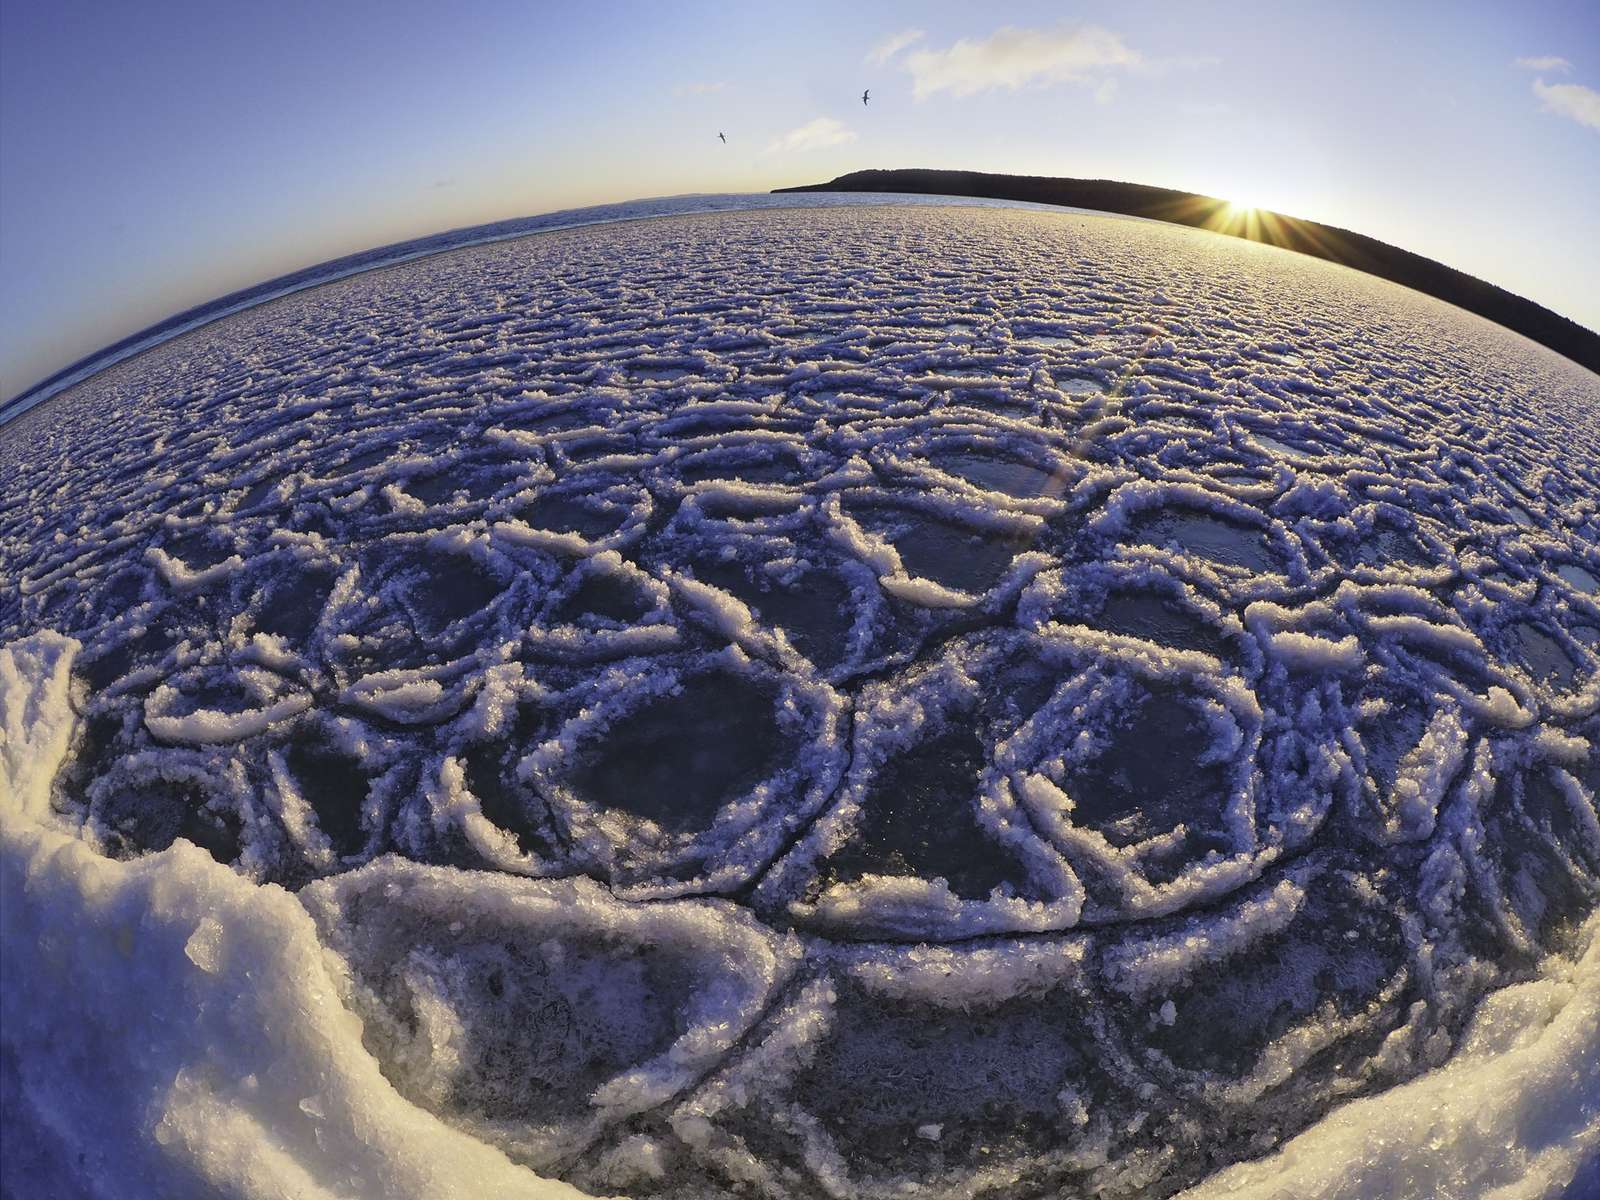
I have to admit that I am not a huge fan of the overly distorted look that can be achieved with a fisheye lens. But, it can work to your advantage. By purposely placing the horizon toward the top or bottom of the frame you can accentuate interesting patterns or perspectives. The image below is a perfect example of this. By pointing the camera down towards my feet I was able to emphasize the interesting, organic look of these icy donuts floating in a local bay. On my first attempt I placed the horizon in the centre, but wasn't all that impressed with the result.
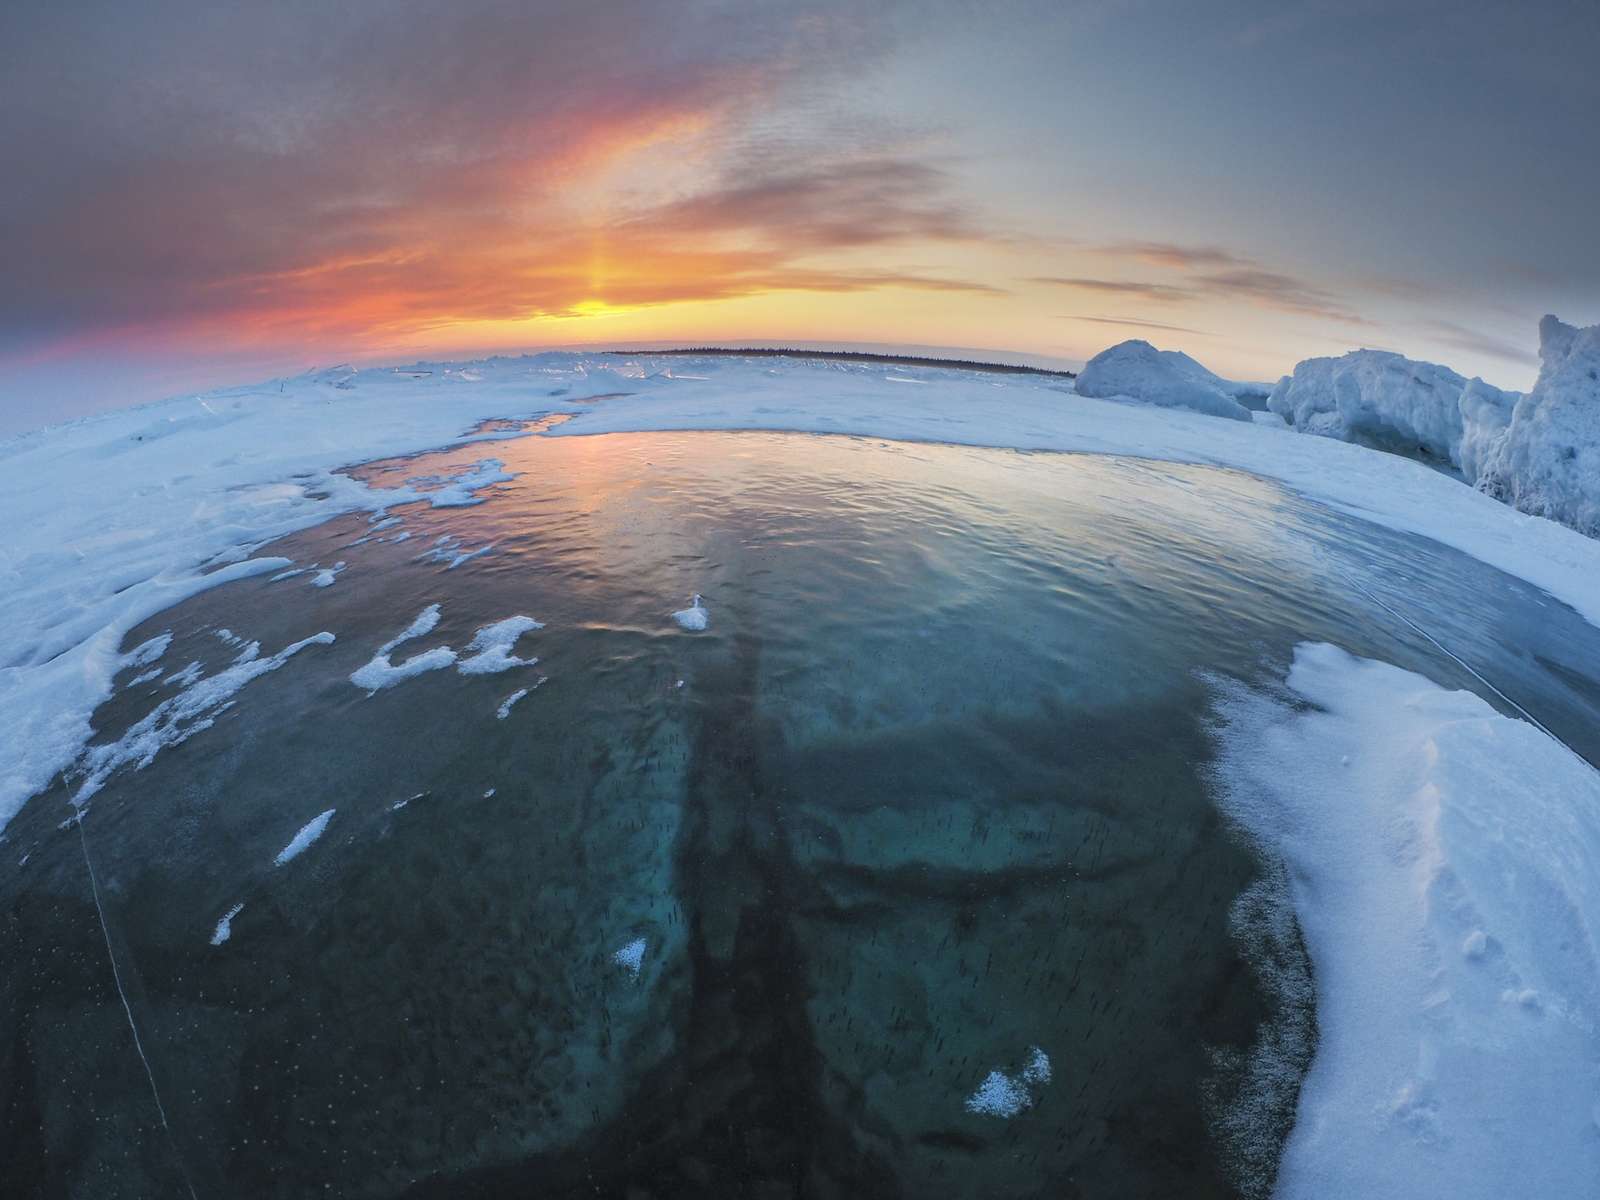
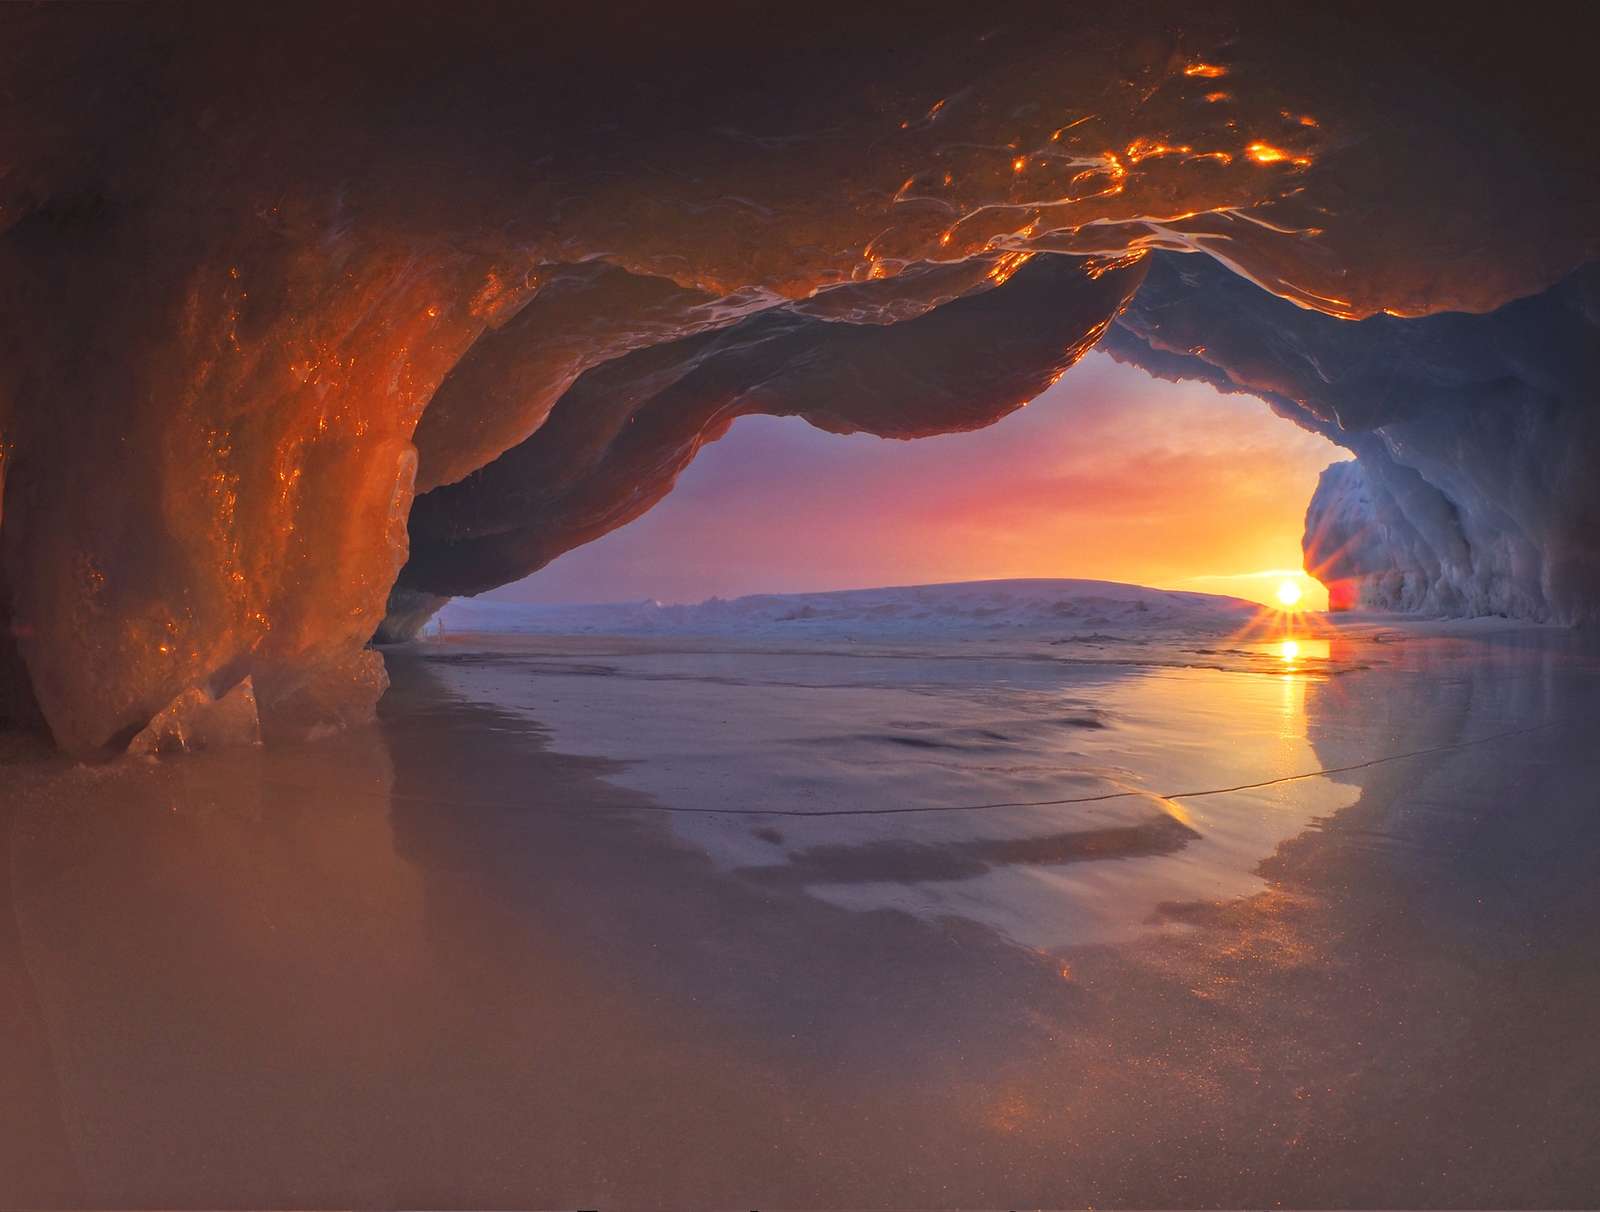
“In this shot I wanted to include the sunset, the icy cliffs, and most importantly the interesting rocks that I could see through the ice.”
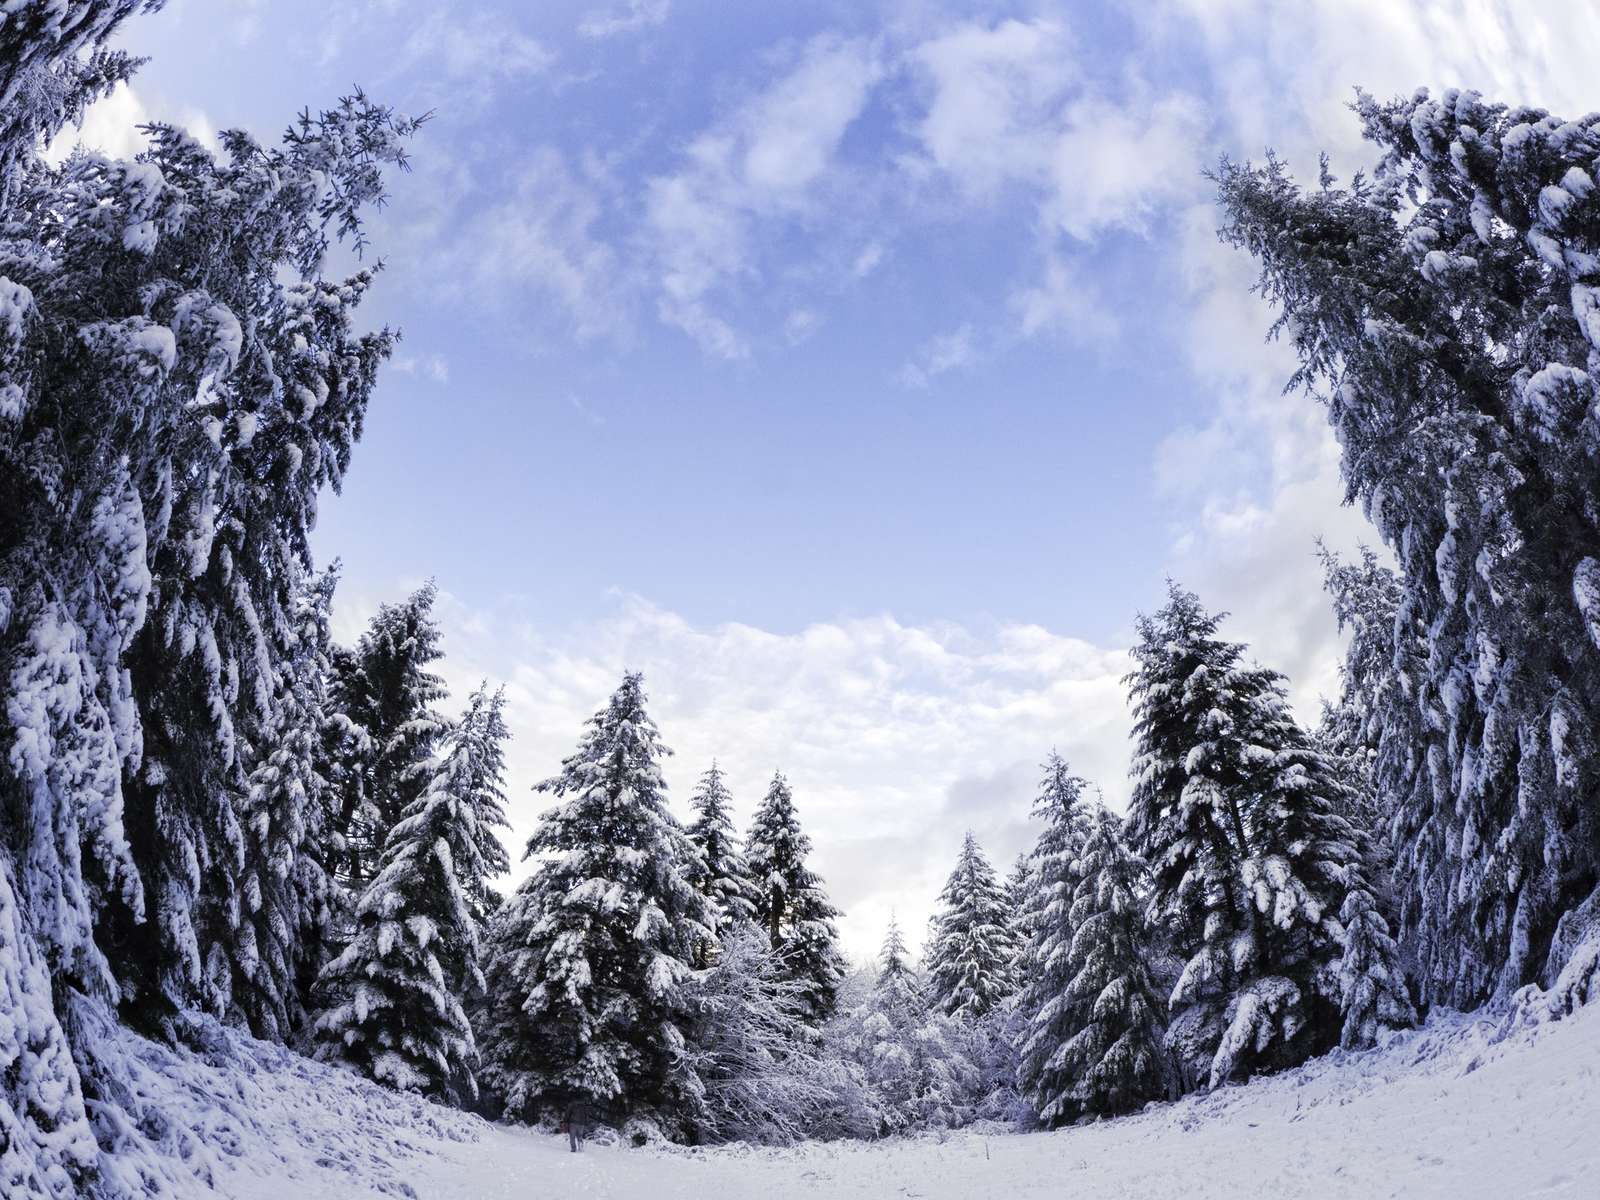
“I liked the converging look of these snow-covered conifers that the fisheye delivered.”
TIGHT SPACES
This is one of those situations where a fisheye lens really shines and is perhaps the best use of this lens. As a landscape photographer I am generally interested in capturing more expansive scenes, but on occasion I find myself in rather tight quarters, ones where even an ultra wide-angle lens won't do it justice. A couple of personal situations help to illustrate the point.
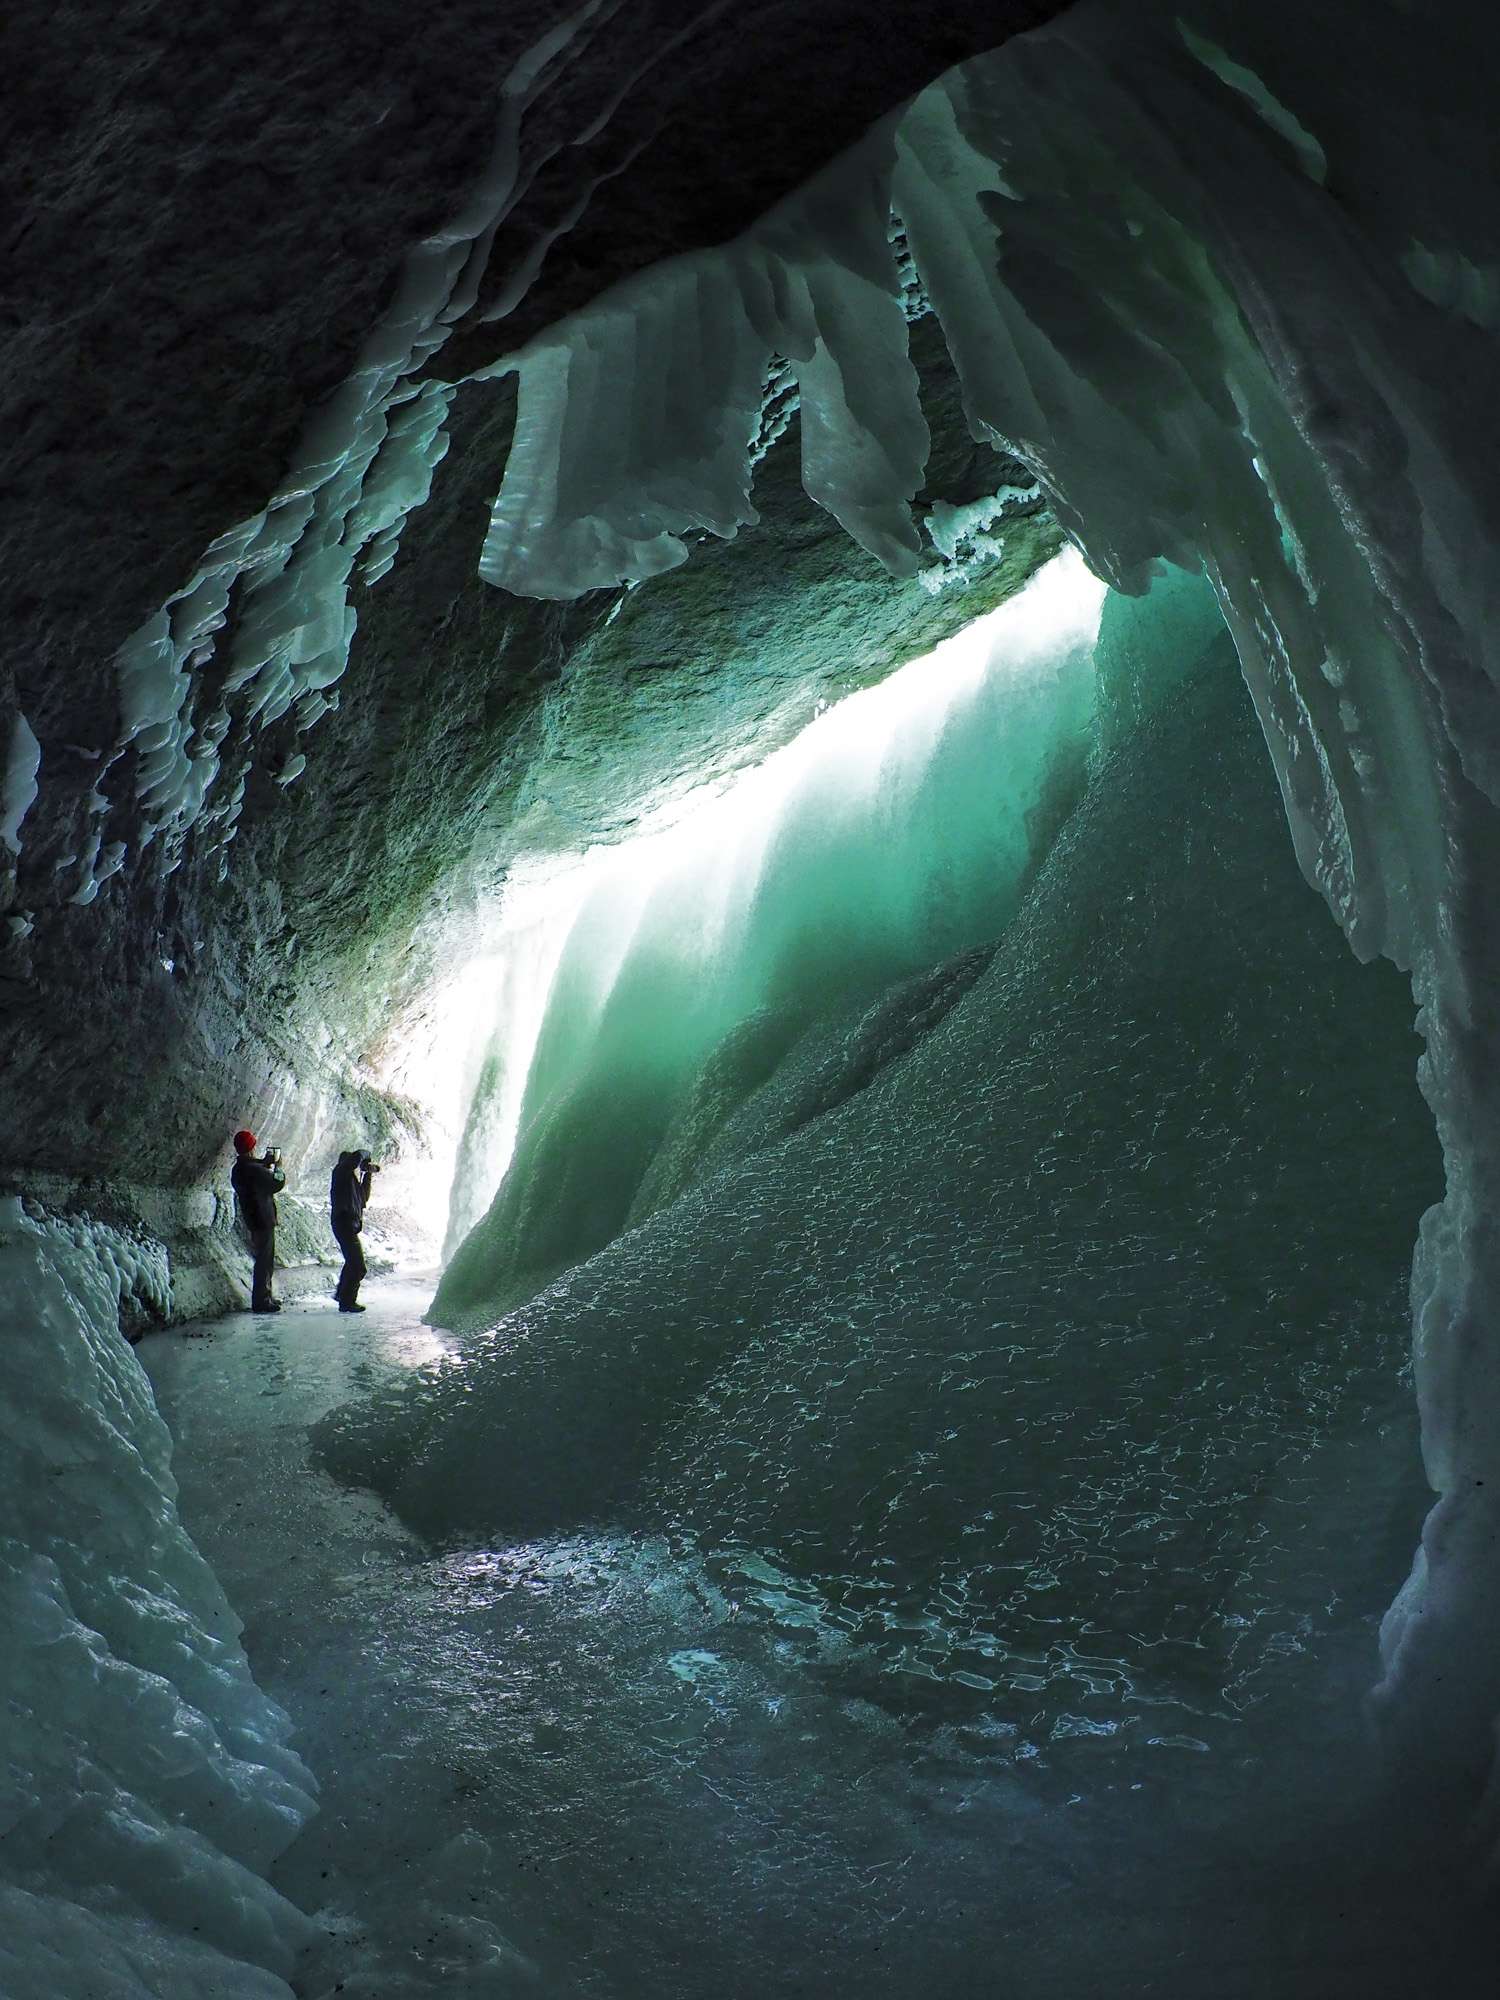
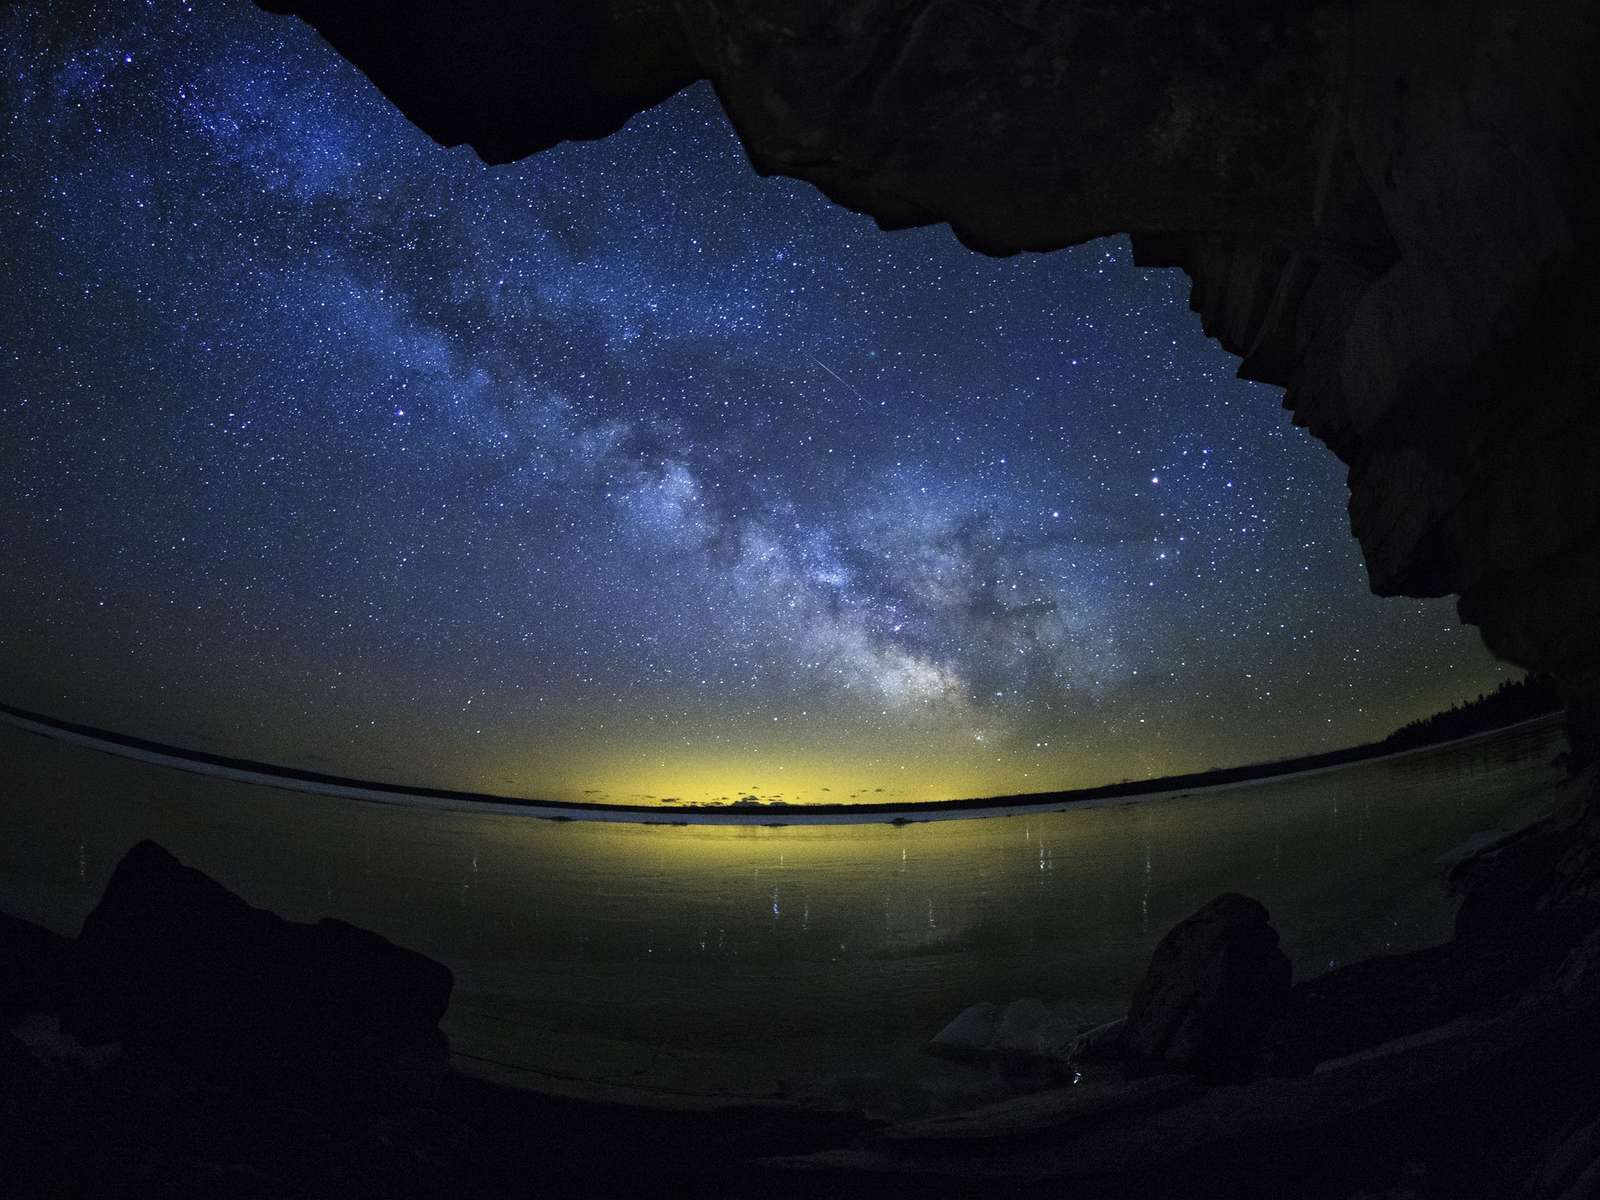
During a severe Canadian winter, we will get some impressive ice features forming on the southern shore of the island that I live on. Tiny ice caves can form that make for great subjects. The image below is a case in point. I had to crawl into this cave on my belly in order to shoot this. Having a fisheye lens allowed me to capture the entire cave - something I would not have been able to accomplish with a wide-angle lens. The added benefit to a fisheye lens is that it makes things appear larger than they really are since you are squishing a massive field of view into a single frame.
Each winter, one of the waterfalls close to where I live freezes almost solid, creating a thick curtain of ice. It is relatively easy to walk behind, but difficult to photograph in because of the cramped quarters. Again, the fisheye lens allows the capture of an incredible field of view, all in a single image.
THE URBAN LANDSCAPE
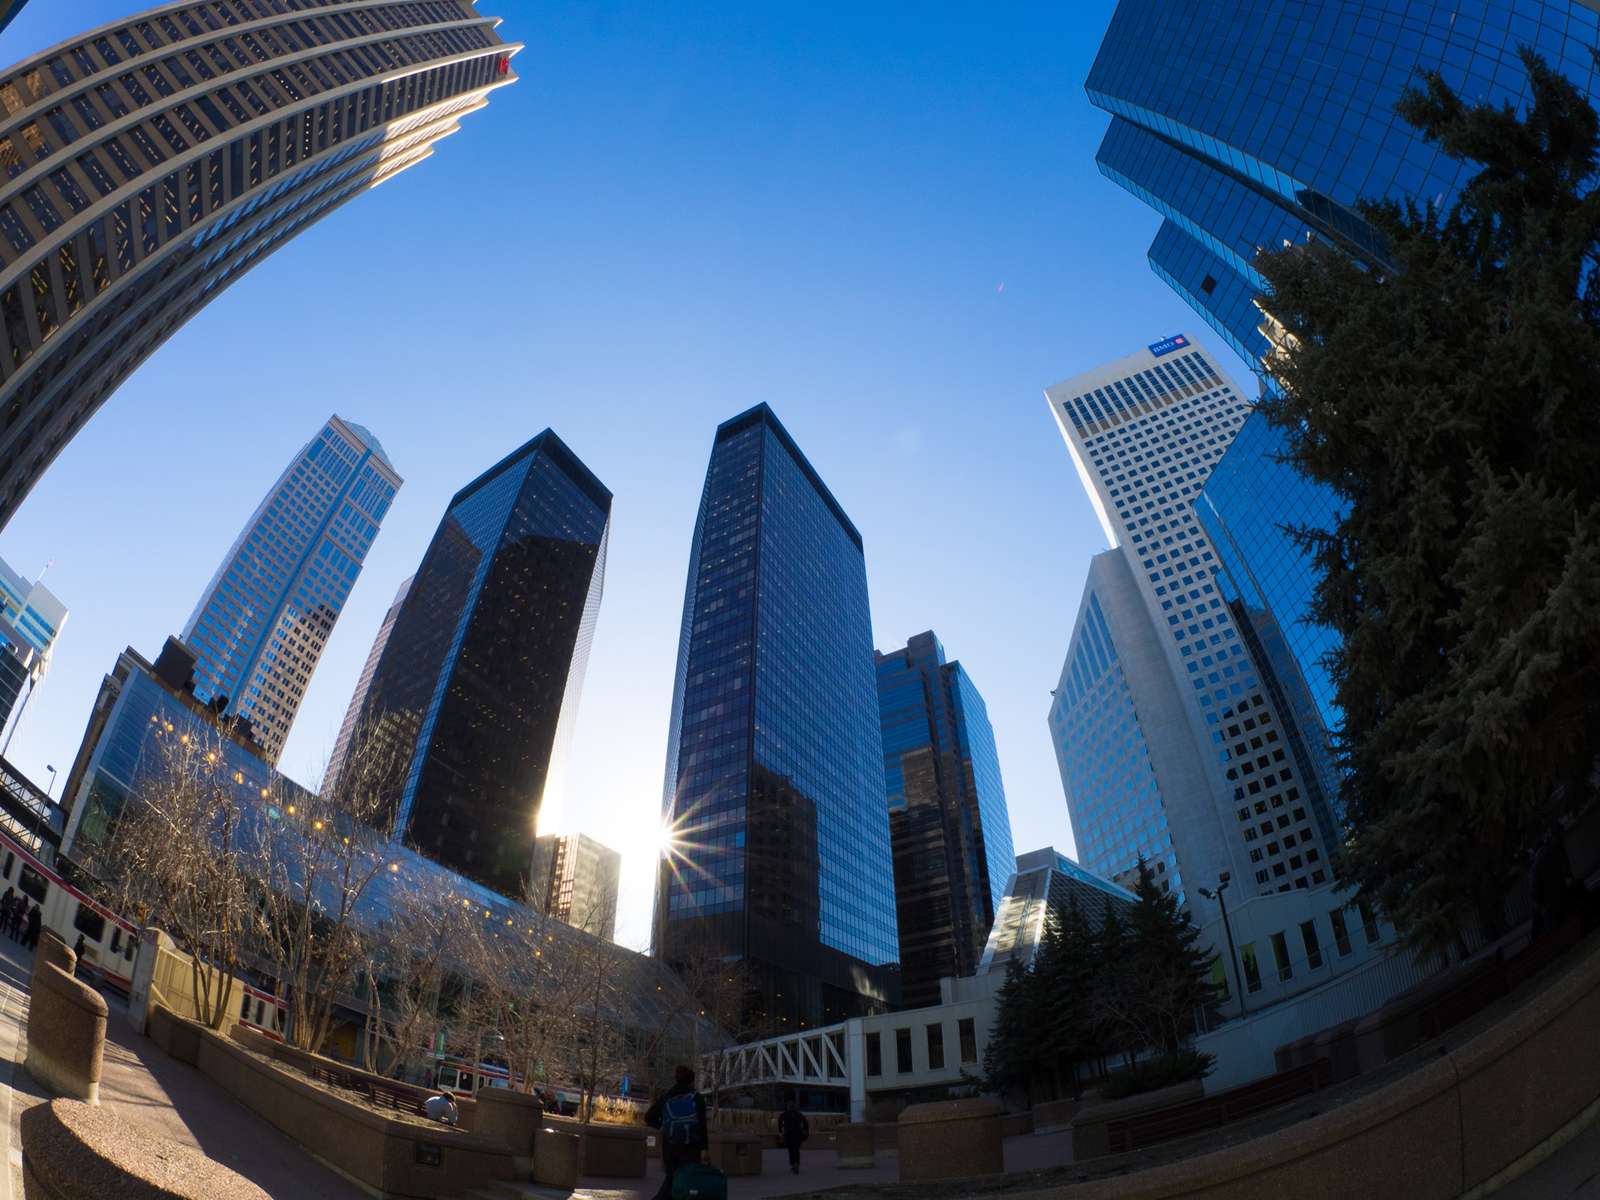
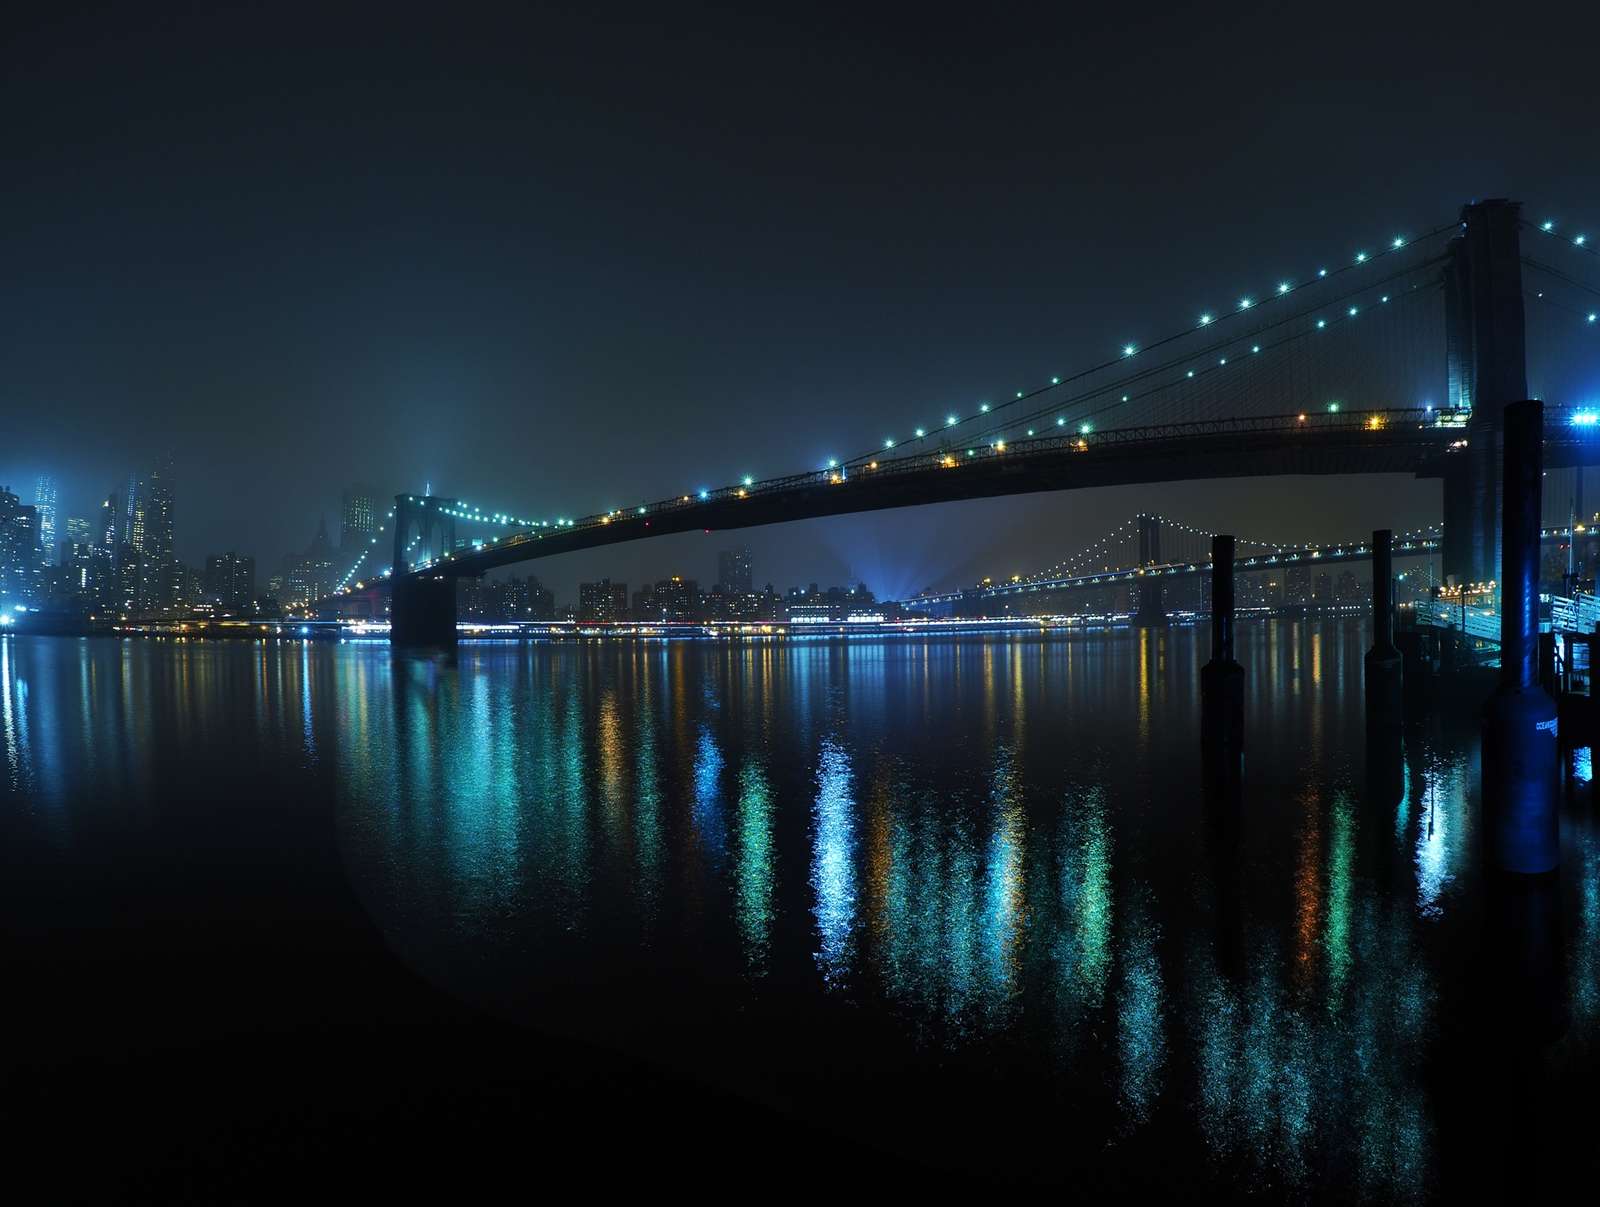
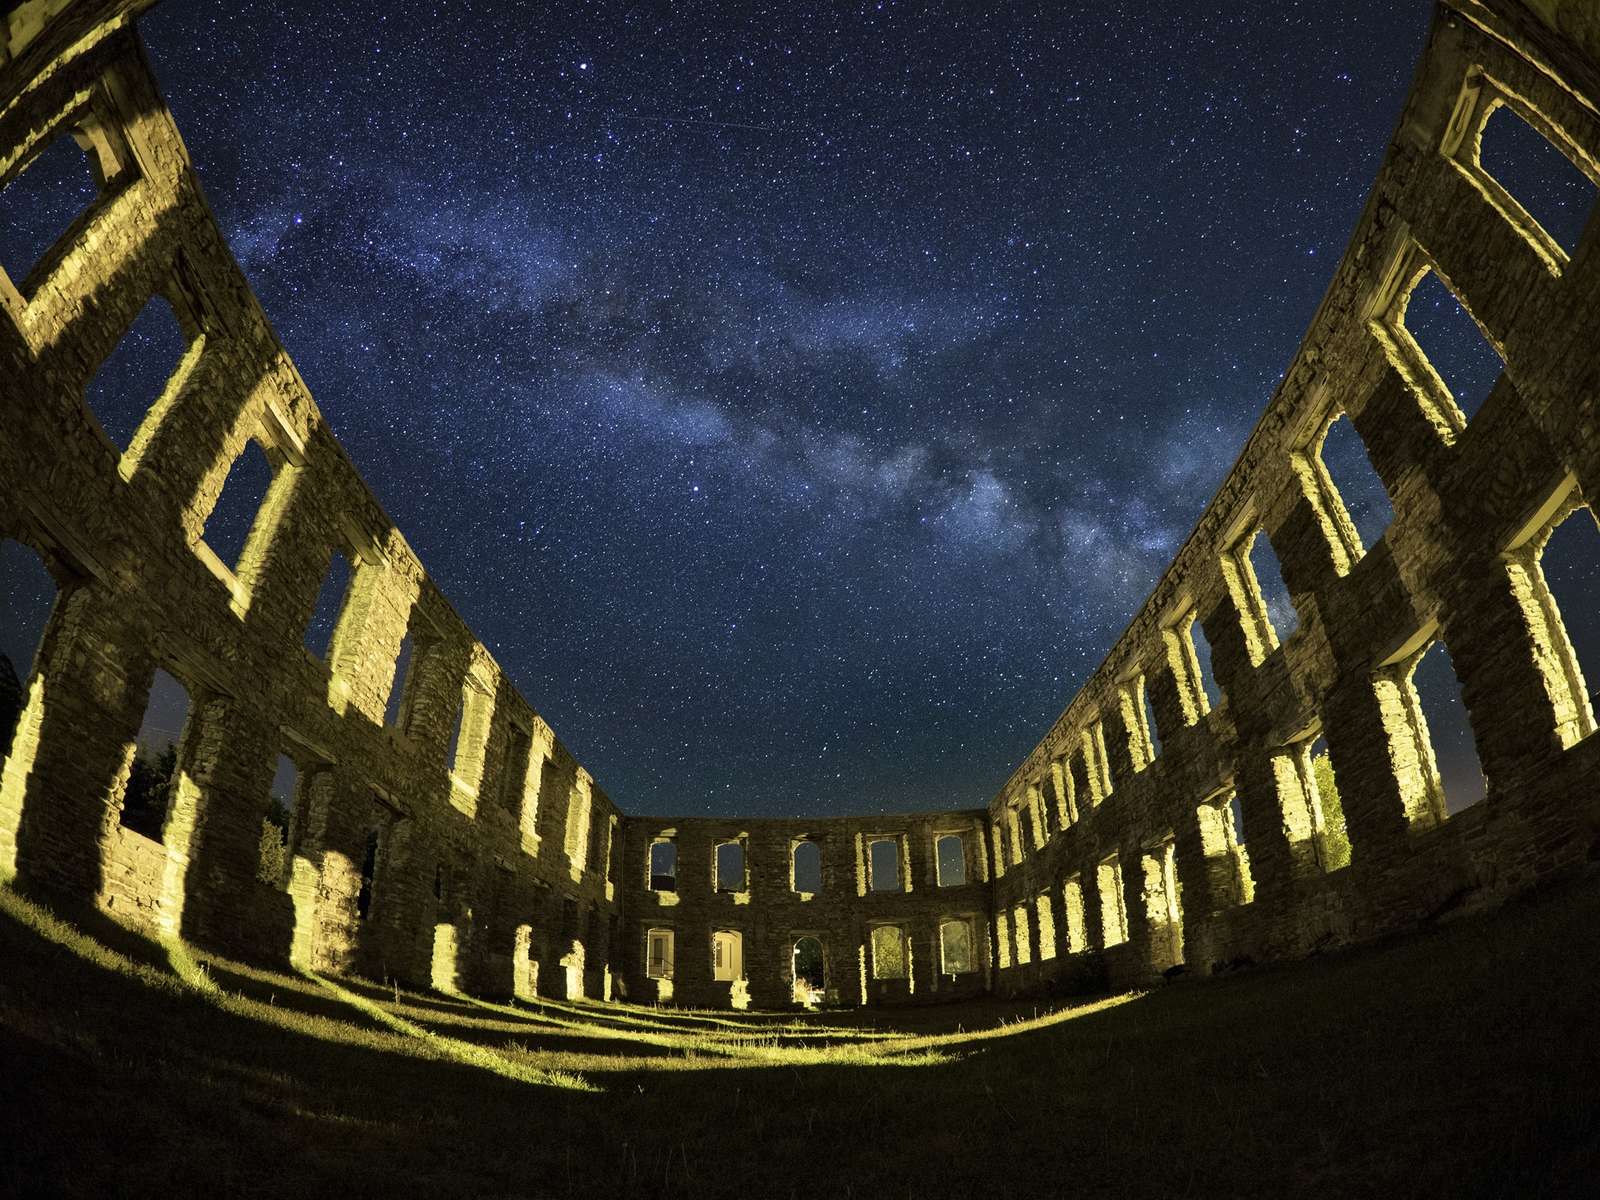
Shooting in urban settings with a fisheye is perhaps the most challenging one for me, mainly because I don't get to the city all that often. I live in a very rural area, and given the choice, I much prefer a wilderness area to photograph in than the urban jungle. For my regular landscape shooting, I choose the fisheye lens in order to capture more of the scene and squeeze it into the frame. When I grab that lens in the city it is usually a creative decision. The image below is such an example. I rather enjoyed the curved look of these skyscrapers in Calgary. For the photo below that however, the bridges and buildings of Manhattan were far enough away that I could avoid the overly distorted look. As well, I was able to keep the horizon close to the centre of the image.
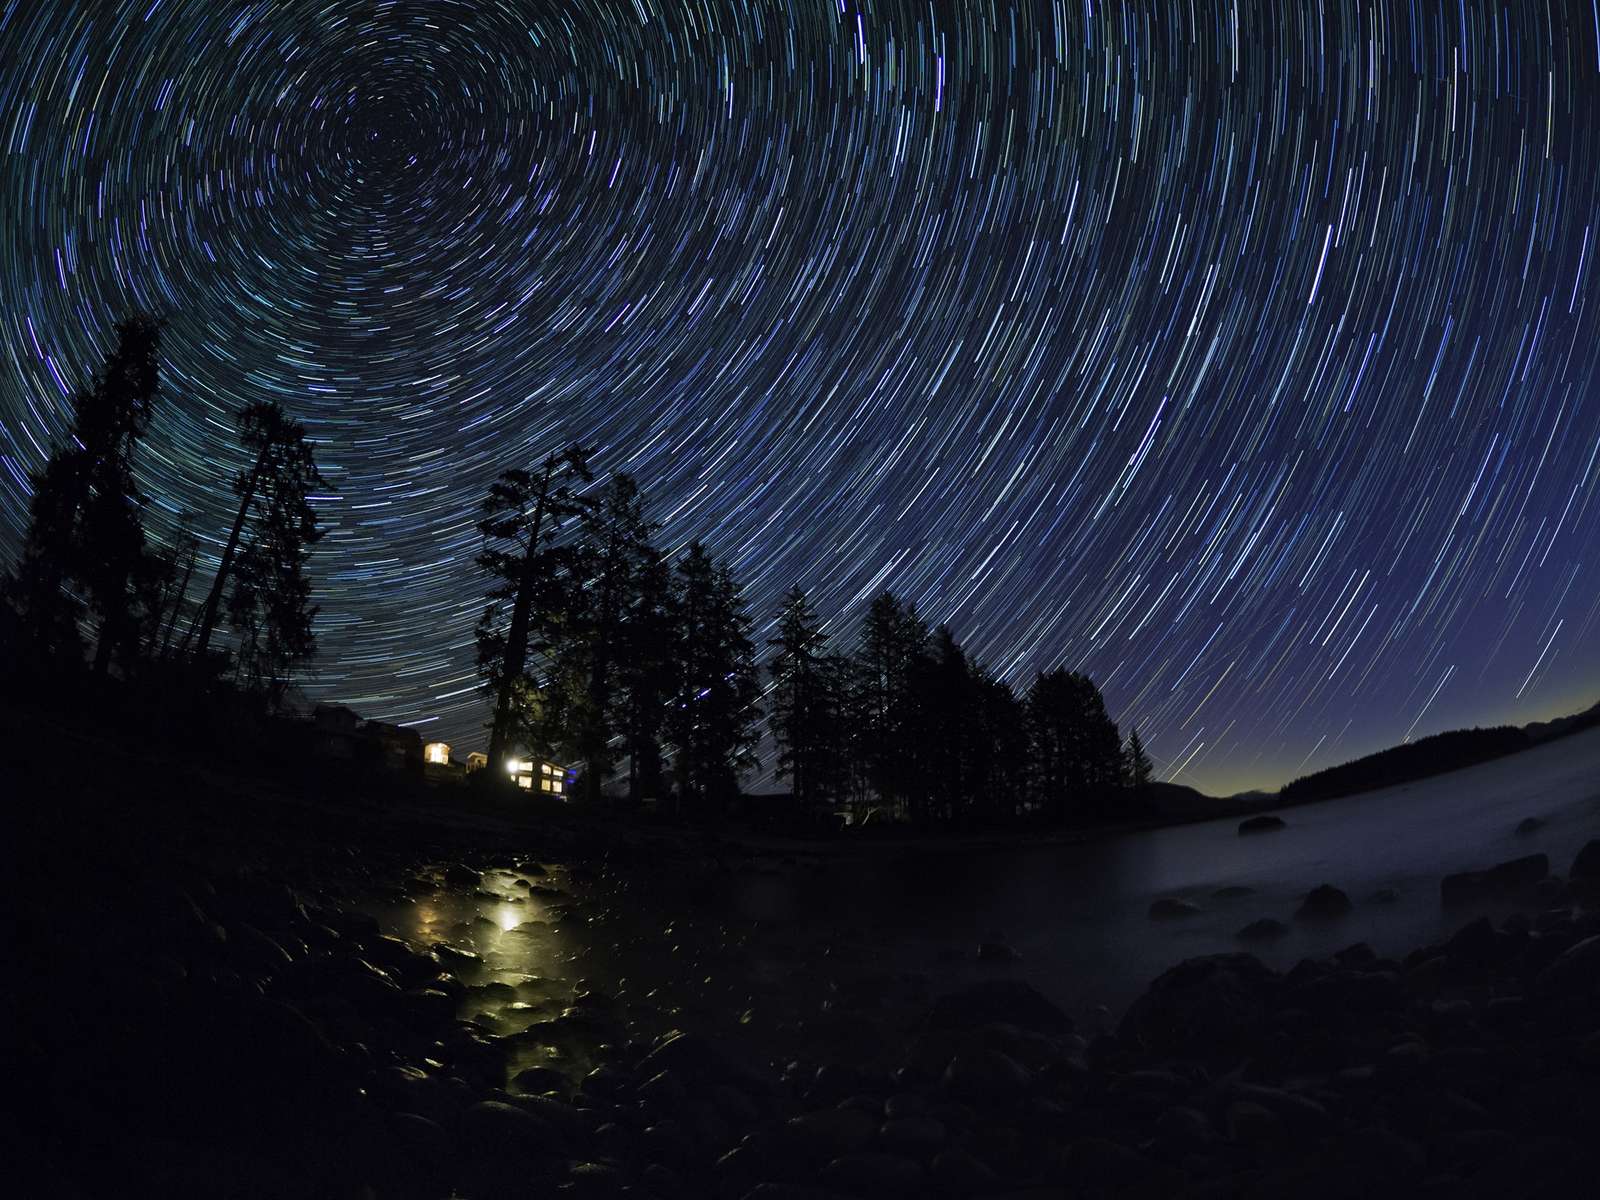
Once the sun has set and the sky has darkened, that's when my fisheye lens really gets a chance to come out and play. When I see the Milky Way stretching across the night sky it's a natural fit to go for the widest view possible. The M.Zuiko 8mm f1.8 is also the fastest fisheye on the market today. That gives it incredible light-gathering power for my astrophotography. I'm not sure why, but in most cases I don't even mind the warped horizon line since I rarely put it in the centre.
CLEANING YOUR FISH
When I reach into my camera bag to pull out my fisheye lens, I completely understand the potential for distortion and am usually happy to live with the results. That is not always the case, however. There are times when I am looking for the very wide field of view yet also want little tono obvious distortion. That's when I will de-fish the image. There are a number of ways to skin a cat, or de-fish a photo. This section alone could be a lengthy article so I will only give the methods a cursory look.

USING LENS PROFILES IN LIGHTROOM
This is the easiest method, but one I rarely use. I will get to why in a moment. But first some background. Most wide-angle lenses are rectilinear. This means objects with straight lines (buildings, trees, the horizon) remain straight in the final image. The lines may end up converging or diverging a fair degree, but they remain straight. With a fisheye lens, they don't. Even the widest rectilinear lenses only have a field of view of about 120º - very wide, but not as wide as a fisheye lens with a field of view of 180º. Within the Develop panel of Lightroom you can select one of the available fisheye lens profiles and your fisheye photo will become a rectilinear one. This will straighten your horizon, and other lines, but in the process it will dramatically crop the photo, thereby reducing your field of view. This is the reason that I rarely use this option. If I wanted a narrower field of view I would just use a regular ultra-wide angle lens. It is worth noting that not all lenses are listed within Lightroom. I shoot with Olympus lenses and none of these are listed. Why? Olympus lenses are already optimized for digital photography, unlike the legacy glass of many other manufacturers.
THE WARP TOOL IN PHOTOSHOP
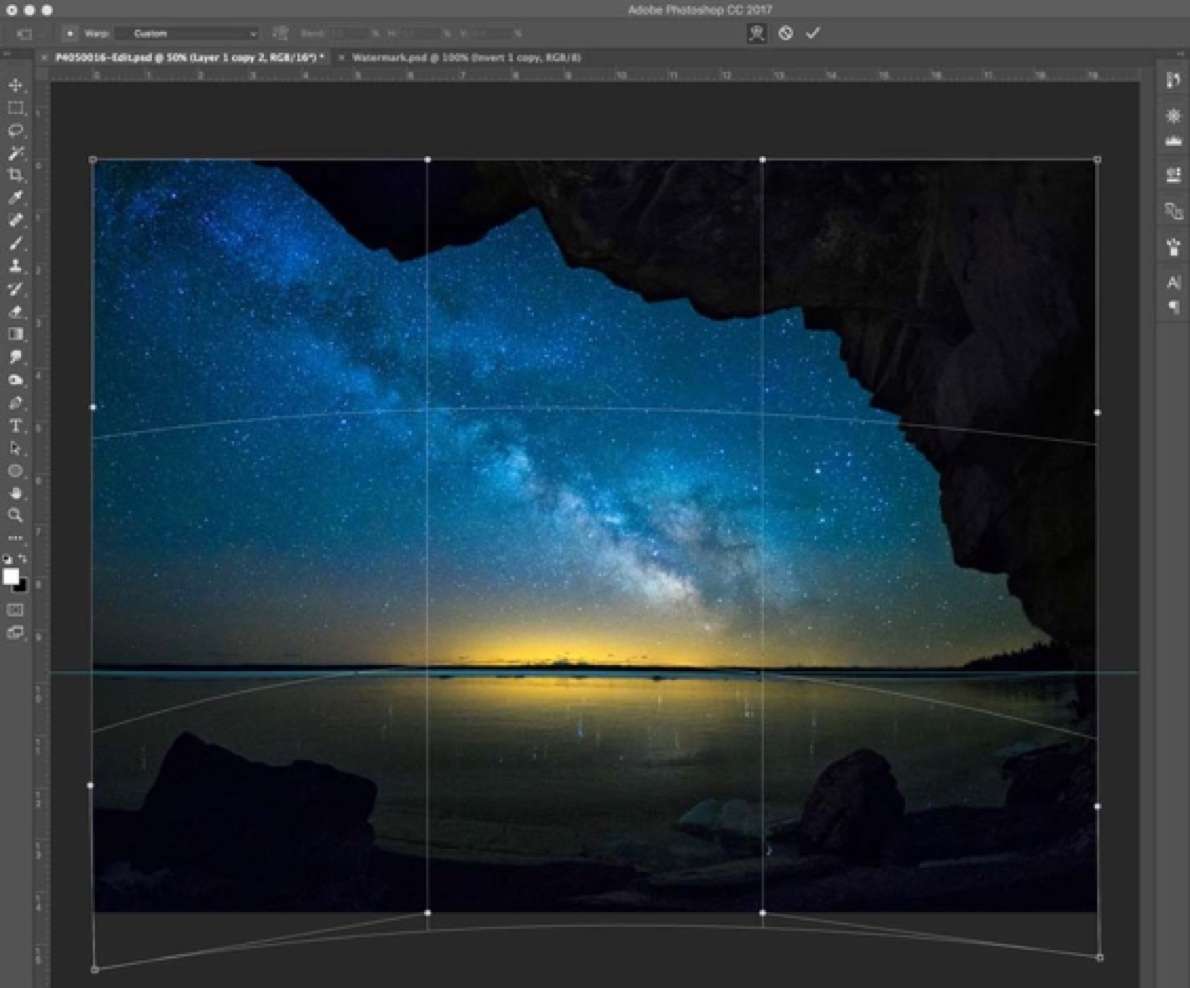
This is my preferred method. Photoshop has a number of built-in Transform tools that allow you to change the shape of whatever layer you are working on.The Warp tool provides the the most "flexible" option (pun intended). Although this method is a bit more time-consuming, it puts me in complete control and more importantly gives me the freedom to only adjust the sections of the photo that I feel need it. Let's look at one example.
For the nightscape below I crawled under a cliff face that helped to nicely frame the Milky Way. In this case I definitely did not want the horizon line in the centre of the image, thereby creating an obvious curvature.
After a bit of post-processing in Lightroom, I brought the image into Photoshop and duplicated the image onto a new layer. I then dragged a horizontal guideline (in light blue) down toward the horizon. Within the Transform menu I selected Warp and dragged the handles on the left and right sides of the image in order to straighten it. The guideline became the frame of reference. You may need to play around with other sections of the photo as well, or repeat the process a second time in order to tweak it.
Once you are satisfied with the results, accept the transformation and remove the guideline. By making an initial copy of the photo you have a before and after image to compare. As well, you can always revert back to the original should you wish to.
But doesn't this create a loss of image quality in the stretched areas? Yes, it does. There is a very slight stretching of the stars (and I do mean very slight). It is far less than you would get with a lens correction profile or even with some wide-angle lenses that suffer from pronounced coma along the edges of the frame.

There are other defishing options as well. One is to use Imadio's Fisheye-Hemi software. It can be downloaded and used as plug-in for Photoshop. Olympus also has a defishing tool within the Olympus Viewer 3 app. It works quite well with both auto (one-click) and manual options for adjusting your image. (Editor's Note: If you have the latest firmware for the OM-D E-M1 Mark II, you can now defish images taken with the M.Zuiko Digital ED 8mm f1.8 Fisheye PRO lens right in your camera BEFORE you take the shot).
A FINAL WORD
When building up your arsenal of landscape lenses, a fisheye is unlikely to become your second or even third lens purchase. It is however, a lens that deserves some serious consideration, not only because of the incredible 180º field of view that it offers but, perhaps more importantly for me, the creative potential that it presents.