Tough TG-5 Support Topics
How do I attach the Flash Diffuser (FD-1) to the camera and what settings are required?
How do I attach the Flash Diffuser (FD-1) to the camera and what settings are required?
The following explains how to attach the Flash Diffuser (FD-1, sold separately) to the camera and the required camera setting.
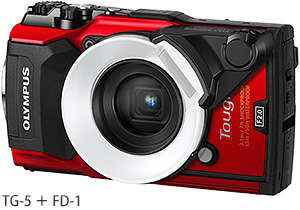
Attaching the Flash Diffuser (FD-1) to the camera
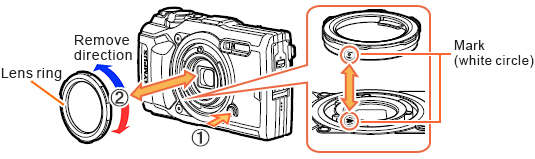
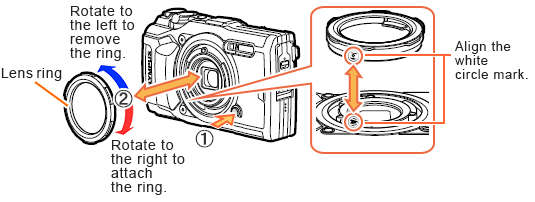
Before attaching the Flash Diffuser (FD-1) to the camera, remove the lens ring from the camera.
How to remove the lens ring:
To remove the lens ring, rotate the lens ring in the remove direction (to the left) while pressing down the remove button (![]() ).
).
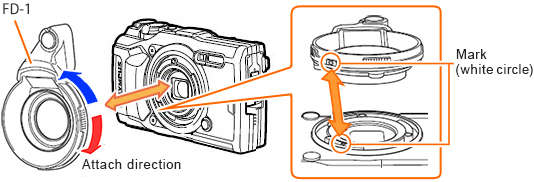
How to attach the Flash Diffuser (FD-1):
To attach the Flash Diffuser, align the white circle marks on the camera and Flash Diffuser, and then rotate the Flash Diffuser to the right until you hear a click.
Do not press the remove button while attaching the flash diffuser.
Note:
You can remove the Flash Diffuser and attach the lens ring in the same procedure.
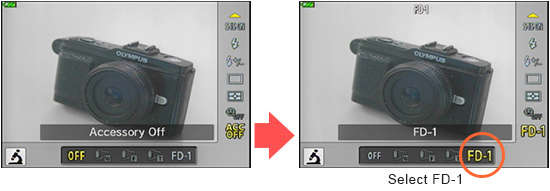
Required camera settings for the Flash Diffuser
For shooting in the appropriate settings using the flash diffuser, select FD-1 in the Accessory settings of the camera. You can change the Accessory setting in Live Control.
Note:
- You can change the accessory setting to FD-1 in shooting mode P, A and Microscope.
- Change the accessory setting to OFF when the flash diffuser is not used.
How do I attach a converter or a lens filter to the TG-5 using the converter lens adapter CLA-T01?
How do I attach a converter or a lens filter to the TG-5 using the converter lens adapter CLA-T01?
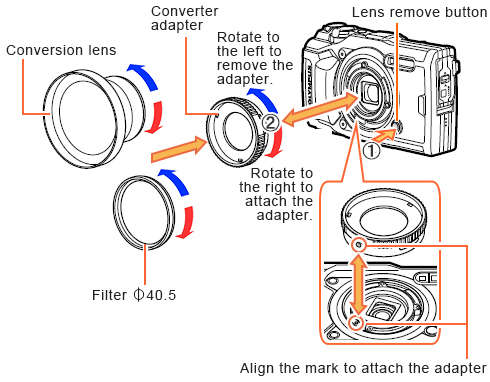
Converter lens adapter CLA-T01:

The converter lens adapter CLA-T01 (sold separately) is required to attach the Teleconverter TCON-T01 or Fisheye converter FCON-T01 to the TG-5. You can also use the converter lens adapter CLA-T01 to attach a 40.5 mm lens filter that is 6 mm thick or less.
Before attaching the CLA-T01 to the TG-5, remove the lens ring from the camera.
Note:
- A lens cap is included with the CLA-T01.
- The lens ring on the TG-5 is only cosmetic and has no effect on the waterproof or dustproof ability of the camera.
How to attach or remove the lens ring:
- To remove the lens ring, rotate the lens ring in the remove direction (to the left) while pressing down the remove button (
 ).
). - To attach the lens ring, align the white circle marks on the camera and lens ring, and then rotate the lens ring to the right until you hear a click. Do not press the remove button while attaching the lens ring.
How to attach a conversion lens / filter using the CLA-T01
- * You can attach and remove the CLA-T01 in the same procedure as attaching or removing a lens ring.
Note:
- Filters cannot be attached directly to the camera.
- When a filter that is 6 mm thick or more is attached, vignetting may occur in the corners of the images. In that case, use a thin mount or slim type of filter instead.
- The image quality when using a filter is not guaranteed.
- A filter and a Fisheye converter FCON-T01 cannot be used simultaneously.
What types of JPEG image modes are available?
What types of JPEG image modes are available?
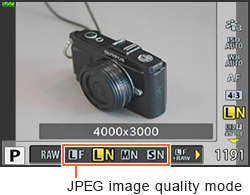
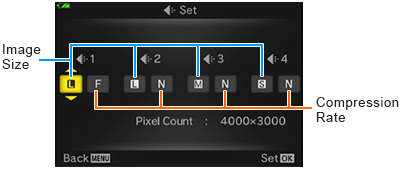
The default "image size and compression" combination for the JPEG image quality mode are L-F, L-N, M-N and S-N.
If you want to shoot, for example, in SF (Super Fine) compression, change the setting to the desired combination.
You can set 4 JPEG image quality modes in image quality setting. 12 JPEG image quality combinations are available, selecting from 3 types of image size (L, M, S) and 4 types of compression (SF, F, N, B).
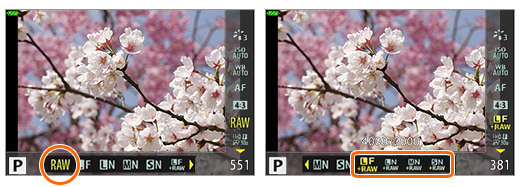
How to set the image quality mode to RAW
You can change the image quality mode to RAW or RAW+JPEG in Live Control. Press the [OK] button to display the Live Control and select the desired image quality.
- * If the image quality mode is set to RAW, image size (4000 x 3000) and compression mode cannot be changed.
- * This page explains the image quality setting for changing the combination of JPEG image quality modes.
Available Size and Compression for JPEG Image
| Size of JPEG Image | Image Size (Pixel Size) |
|---|---|
| L (Large) |
4000 x 3000 (12 million pixel) |
| M (Middle) |
3200 x 2400 (7.68 million pixel) |
| S (Small) |
1280 x 960 (1.22 million pixel) |
| Compression Mode | Compression Rate |
|---|---|
| SF (Super Fine) |
1/2.7 |
| F (Fine) |
1/4 |
| N (Normal) |
1/8 |
| B (Basic) |
1/12 |
How to change the combination of JPEG image quality mode
Press the [MENU] button. In ![]() (Custom Menu), select E.
(Custom Menu), select E. ![]() /WB/Color. In
/WB/Color. In ![]() Set, change the image size and compression rate to the desired mode.
Set, change the image size and compression rate to the desired mode.
How do I change the position of the AF target mark?
How do I change the position of the AF target mark?
What is AF target selection
AF target selection (named AF Area in the camera menu) is a function to set the position of the focus point on the monitor.
In the TG-5, you can choose from 25 AF target marks (horizontal by vertical: 5 x 5).
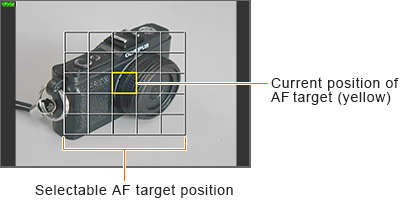
AF target selection (named AF Area in the camera menu) is a function to set the position of the focus point on the monitor.
In the TG-5, you can choose from 25 AF target marks (horizontal by vertical: 5 x 5).
This function is available when the AF Area is set to ![]() (Single Target).
(Single Target).
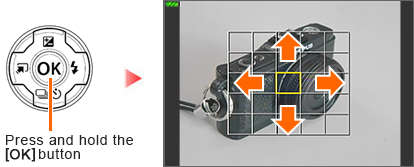
How to select AF target
If you press and hold the [OK] button for a few seconds, 25 selectable AF target points are displayed on the monitor. Use the arrow pad button to select the desired AF target point, and then press the [OK] button to complete.
Note:
- To select the central AF target point at once, press and hold the [OK] button for a few seconds while the 25 selectable AF target points are displayed.
- AF target selection is not possible in some scene modes.
- The default setting of AF Area is
 (Single Target).
I want to focus a subject manually. What should I do? [MF / MF Assist]
I want to focus a subject manually. What should I do? [MF / MF Assist]
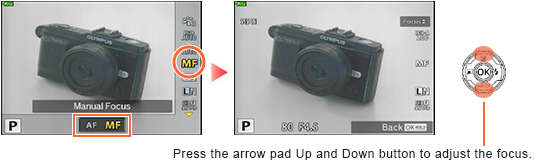
How to set manual focus
To adjust the focus manually, select MF in live control.
Press the arrow pad Up and Down button or use the control dial to adjust the focus of a subject on the monitor.
Press and hold the [OK] button for a few seconds when the adjustment is completed. To change the focus again, press and hold the [OK] button for a few seconds.
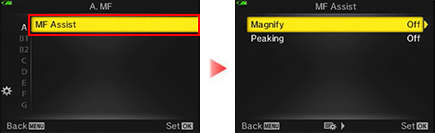
Related function for manual focus (MF Assist)
There are two functions in MF Assist that are useful for adjusting the focus on the LCD monitor; Magnify and Peaking.
Press the [MENU] button and select ![]() (Custom Menu). In A.MF, select MF Assist and press the [OK] button.
(Custom Menu). In A.MF, select MF Assist and press the [OK] button.
You can set each functions to On or Off. Both functions are set to Off in default setting.
Magnify
An enlarged image is displayed on the monitor when you press the arrow pad Up or Down button to adjust the focus manually.
When you press the [INFO] button while an enlarged image is displayed, you can shift the position of the enlarged image using the arrow pad button (Up, Down, Right and Left button). You can also change the magnification up to 14x by turning the control dial.

Peaking
When adjusting the focus manually in MF, points with clear outline (in focus) are highlighted in a selected color.
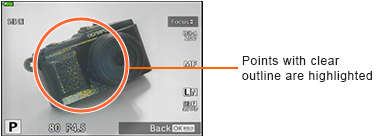
- * The peaking color in this image is Yellow. The default setting is White.
You can select a peaking color in the ![]() (Custom Menu). In B.1 Disp/
(Custom Menu). In B.1 Disp/ ![]() /PC, select Peaking Color. Four color choices are available: White, Black, Red and Yellow.
/PC, select Peaking Color. Four color choices are available: White, Black, Red and Yellow.
Note:
- When Magnify and Peaking are activated simultaneously, the outline may be hard to see depending on the subject.
- Manual Focus and MF Assist cannot be used in iAUTO
UPDATING YOUR FIRMWARE – READ THIS FIRST!
UPDATING YOUR FIRMWARE – READ THIS FIRST!
Please carefully follow the directions when updating your lens or camera firmware and keep in mind the following:
· Firmware updates can take several minutes or longer to complete. Do not disconnect the USB cable during the update process.
Once you see "OK" on the rear monitor, it is safe to disconnect the cable.
- Be sure to have a fully charged battery in the camera and installed Digital Camera Updater software. Follow the Download Firmware link on the product support page to obtain this software.
Olympus Technical Support is happy to help you through this process. If you would like assistance, please contact us.
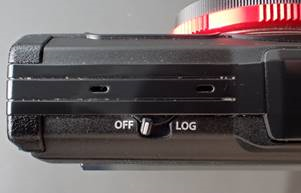
Why does the battery power drain quickly?
Why does the battery power drain quickly?
Please note that if you experience rapid battery drain in TG cameras the cause
could be the GPS logging feature being left on after the camera is switched off. The GPS will continue
to log and draw power from the battery even when the camera is off if the Log switch is left in the on position.
See image
Is a memory card (SD card) bundled with the camera?
Is a memory card (SD card) bundled with the camera?
No, the memory card is not bundled with the camera.
A separately sold SD card (SD, SDHC, SDXC card) is required for recording images or logs.
A separately sold SD card (SD, SDHC, SDXC card) is required for recording images or logs.
Note:
- TG-5 is not equipped with internal memory. Make sure a SD card is inserted into the camera.
- Use a speed class 10 or larger SD card for movie shooting.
- Use a UHS speed class rating 3 or faster UHS-I card in the following conditions:
- * When shooting in movie mode [4K] or [HS]
- * When shooting with the bit rate (compression rate) set to [Super Fine]