I've Been Framed!
Using a natural frame can dramatically improve your compositions, and it's a technique that I use quite often in my photography. While 'working a scene' I will try a variety of compositional techniques. I don't usually start by using a natural frame, but there are many cases where adding that frame improves the overall look that I'm trying to capture. Here is a case in point;
It was a beautiful June morning with a bit of mist hanging in the air. I took the short drive from my home to a meadow with an old barn in it, thinking this would be the perfect location. It certainly had potential. For my first shot I created a simple composition - grasses in the foreground, the barn in the distance and the early morning sun illuminating the mist hanging over the field.
I looked at the LCD, and was far from impressed with the shot. How could I make the scene before me more interesting?

1/30s | F10 | ISO 400
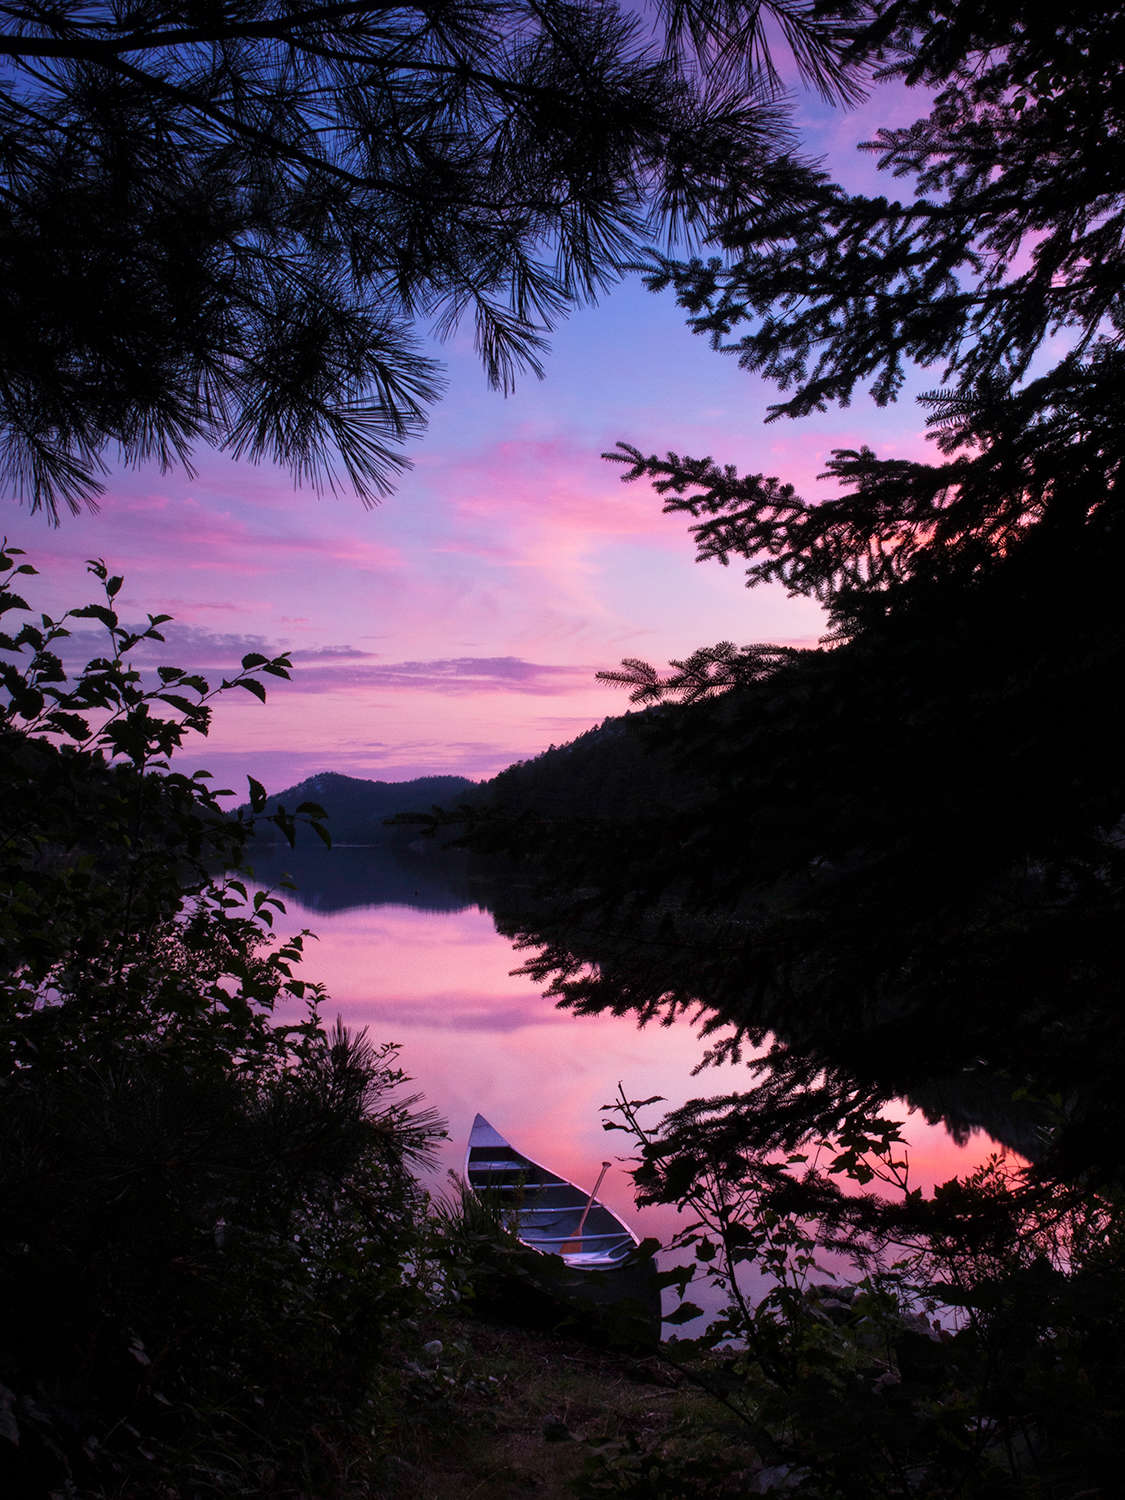
I looked over my right shoulder, saw some large maple trees and thought, maybe I could use those trees to improve the composition. I took a quick walk to the edge of the forested hillside, found some branches that were nicely arching overhead and recomposed.
Click!
Now this image I liked! And it’s in large part due to the natural frame.
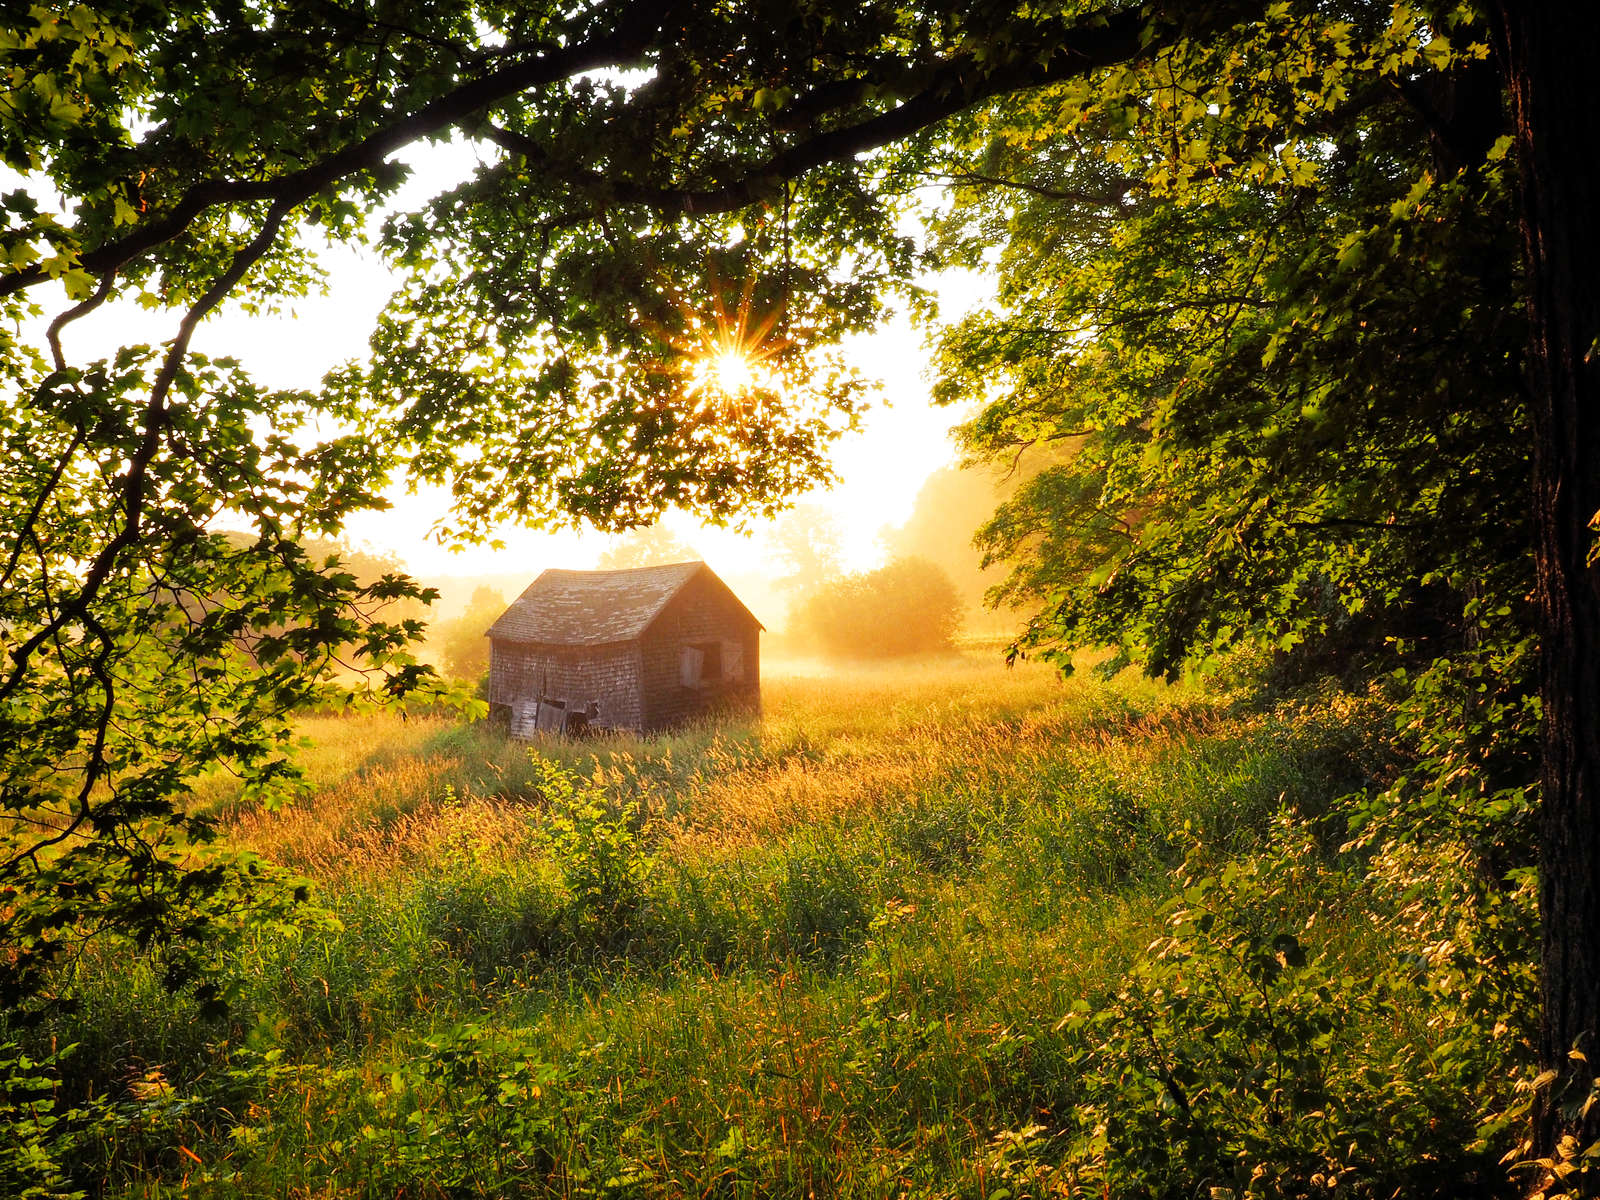
1/125s | F11 | ISO 400
Why Use Natural Framing?
Isolate Your Main Subject – Use a natural frame to focus attention on your main subject. I believe that a simple composition is often the best type of composition. Although adding the overhead branches adds more subject matter, it actually simplifies the scene when compared to the first shot. Adding the frame forces your eye to go where I want it to - the barn.
Increase Depth and Add Dimension - Every photograph is a two-dimensional representation of a three-dimensional world. Including a frame can increase the appearance of depth in your images. This draws the viewer into the photo where hopefully they will spend more time exploring the image.
When I came across the old farmhouse in the photo below it was a rather dull day with very flat lighting. I decided to use the Dramatic Tones art filter built into my Olympus camera to improve the overall look of the photo, It still looked too flat and dull. Then I realized that I was standing at the farmer's gate, so I bent down and used part of the gate to frame the shot.
To me, this was a far more interesting image. I added a great deal more depth to the shot, and, in a way, the frame became the more important subject (more on that later).
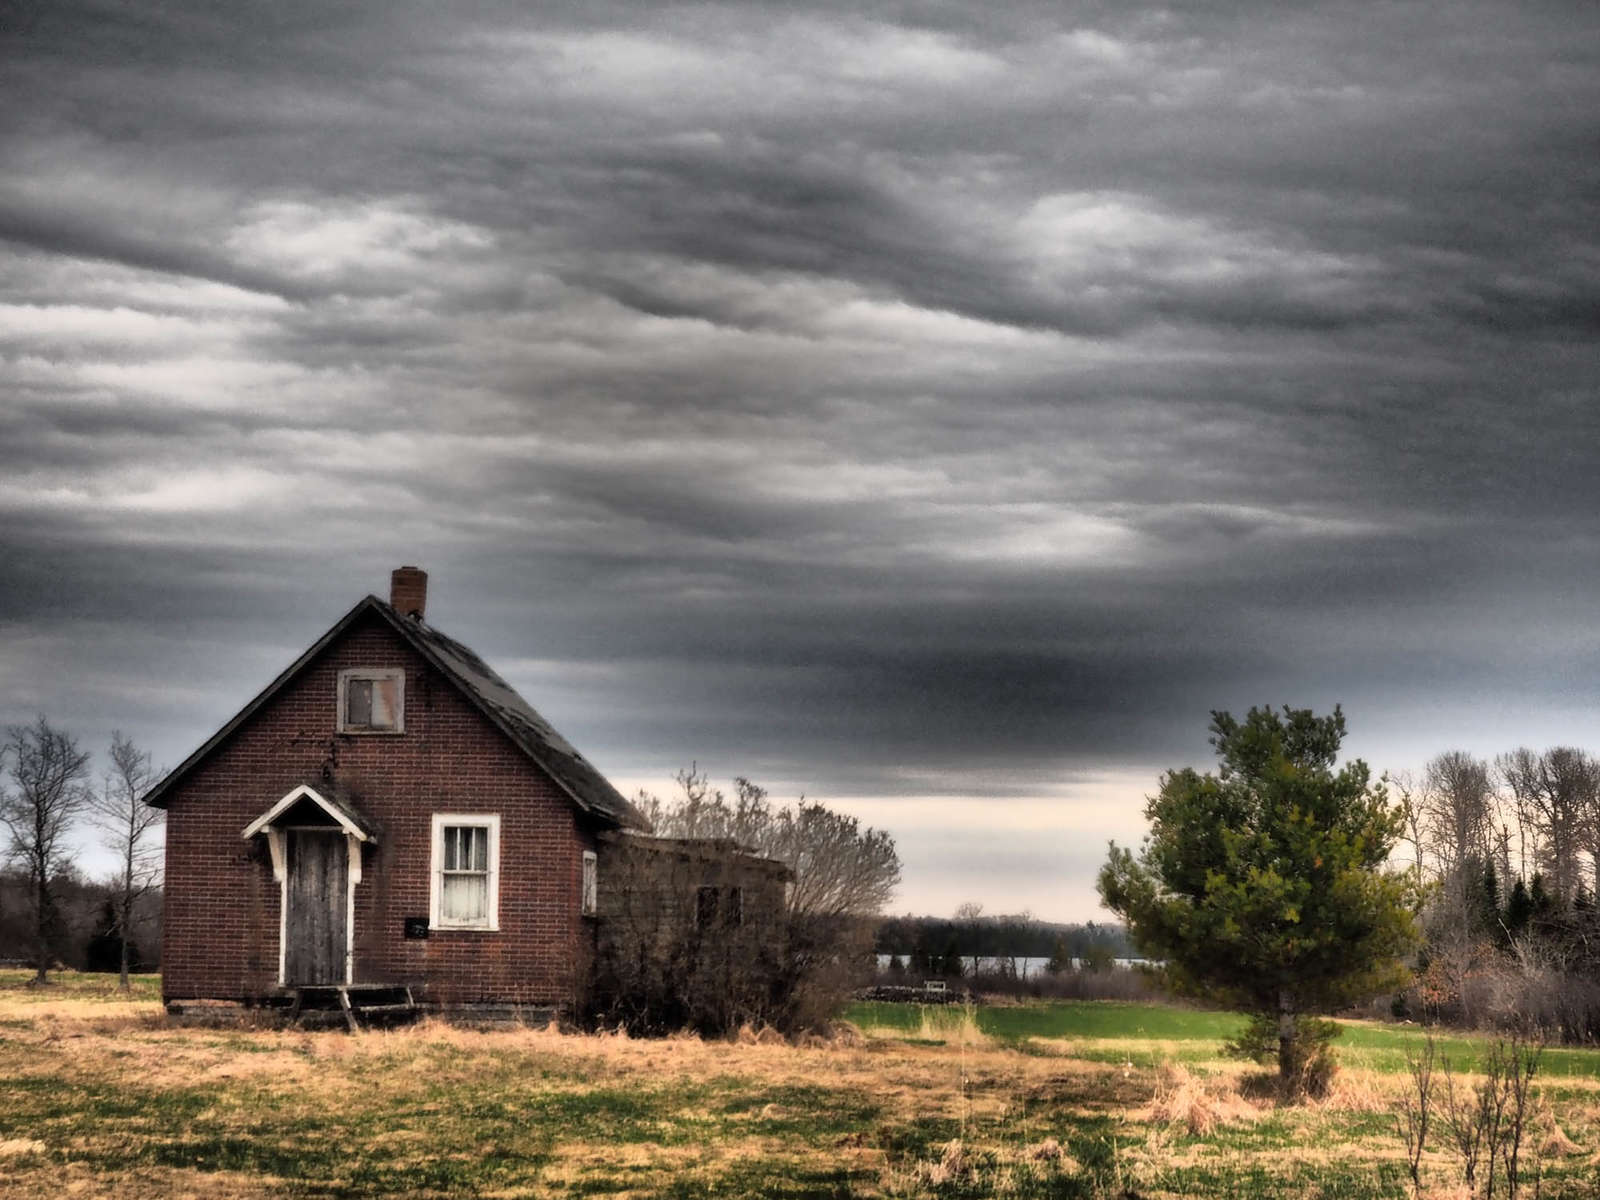
1/500s | F6.3 | ISO 400 | Dramatic Tone Filter
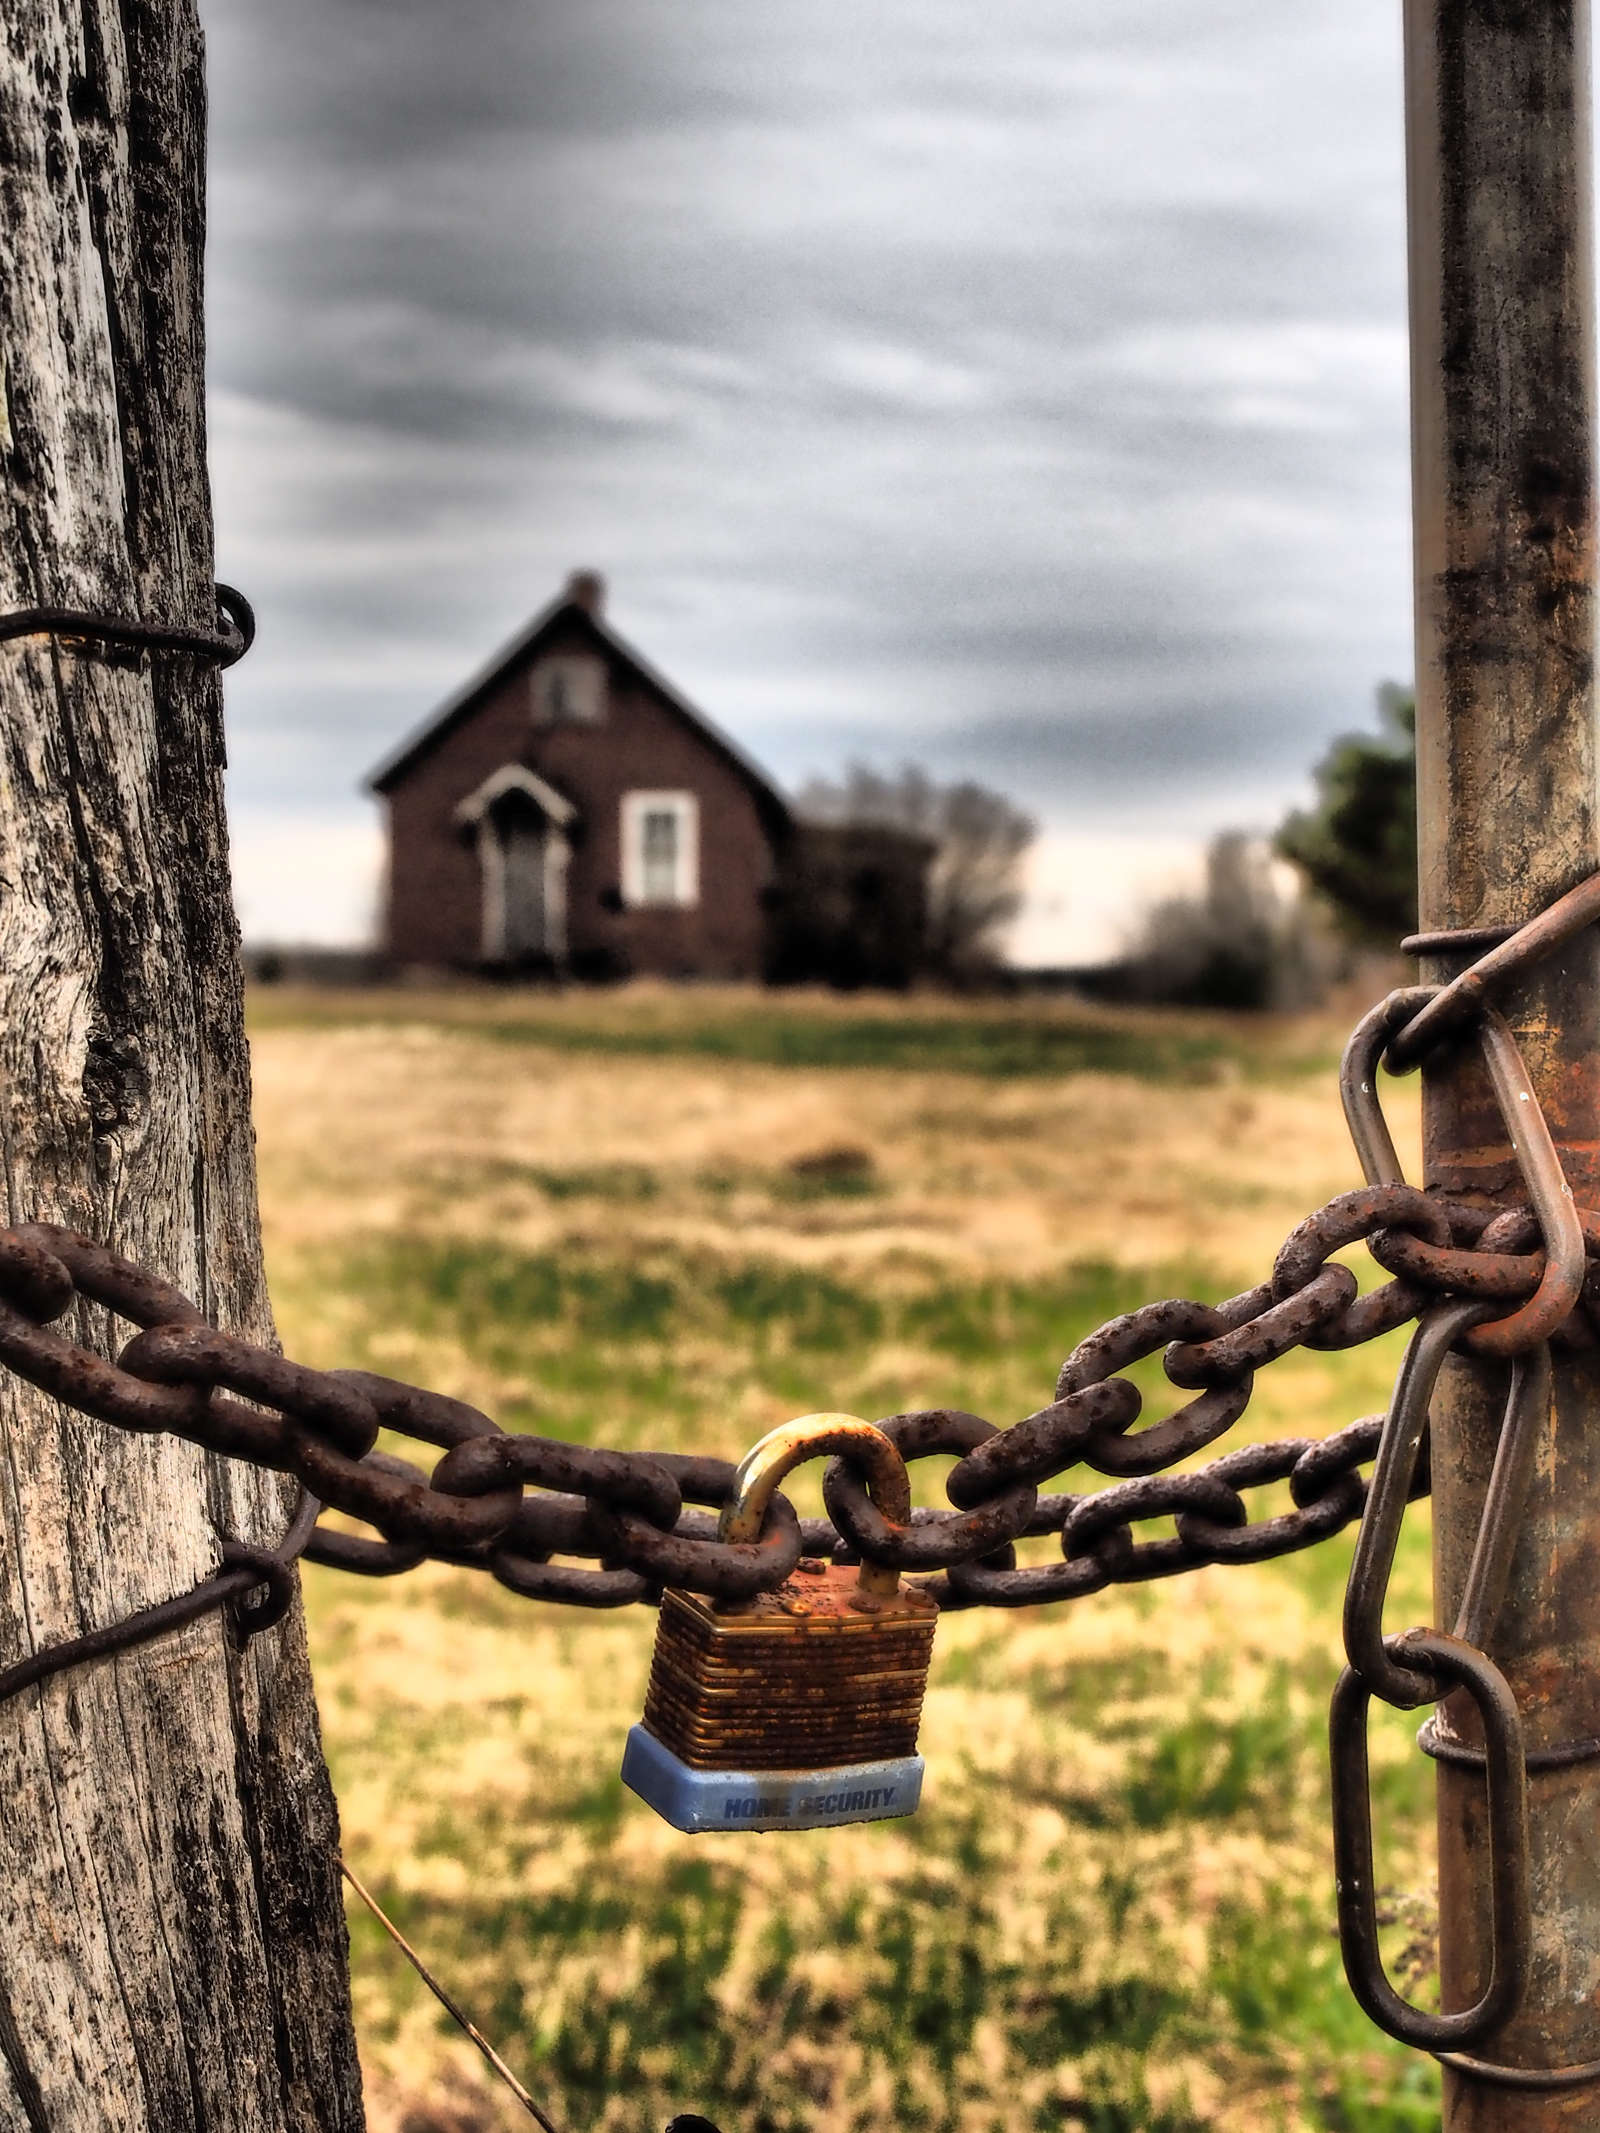
1/400s | F6.3 | ISO 400 | Dramatic Tone Filter
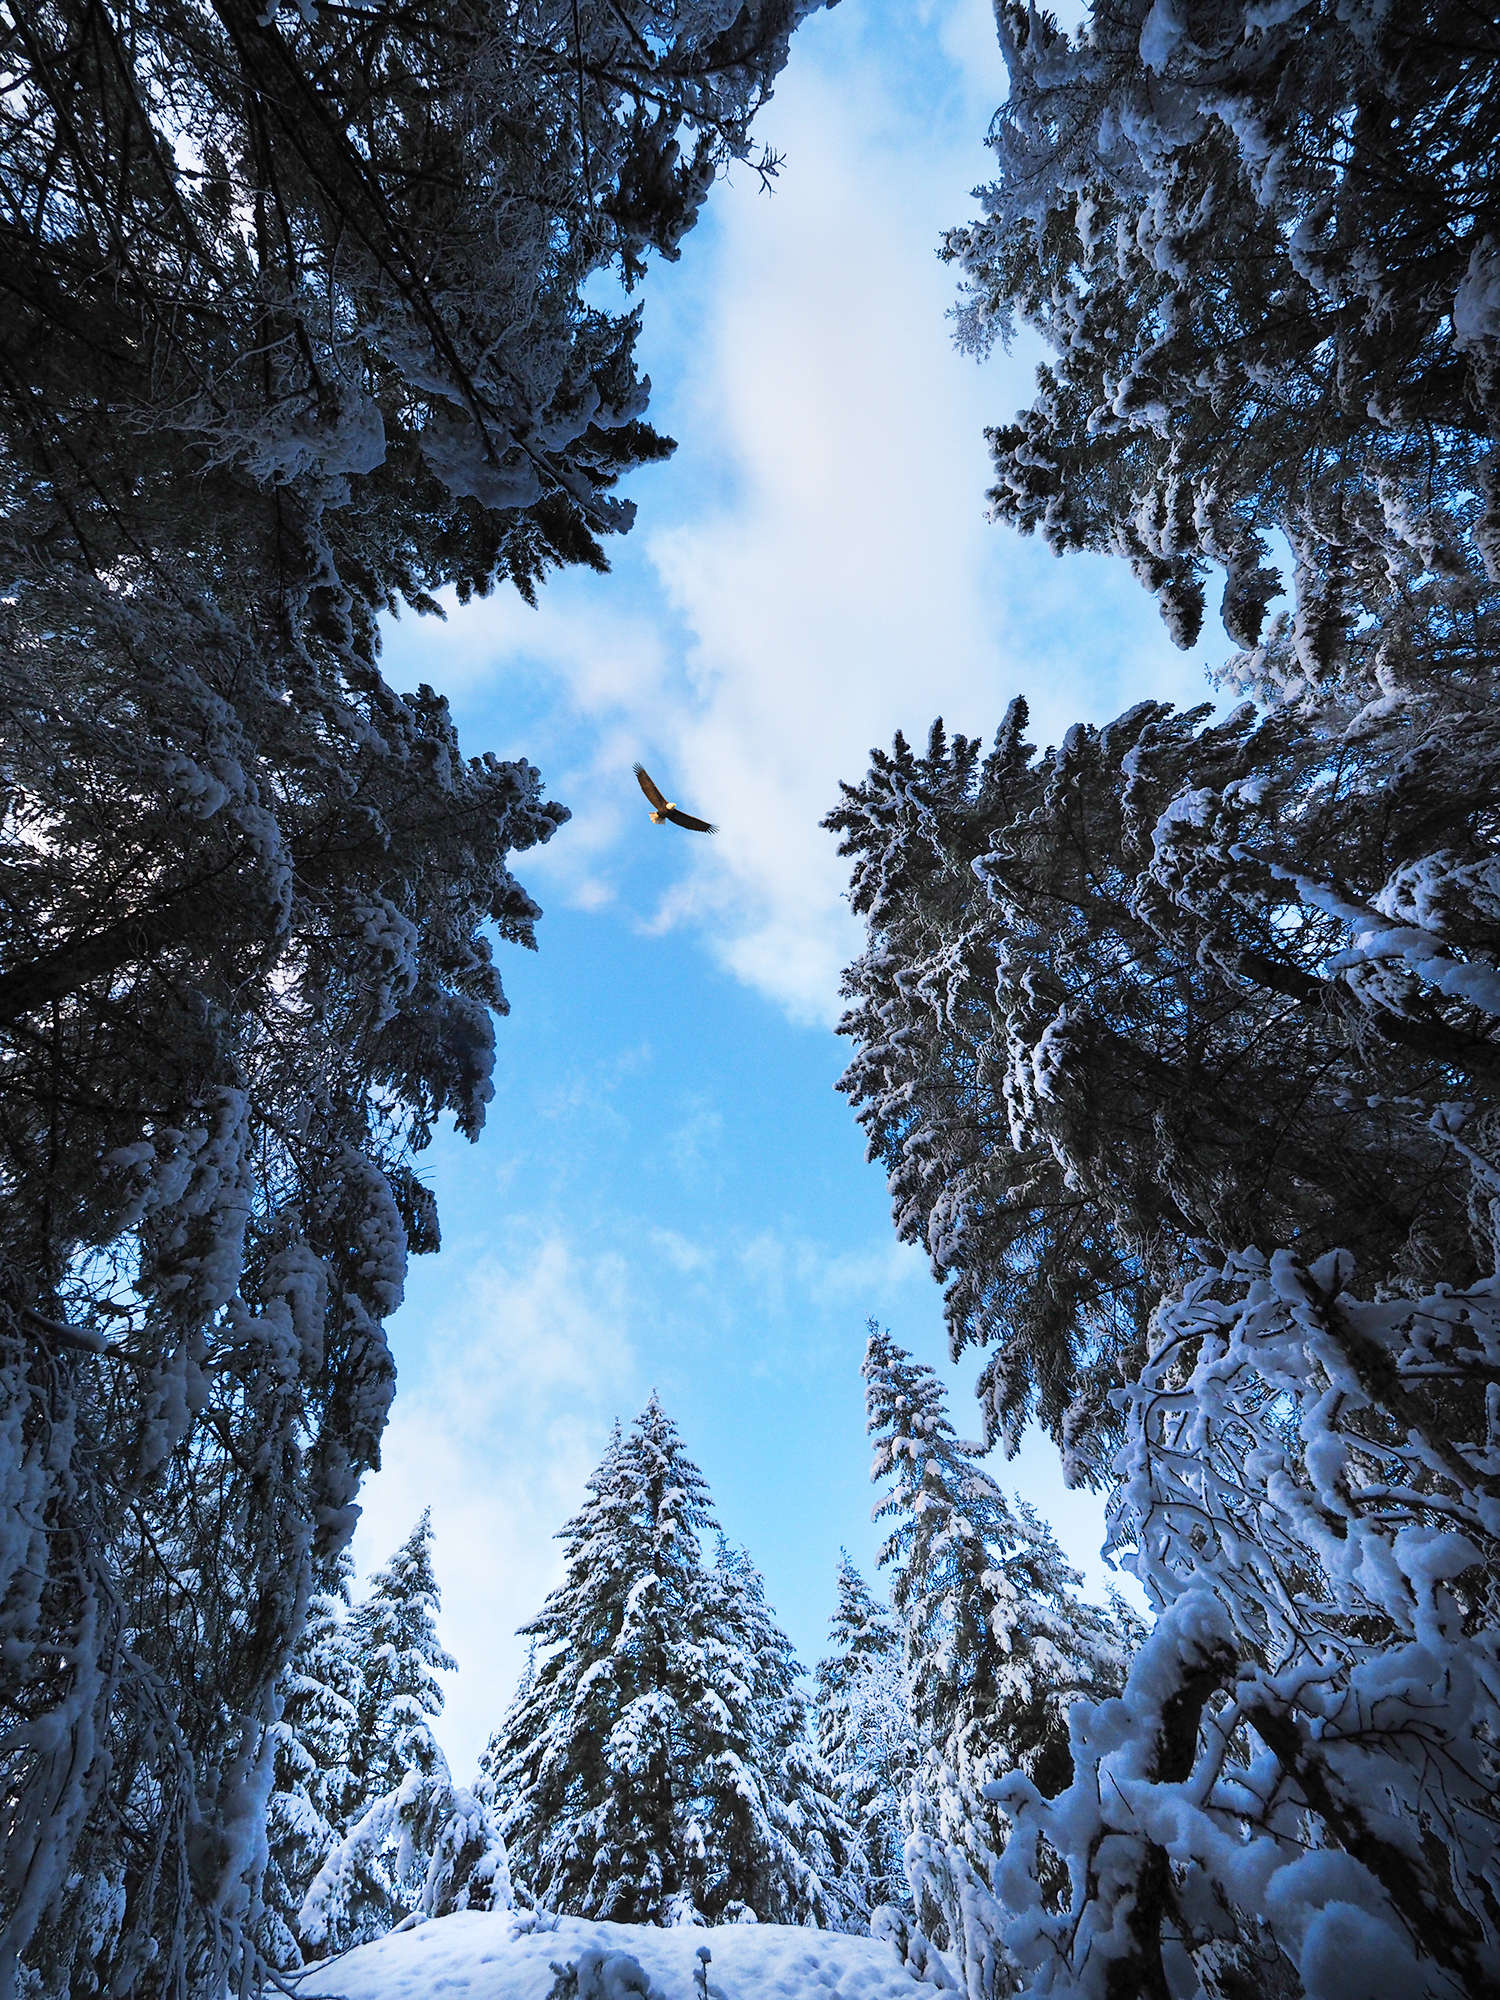
Reduce Negative Space - As a landscape photographer the sky is important in my images. Generally, I'm not keen on shooting under completely overcast skies or completely clear skies. Clouds add texture and dimension to the sky. When I find myself in a situation where the skies are plain (and boring) I will often use a natural frame to fill up some of that negative space.
By standing under the snow-covered branches I could add some interest to the sky and continue the frame around barn already created from the more distant trees.

1/500s | F7.1 | ISO 200
Types of Frames
If you can see through it, around it, or past it, it can be used as a frame. The key is to ensure that your frame adds to the image, rather than detracts from it. It shouldn't just be an afterthought. The frame needs to be a key component that makes the overall composition more interesting.
- Natural Frames - trees, branches, tall grasses, flowers, rocky structures, waves, ice formations
- Architectural Frames - arches, bridges, windows, doors, fences, buildings, and other man-made structures
- Light and Shadow Frames - high contrast areas between light and shadow, for example bright sunlight illuminating a spot on the floor or within a forest scene
A Partial Frame
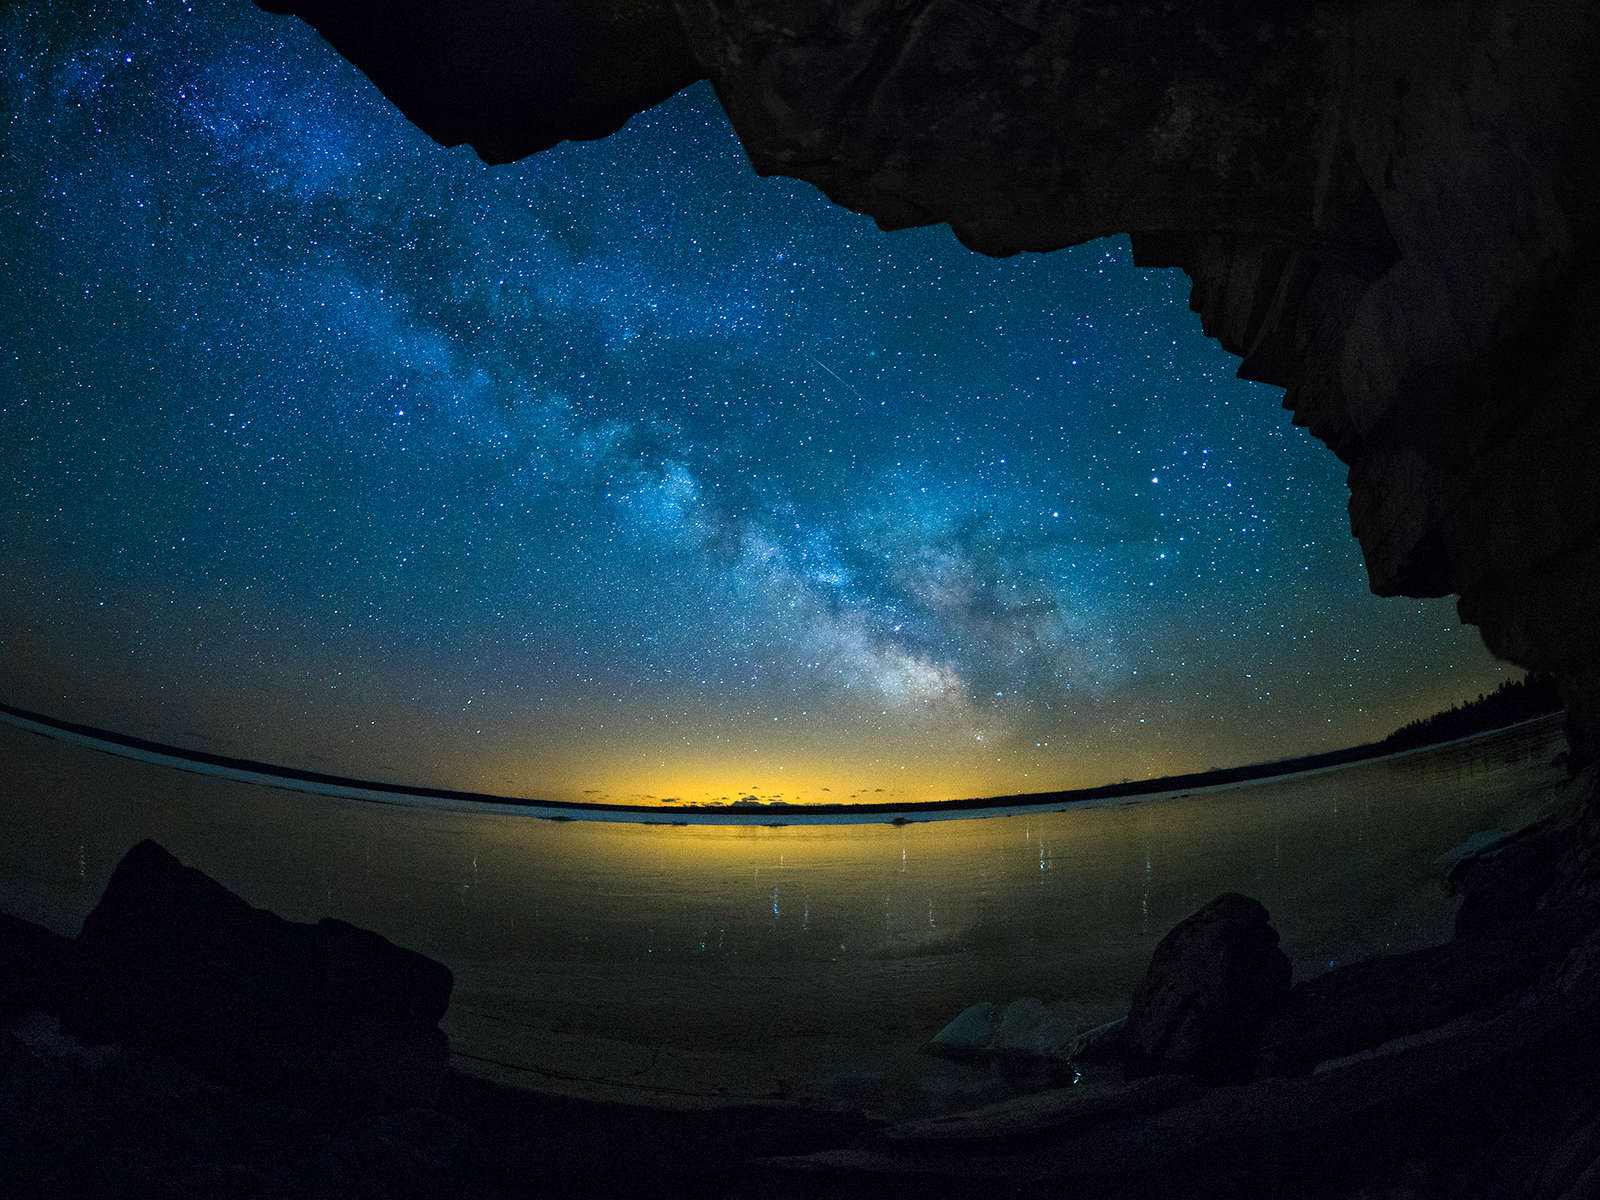
Your natural frame doesn't need to cover multiple sides of the image. A one-sided frame can be quite effective at highlighting your main subject. The cattails along the bottom of the image below anchor the photograph and force your eye upward to the Milky Way and starry sky.

25s | F1.8 | ISO 1250
1/400s | F5.6 | ISO 200
A Bit of Blur
The illusion of depth can also be achieved by purposely blurring your foreground frame. When photographing the statue below I put the camera in amongst the branches of a spirea bush in full autumn color. This created some great blur and added some softness to the image.
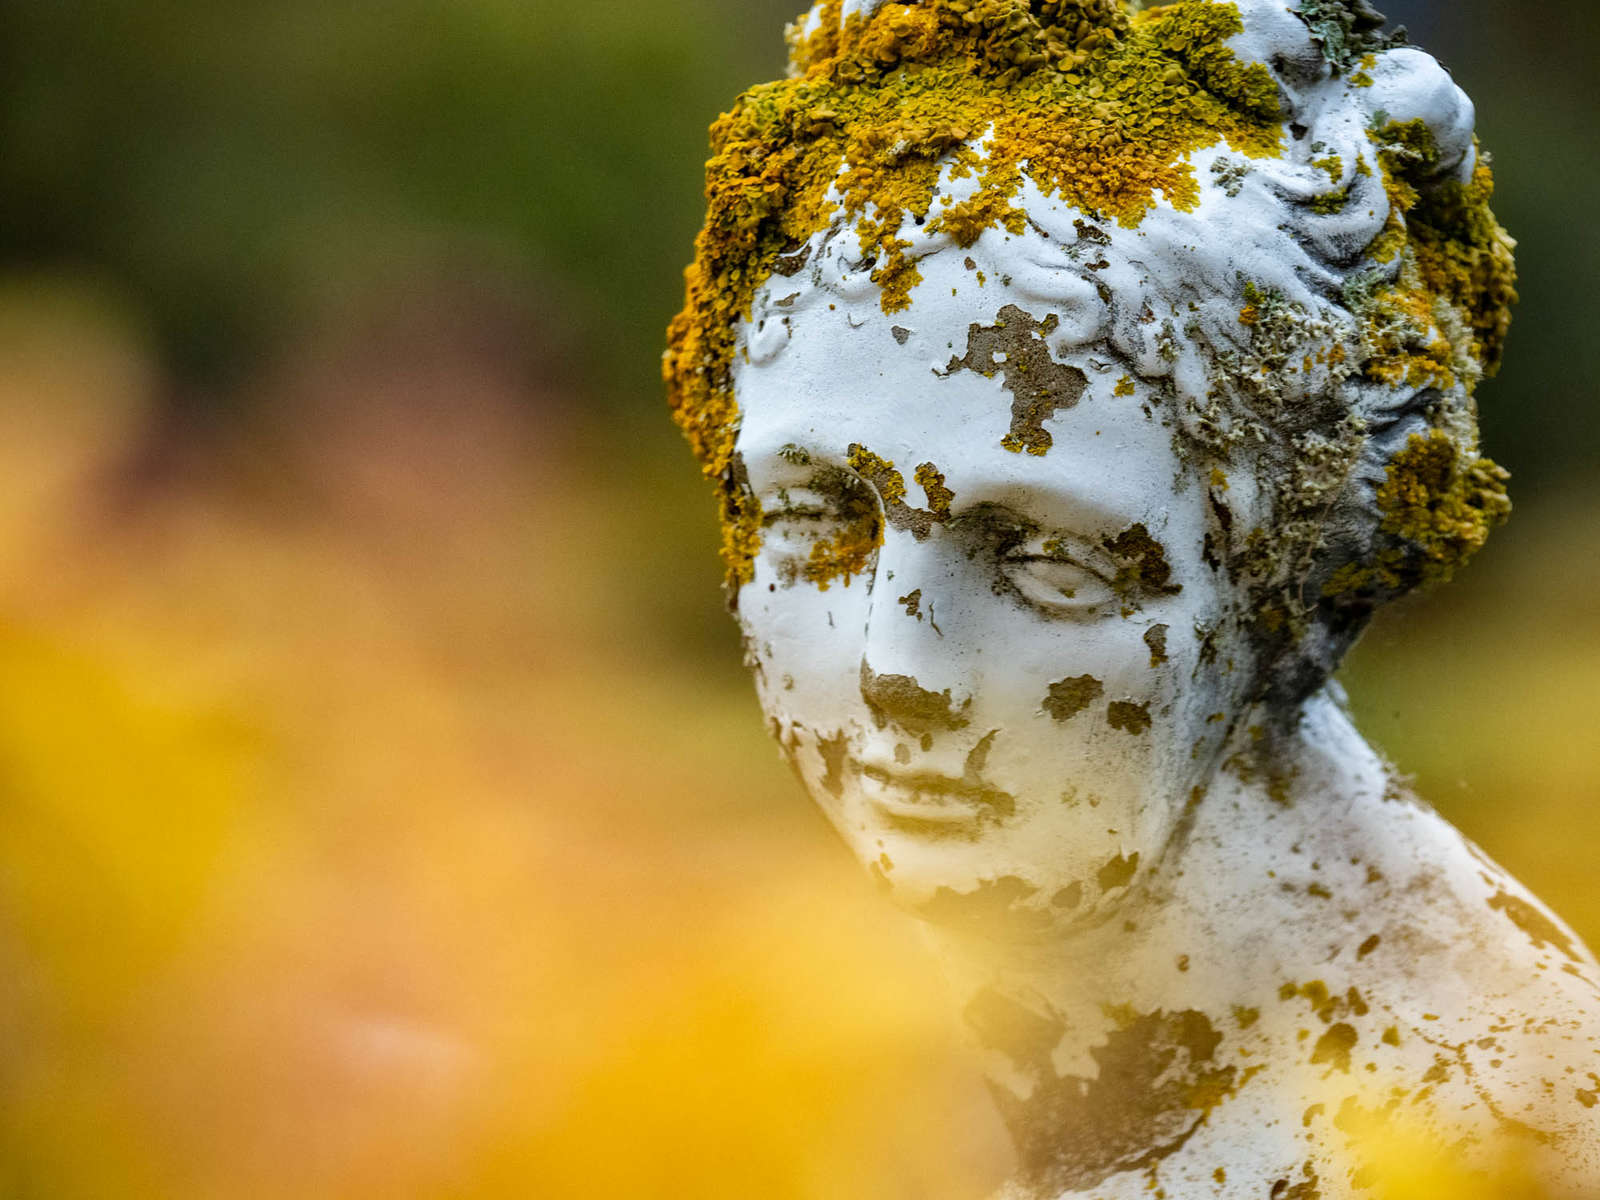
1/400s | F4 | ISO 640
The Frame as the Subject
While driving through Colorado in September I was struck by the gorgeous golden color of the aspen leaves as they transmitted the morning light. I found a spot where there was a small opening in the foliage allowing the distant hills to be seen and I used the tree trucks and leaves as the natural frame.
For this shot, I didn't really care what was in the background. It was the frame itself that was most important to me. There are numerous occasions where the frame is impressive enough that it becomes the key subject. When I see something that qualifies, it's my job to show it off in the best way possible.
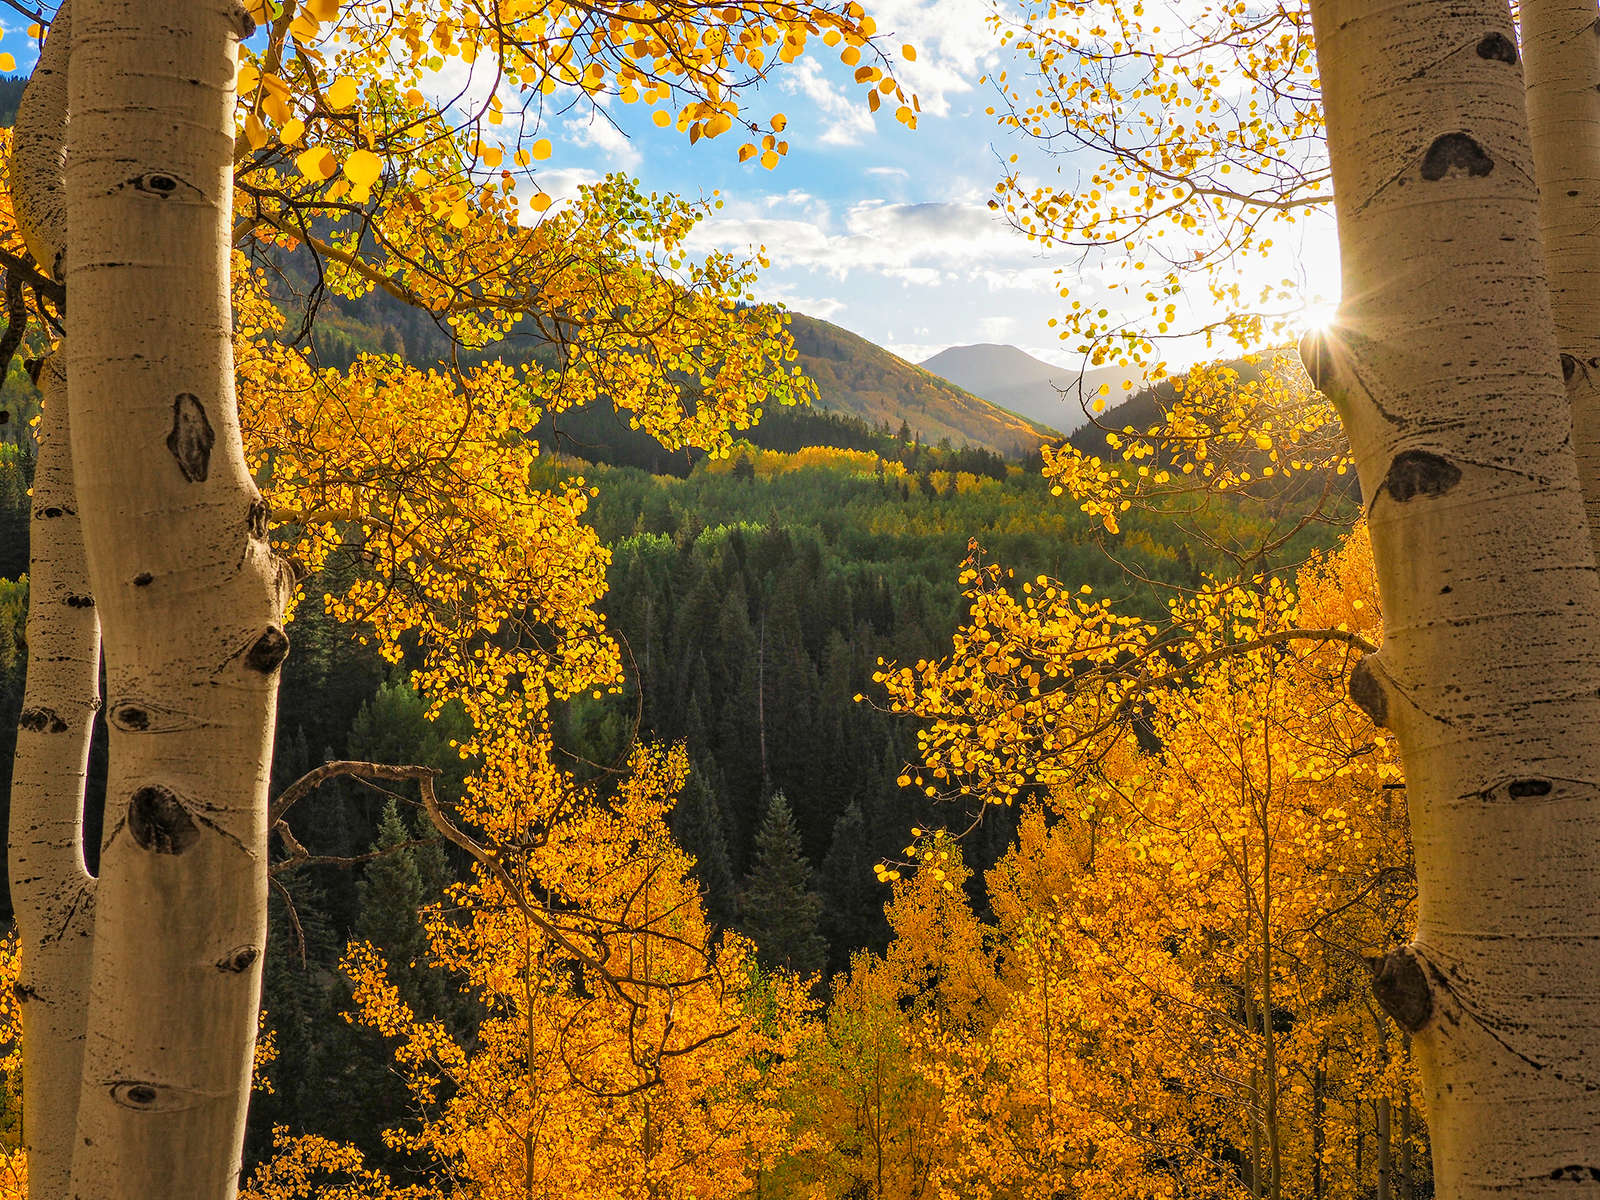
1/320s | F8 | ISO 200
For this ice arch, shooting it just as the sun was setting was critical in order to light up some of the icicles, but the arch itself was my primary subject.
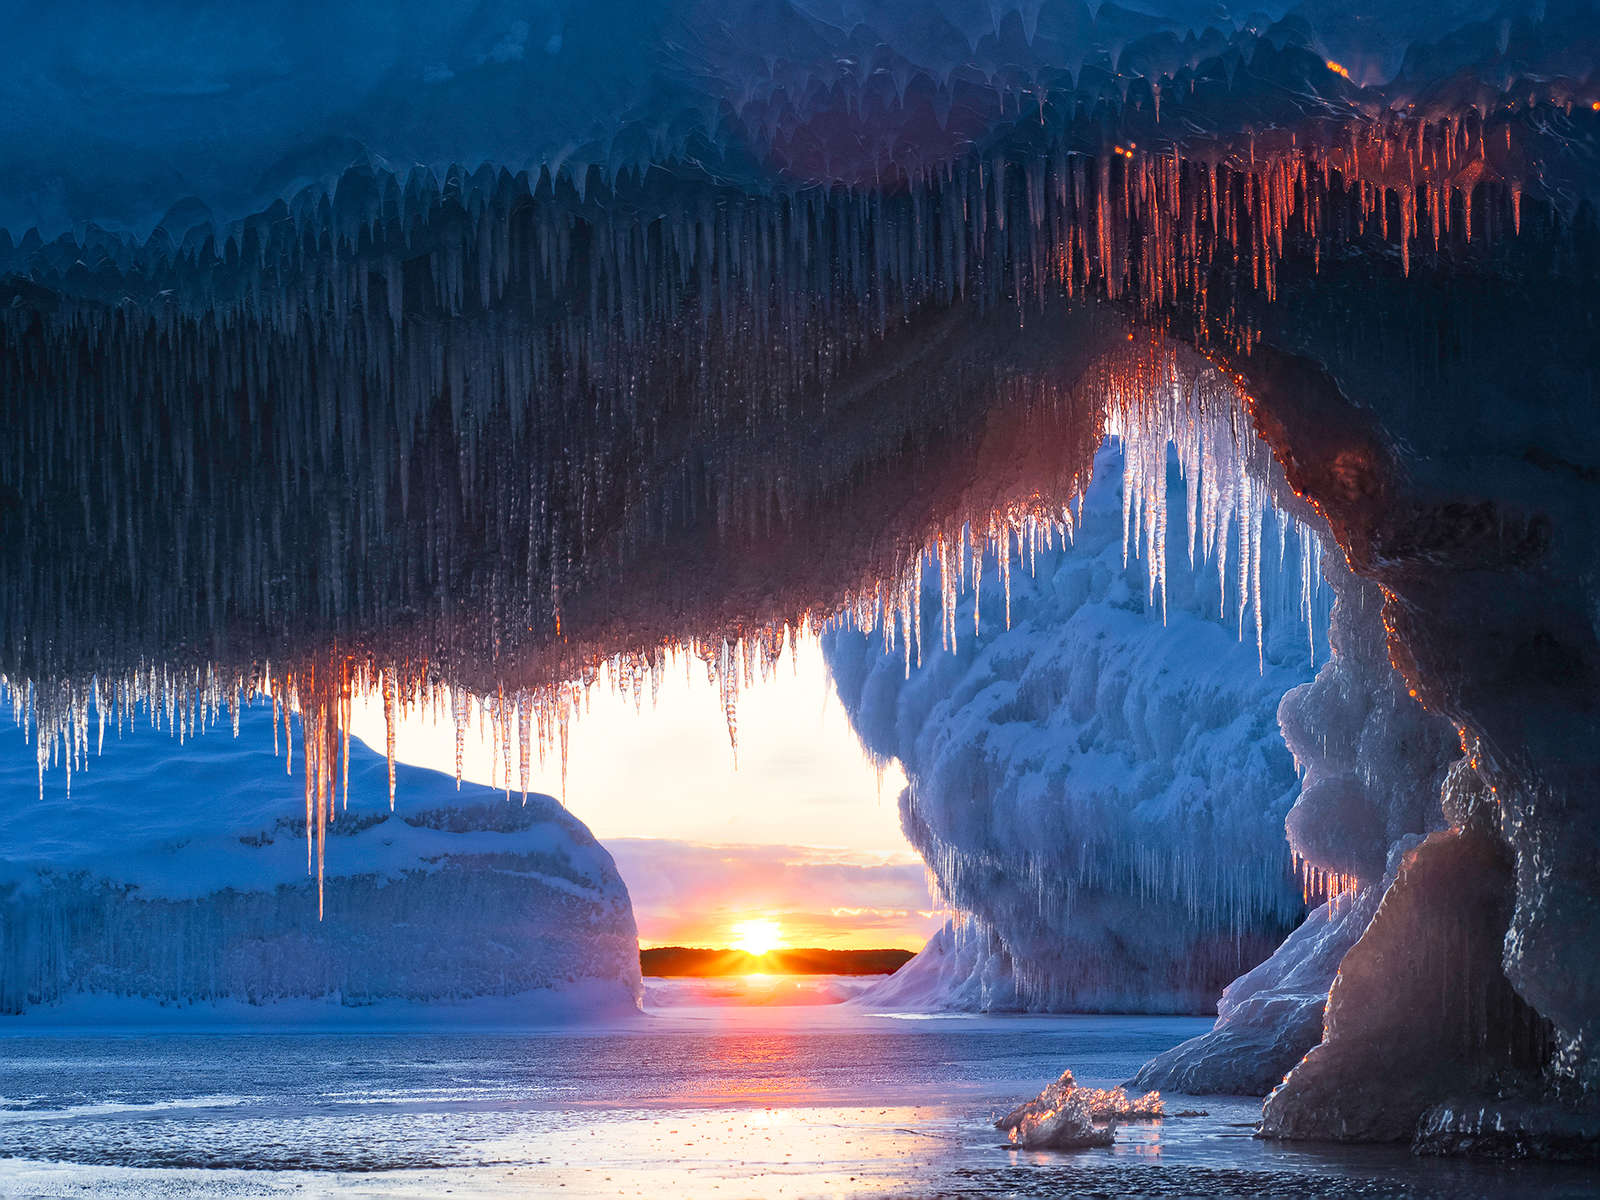
1/80s | F8 | ISO 200
Think Inside the Box
I'd like to take the idea of the frame being the subject one step further. While walking along the rocky shoreline of the island on which I live I came across a small crevice, the inside of which was being illuminated by the setting sun. I thought to myself, wouldn't it be cool if I could get in there and shoot? Well that certainly wasn't possible, but my camera could fit!
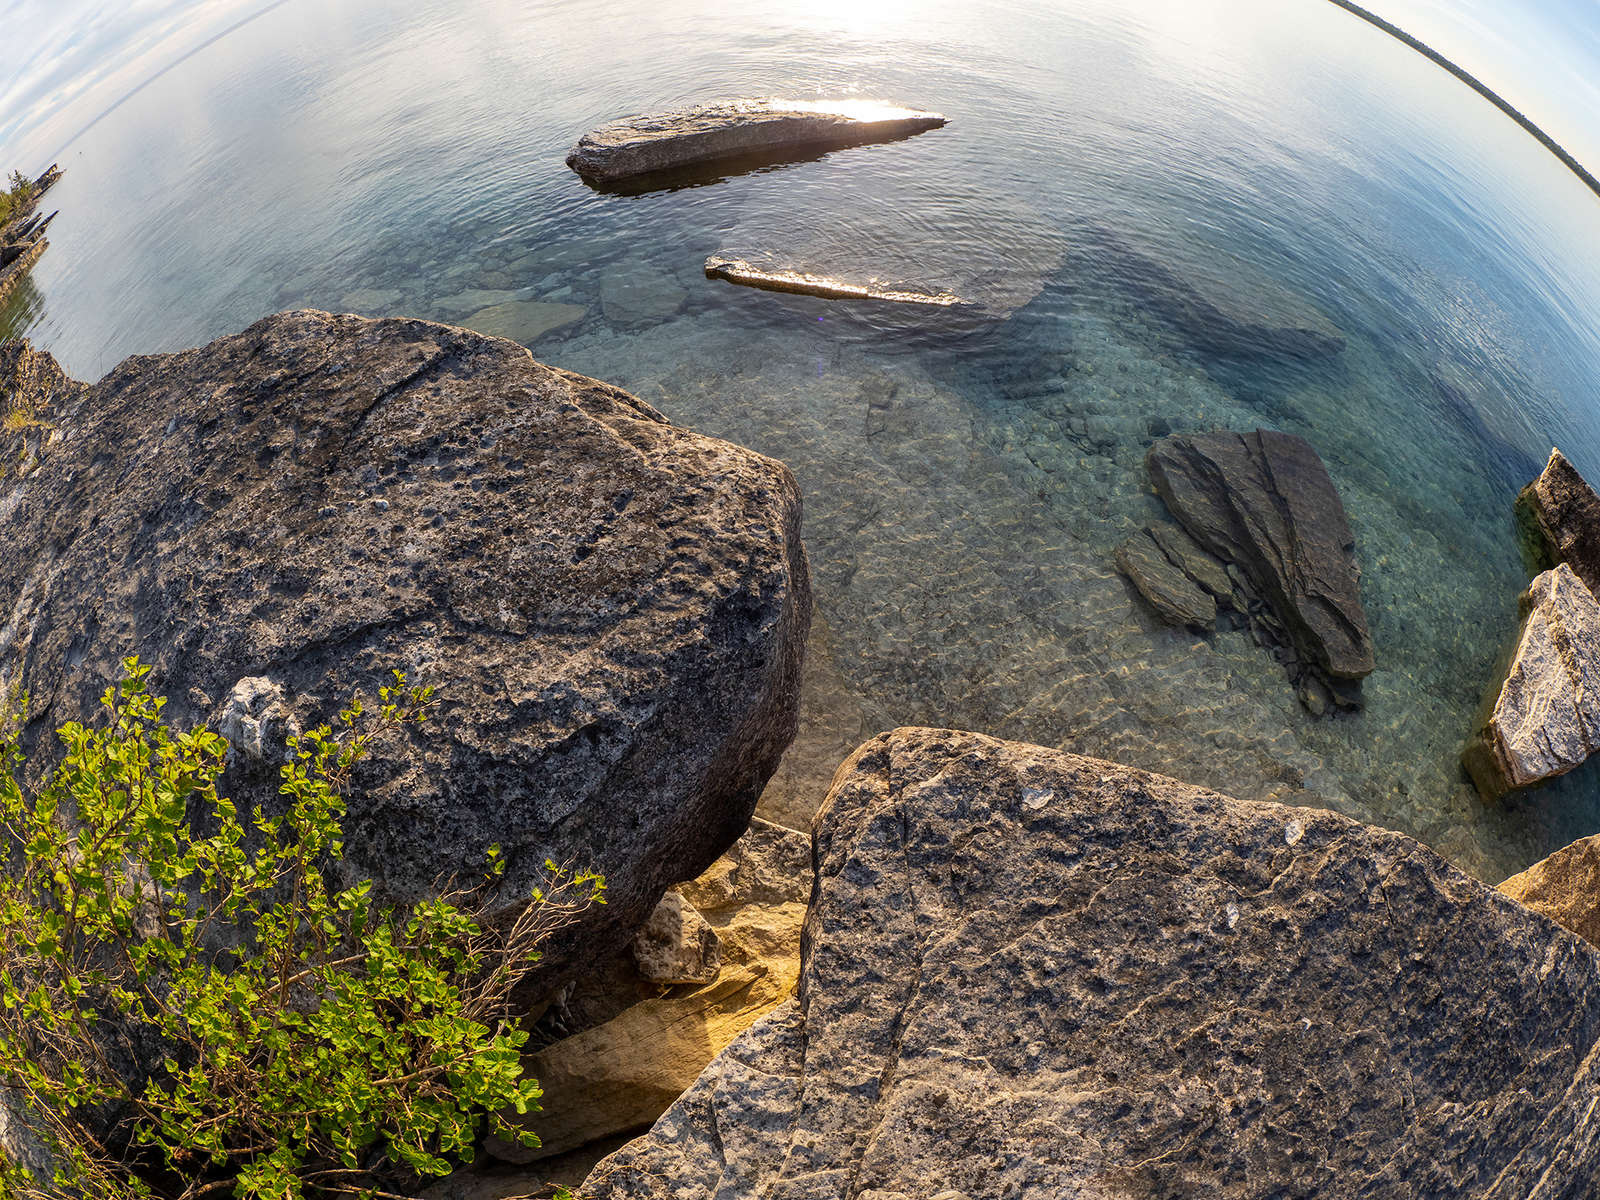
So, I attached the camera to my tripod, extended the legs, initiated the time lapse feature at 2-second intervals, turned the whole apparatus upside down and lowered the camera into the crevice. I had flipped the LCD out so that I could try and compose a shot while the camera was 6 feet below me. With every shot I would make slight adjustments and after about a dozen shots I pulled the camera up and stopped the time lapse feature.
This image is the best of these "inside the box" photos.
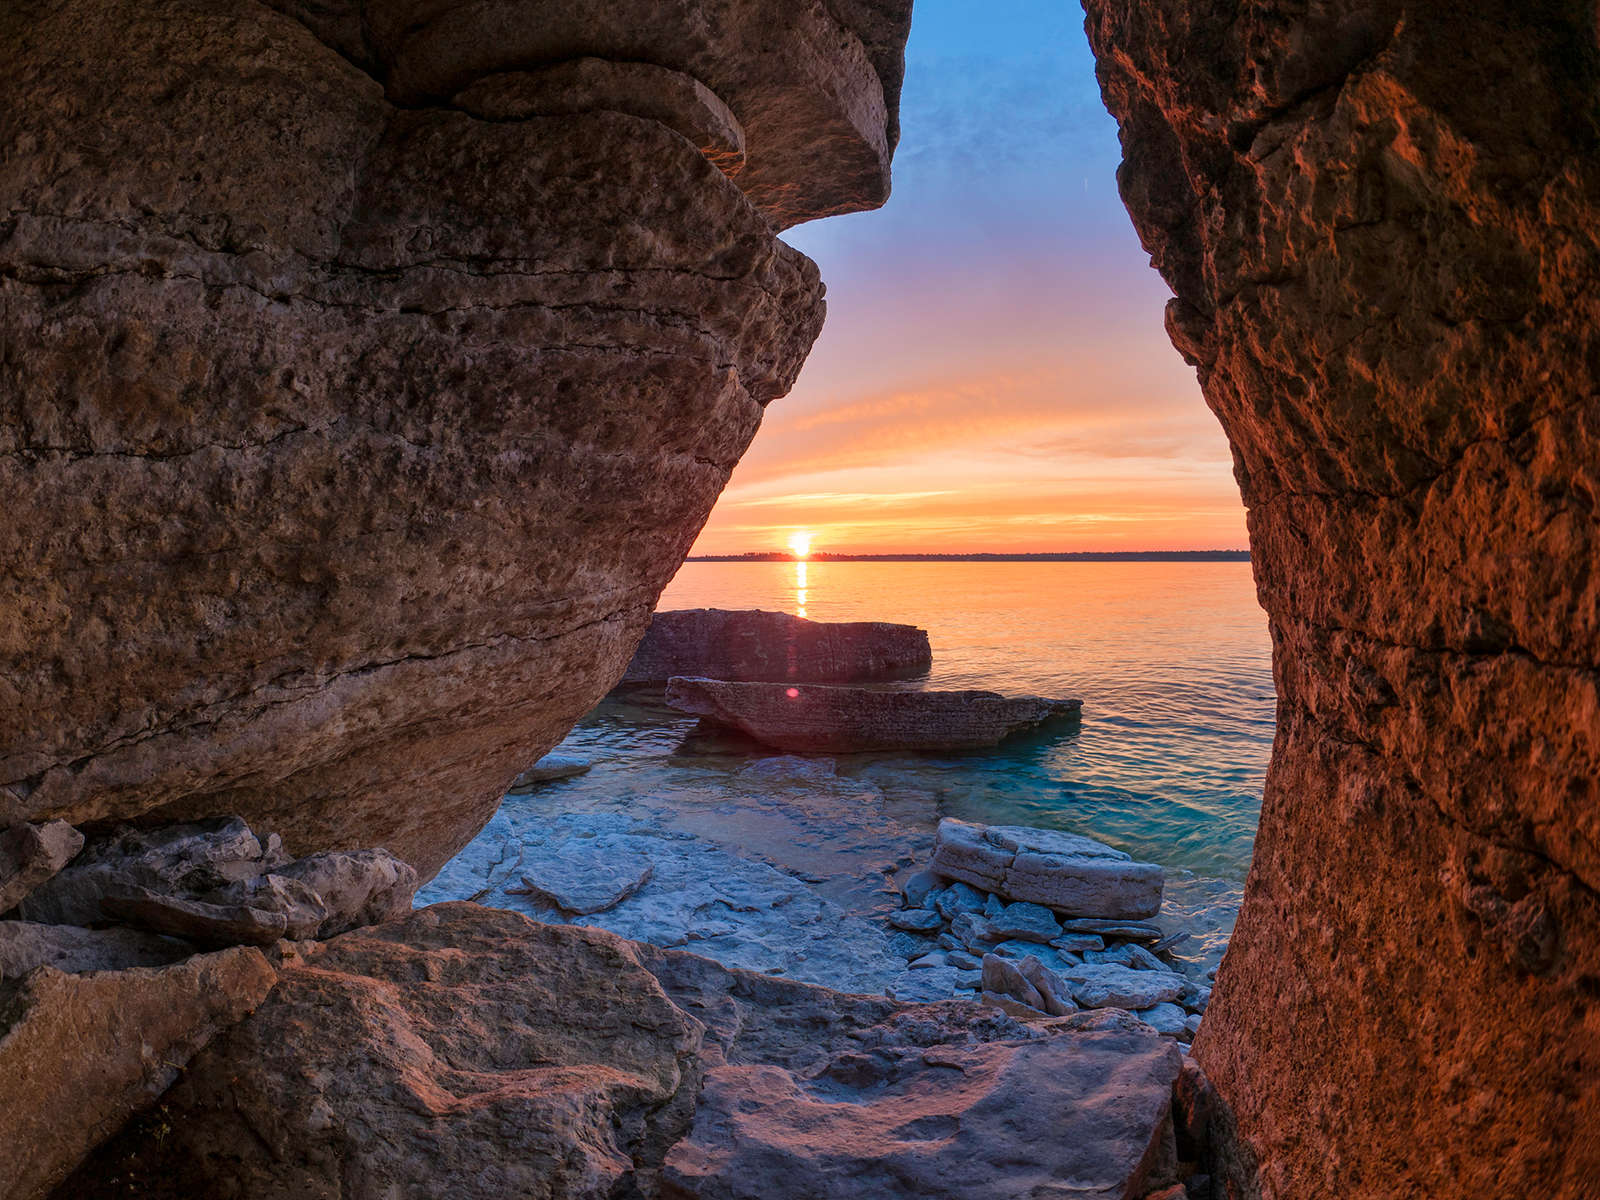
1/20s | F7.1 | ISO 200
On another occasion I came across a hollowed-out stump and wondered what it would look like from in there. I used the time lapse feature again, but this time I just laid the camera down within the trunk cavity. The result is below. Upon seeing this image many people have asked how I lit the inside of the stump. The honest answer is that I didn't. I chose an exposure midway between the highlights and shadows, and because I shoot in RAW there was enough data that I could pull details from the rather dark interior of the stump.
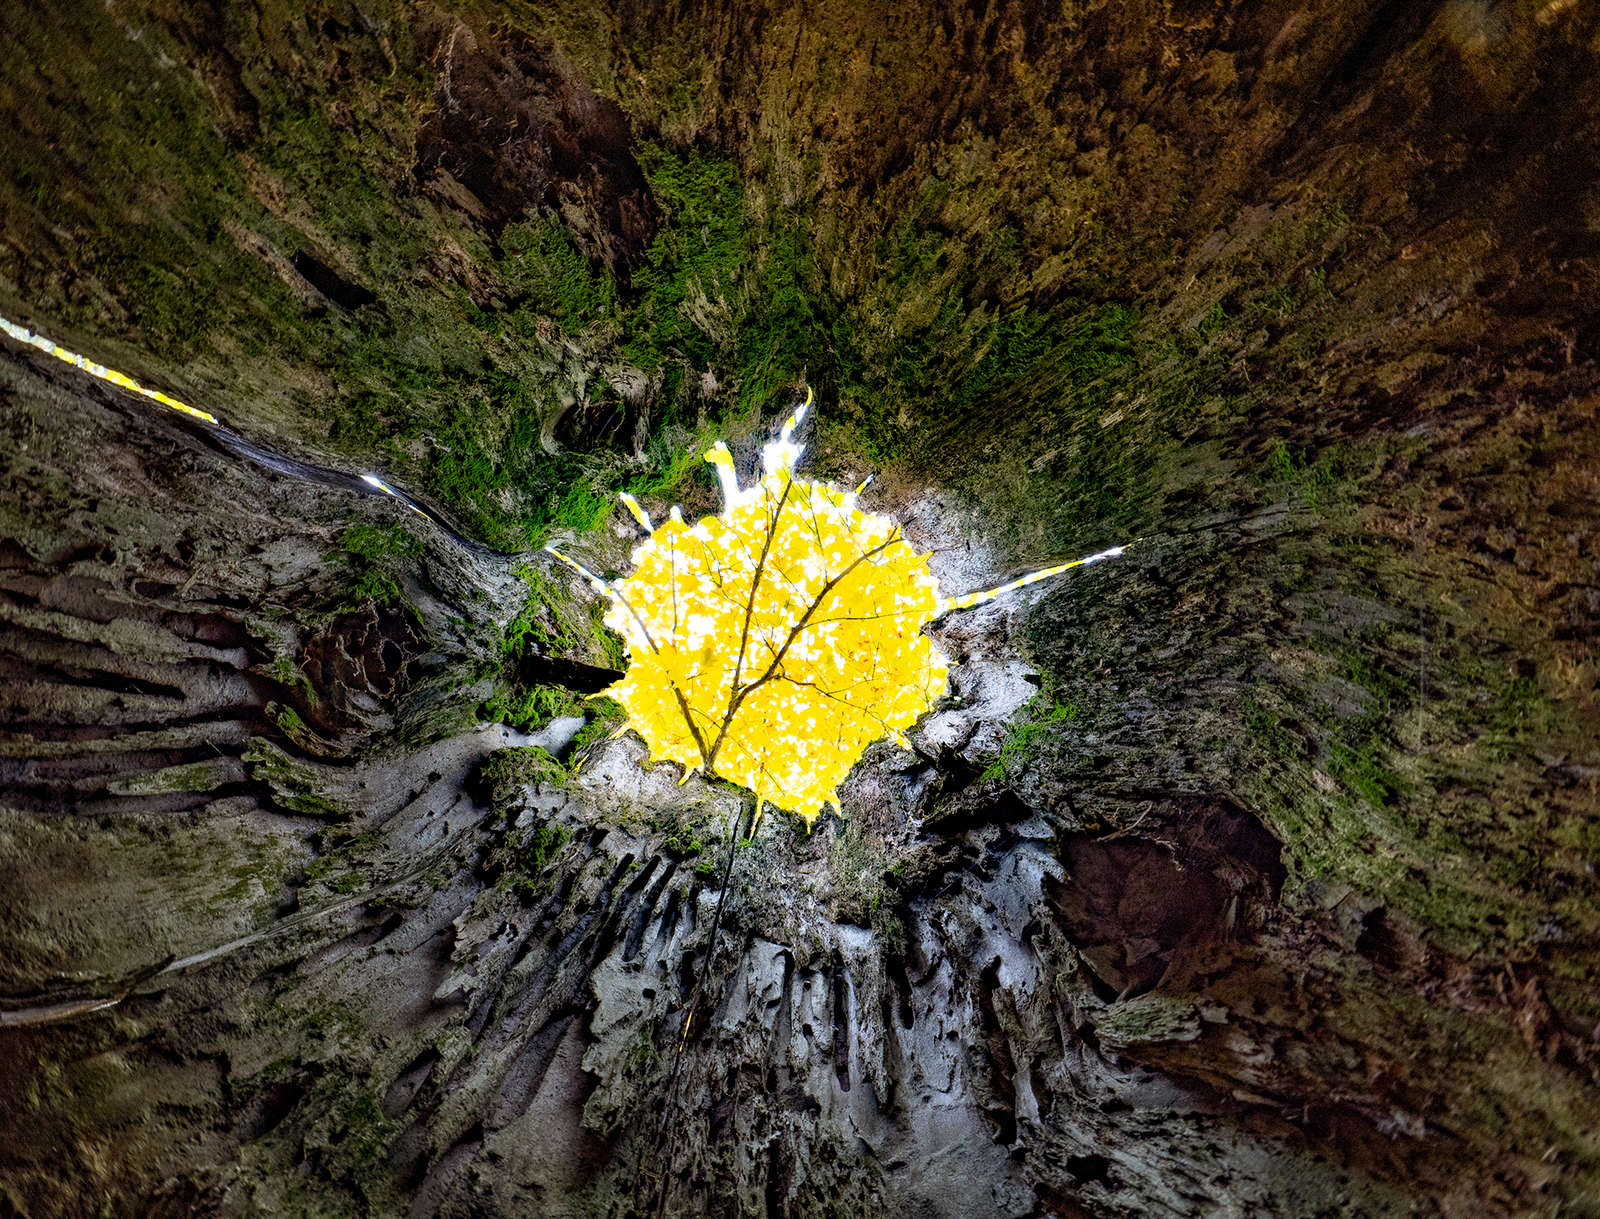
1/15s | F7.1 | ISO 200
Framing Your Wildlife Photos
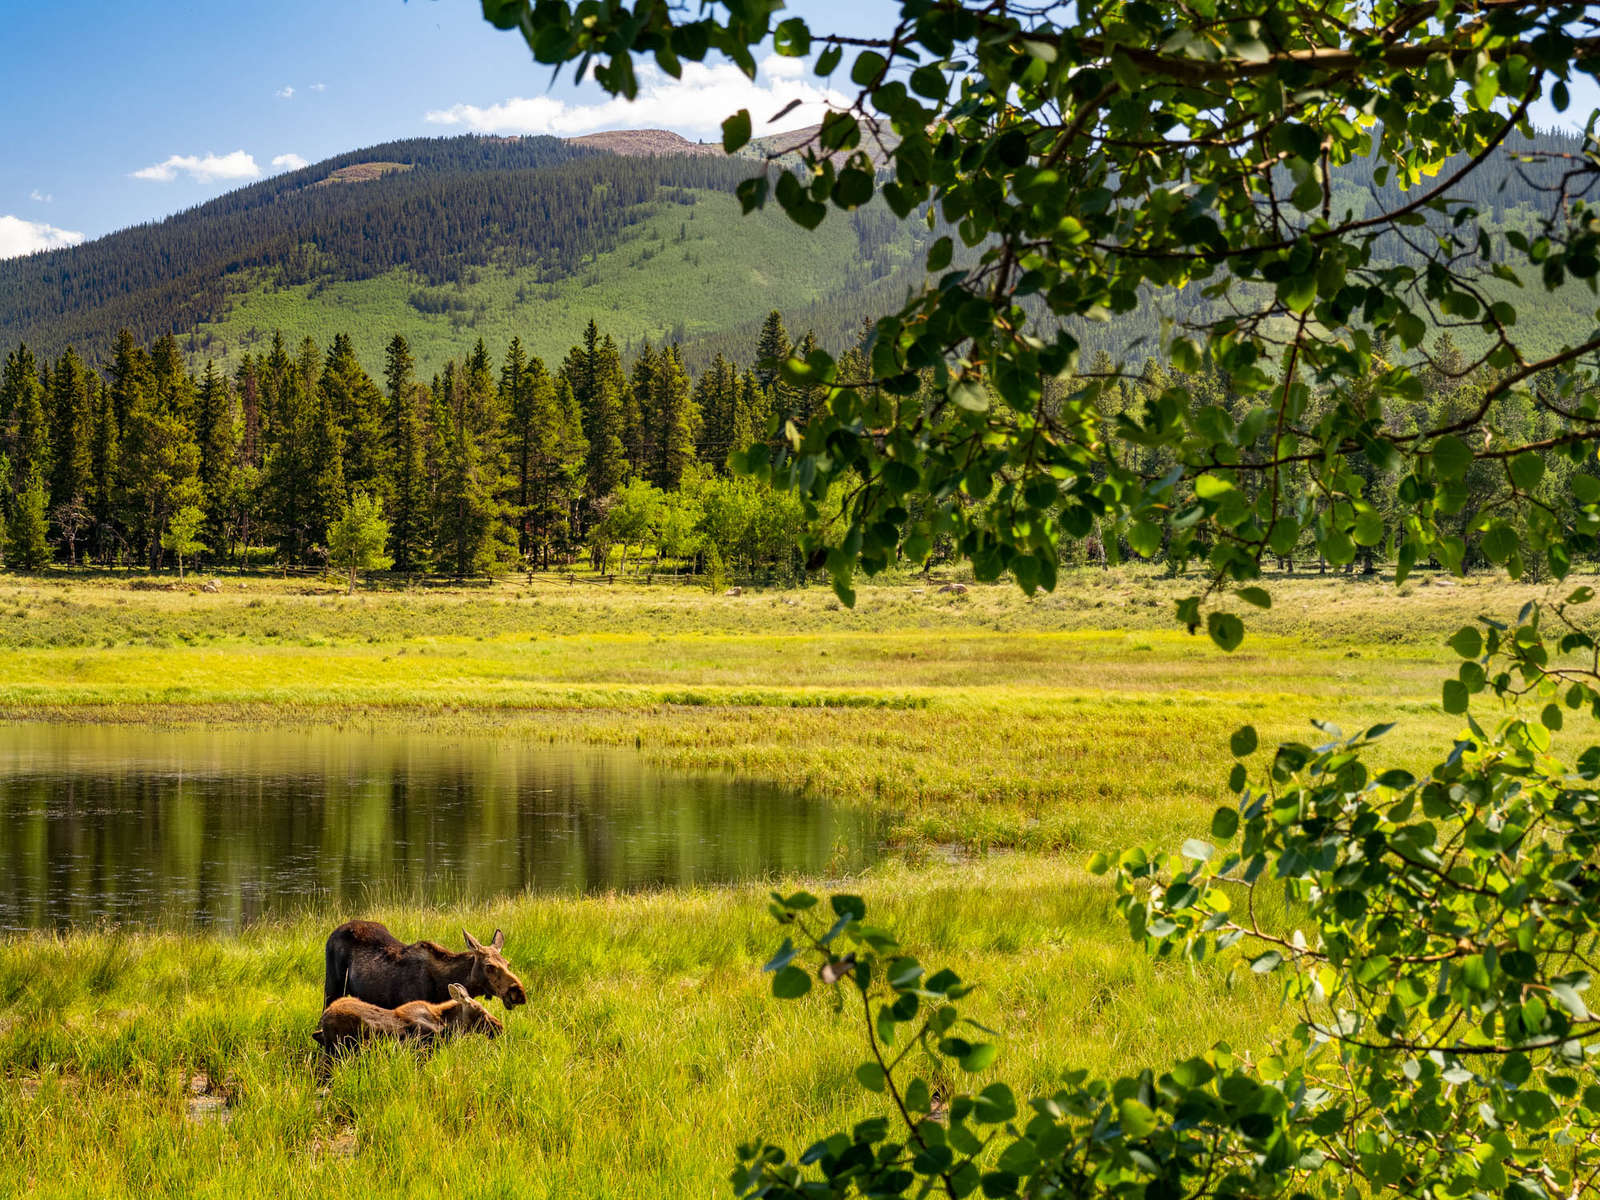
A frame can also be a great way to highlight your wildlife subjects. I will use this technique when I am purposely trying to place my subject in the context of their natural environment. In both of the photos below I could have easily switched to a telephoto lens to get a closeup, but I felt that a better story was being told by shooting wide and including a natural frame.
1/80s | F7.1 | ISO 200
1/250s | F8 | ISO 400
Final Thoughts (and Images)
A natural frame can be an effective way to improve your composition. It can help draw more attention to your main subject and add greater depth to your photograph. I always experiment when I am thinking about using a natural frame and ask myself some key questions. Where will I place the frame? Will a partial frame do the trick or should I surround my subject completely? Should the frame be in sharp focus or blurry? And most importantly, does the frame improve the image or take away from it? Framing works, when done well.
Republished with permission from Peter Baumgarten's Creative Island Photo blog. To comment on this article or ask Peter a question, please view original post.
5s | F16 | ISO 200

1/30s | F10 | ISO 200
25s | F1.8 | ISO 1250
1/200s | F2.8 | ISO 250
1/125s | F5.6 | ISO 640
ABOUT PETER
Web: creativeislandphoto.com
Blog: creativeislandphoto.com/blog
Twitter: @creativeisland4
Peter has been a dedicated Olympus shooter for nearly 40 years, and has found a way to combine his passion for photography with his love of teaching to develop photography workshops with a focus on landscape, wildlife and astrophotography. Peter’s work has been published in a number of magazines including Canadian Geographic, Shutterbug and Outdoor Photographer. He maintains his own blog with an emphasis on tutorials that assist others in bringing their photography up to the next level.
8 Tips for Moonlit Landscapes
Don't limit yourself to daytime landscapes. Extend your landscape opportunities by shooting under the light of the moon.
Using Focus Bracketing & Stacking for Landscapes
Learn how to use this technique to maximize depth of field in your landscape photography.

Perspective: A Small Thing That Makes a Big Difference
A slight change in your camera's position can make a big difference.