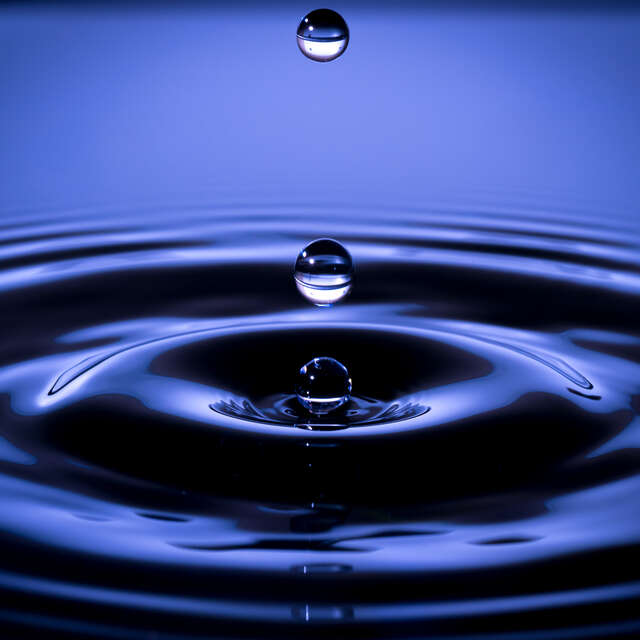
What is Refraction?
Spring is here which means we can all start dusting off our trusty macro gear and head out to inspect the dirty, shrinking piles of snow in hopes of spotting a beautiful fly or an emerging crocus. For us macro photographers, the excitement is at its highest, as we are anticipating the return of our favorite subjects: bees, damselflies, ants, butterflies, and such. However, for those of us who live in parts of the world where spring can take longer to arrive, we can get an early start by playing with refraction. If you are not familiar with this term, refraction is when the light passes from one medium and into another, affecting the direction of the light. In macro photography, the capture of a background subject into a foreground water drop is a good illustration of refraction.
1/8s | F3.2| ISO 400
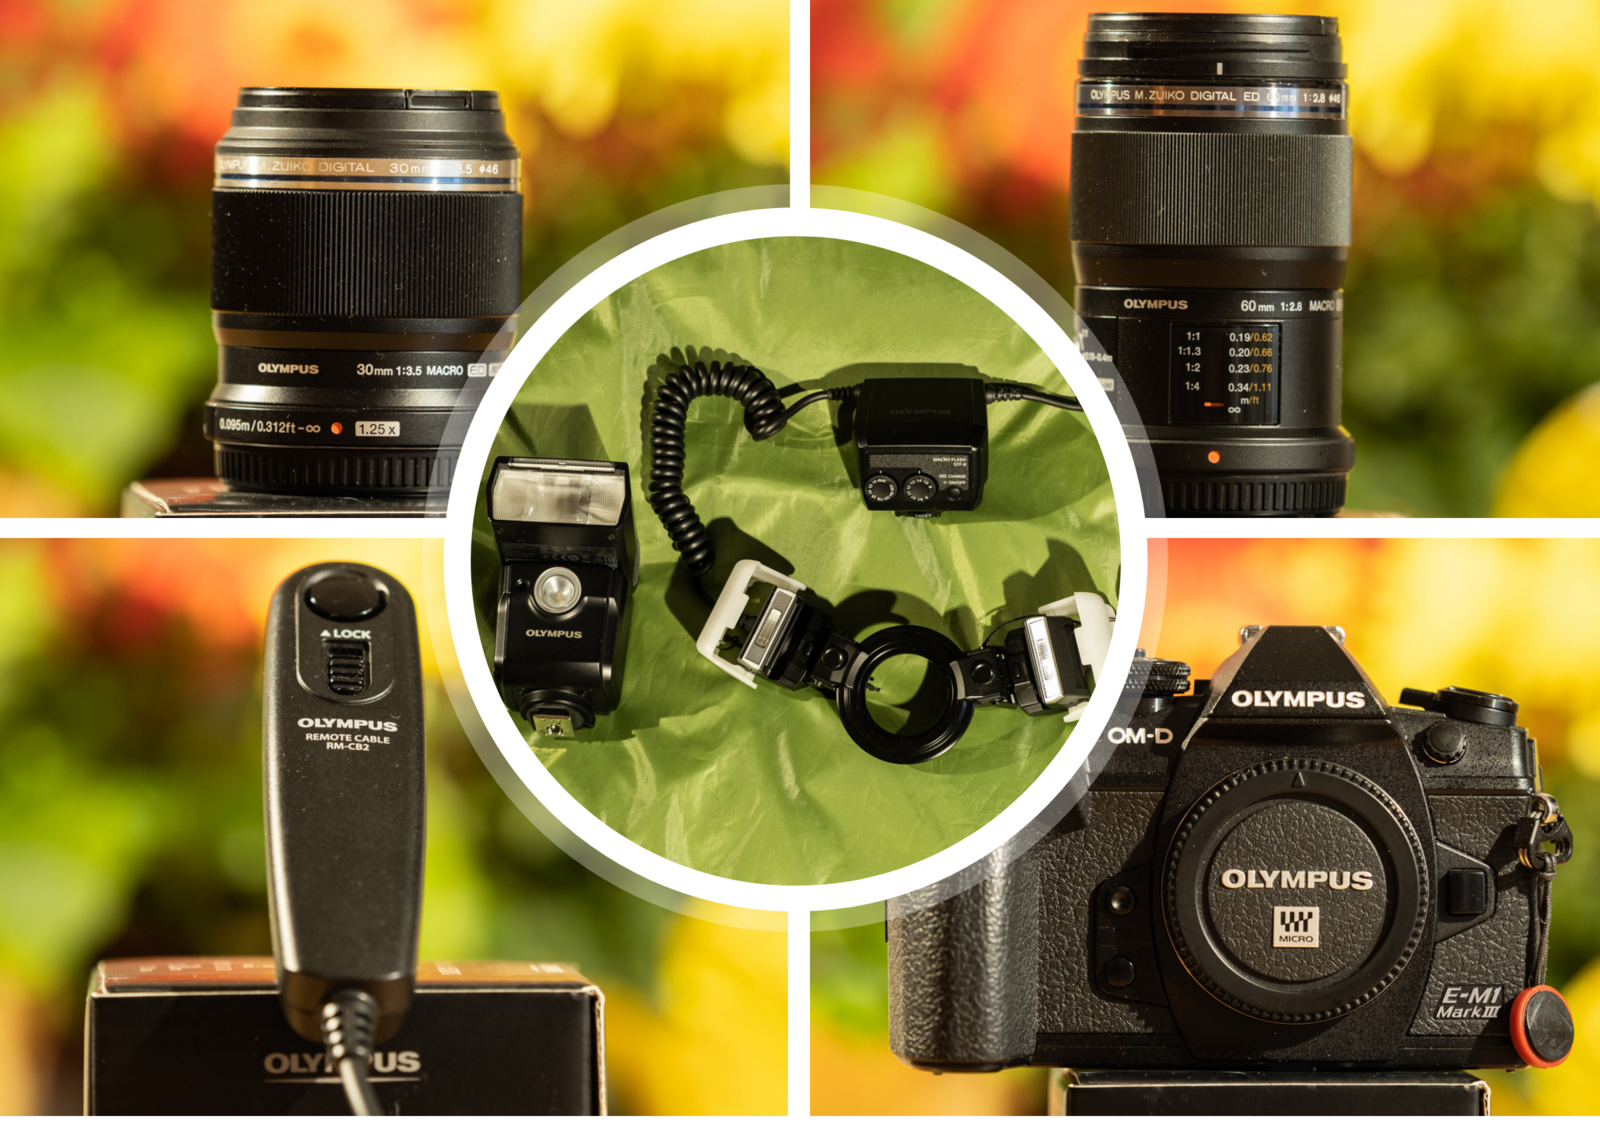
Camera Gear
To be able to capture your first refraction, you will need:
- Your Olympus camera: Mine is the OM-D E-M1 Mark III. I love this camera because it is compact and enables me to get to all the angles I need. The flip screen is also a must as I use it to monitor my frame as I set up the shoot.
- A macro lens: I use the M.Zuiko 60mm F2.8 Macro and 30mm F3.5 Macro. Both are fantastic.
- The 30mm F3.5 Macro is really the perfect companion for refraction as it boosts a 2.5x image magnification and has a blacked-out front that minimizes the reflection. The 14mm (0.55 inches) minimum working distance allows you to get very close to your subject and capture details.
- The 60mm F2.8 Macro is my favorite macro lens. The 1:1 life-size magnification also allows you to get sharp and amazing details. The 7.4-inch minimum focusing distance is great when you bring insects into the picture as you need a little more working distance. There can be a learning curve with this lens so I recommend reading Chris McGinnis' article to get familiar with it.
- A flash: I use the STF-8 Twin Flash or the FL-700WR when I shoot with insects as it helps freeze motion.
- A remote cable release (RM-CB2): This cable helps capture your scene without the vibration associated with using the shutter release button. It also gives you some extra working distance, so you can press the remote while holding a diffuser a few steps away from your camera.
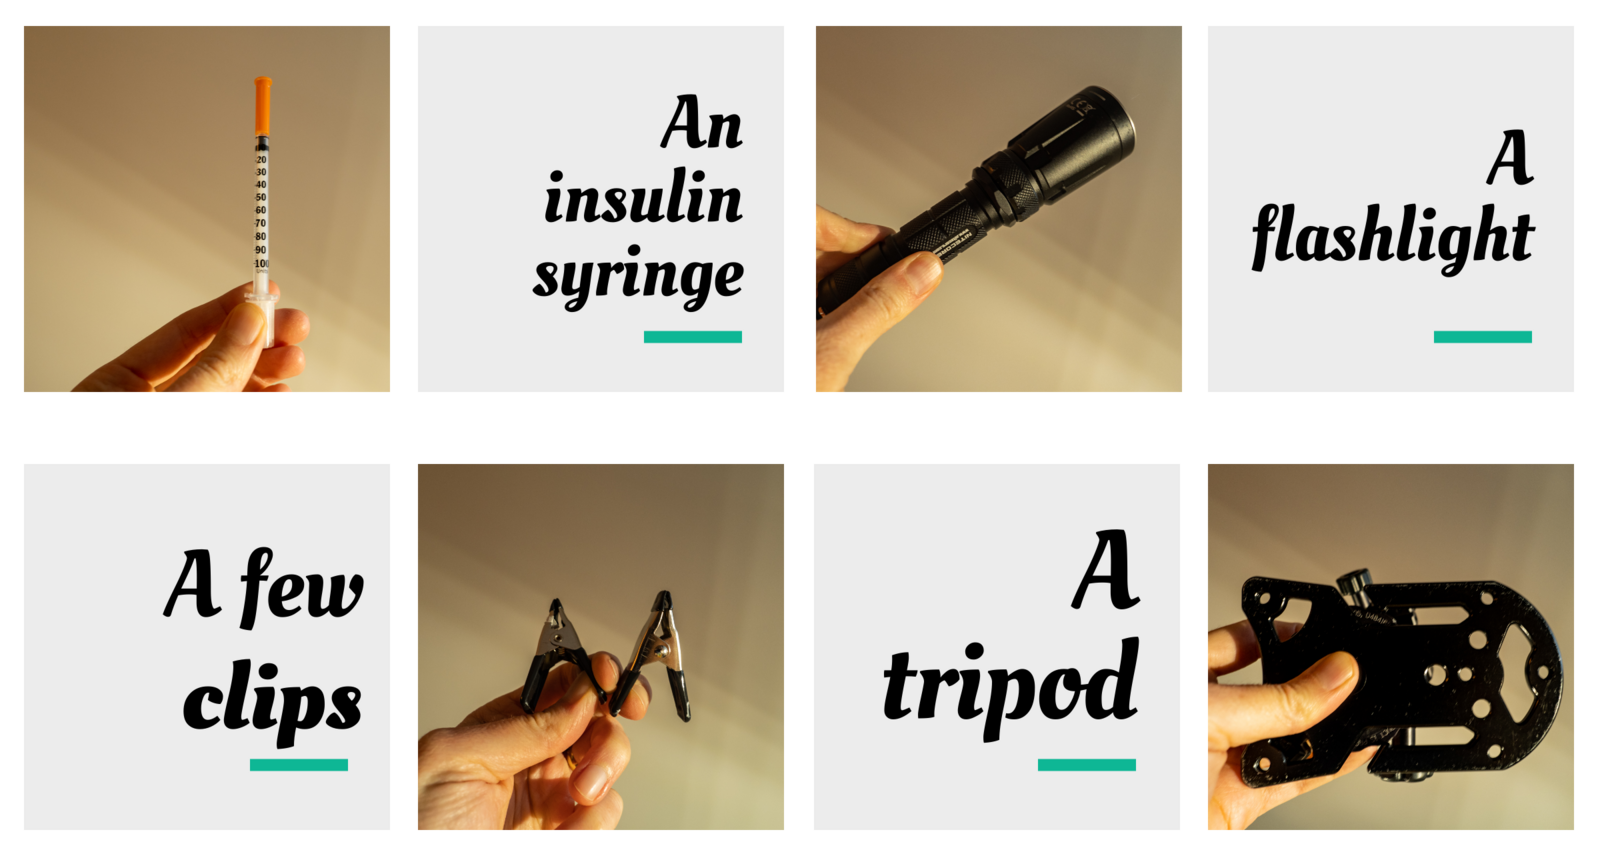
Other Gear
The gear below is not necessary but will definitely facilitate bringing your vision to life.
- An insulin syringe: This will make life easier as it allows you to place the drops exactly where you want them, as well as regulate their size. You can also use an eyedropper or spray bottle but it is less precise.
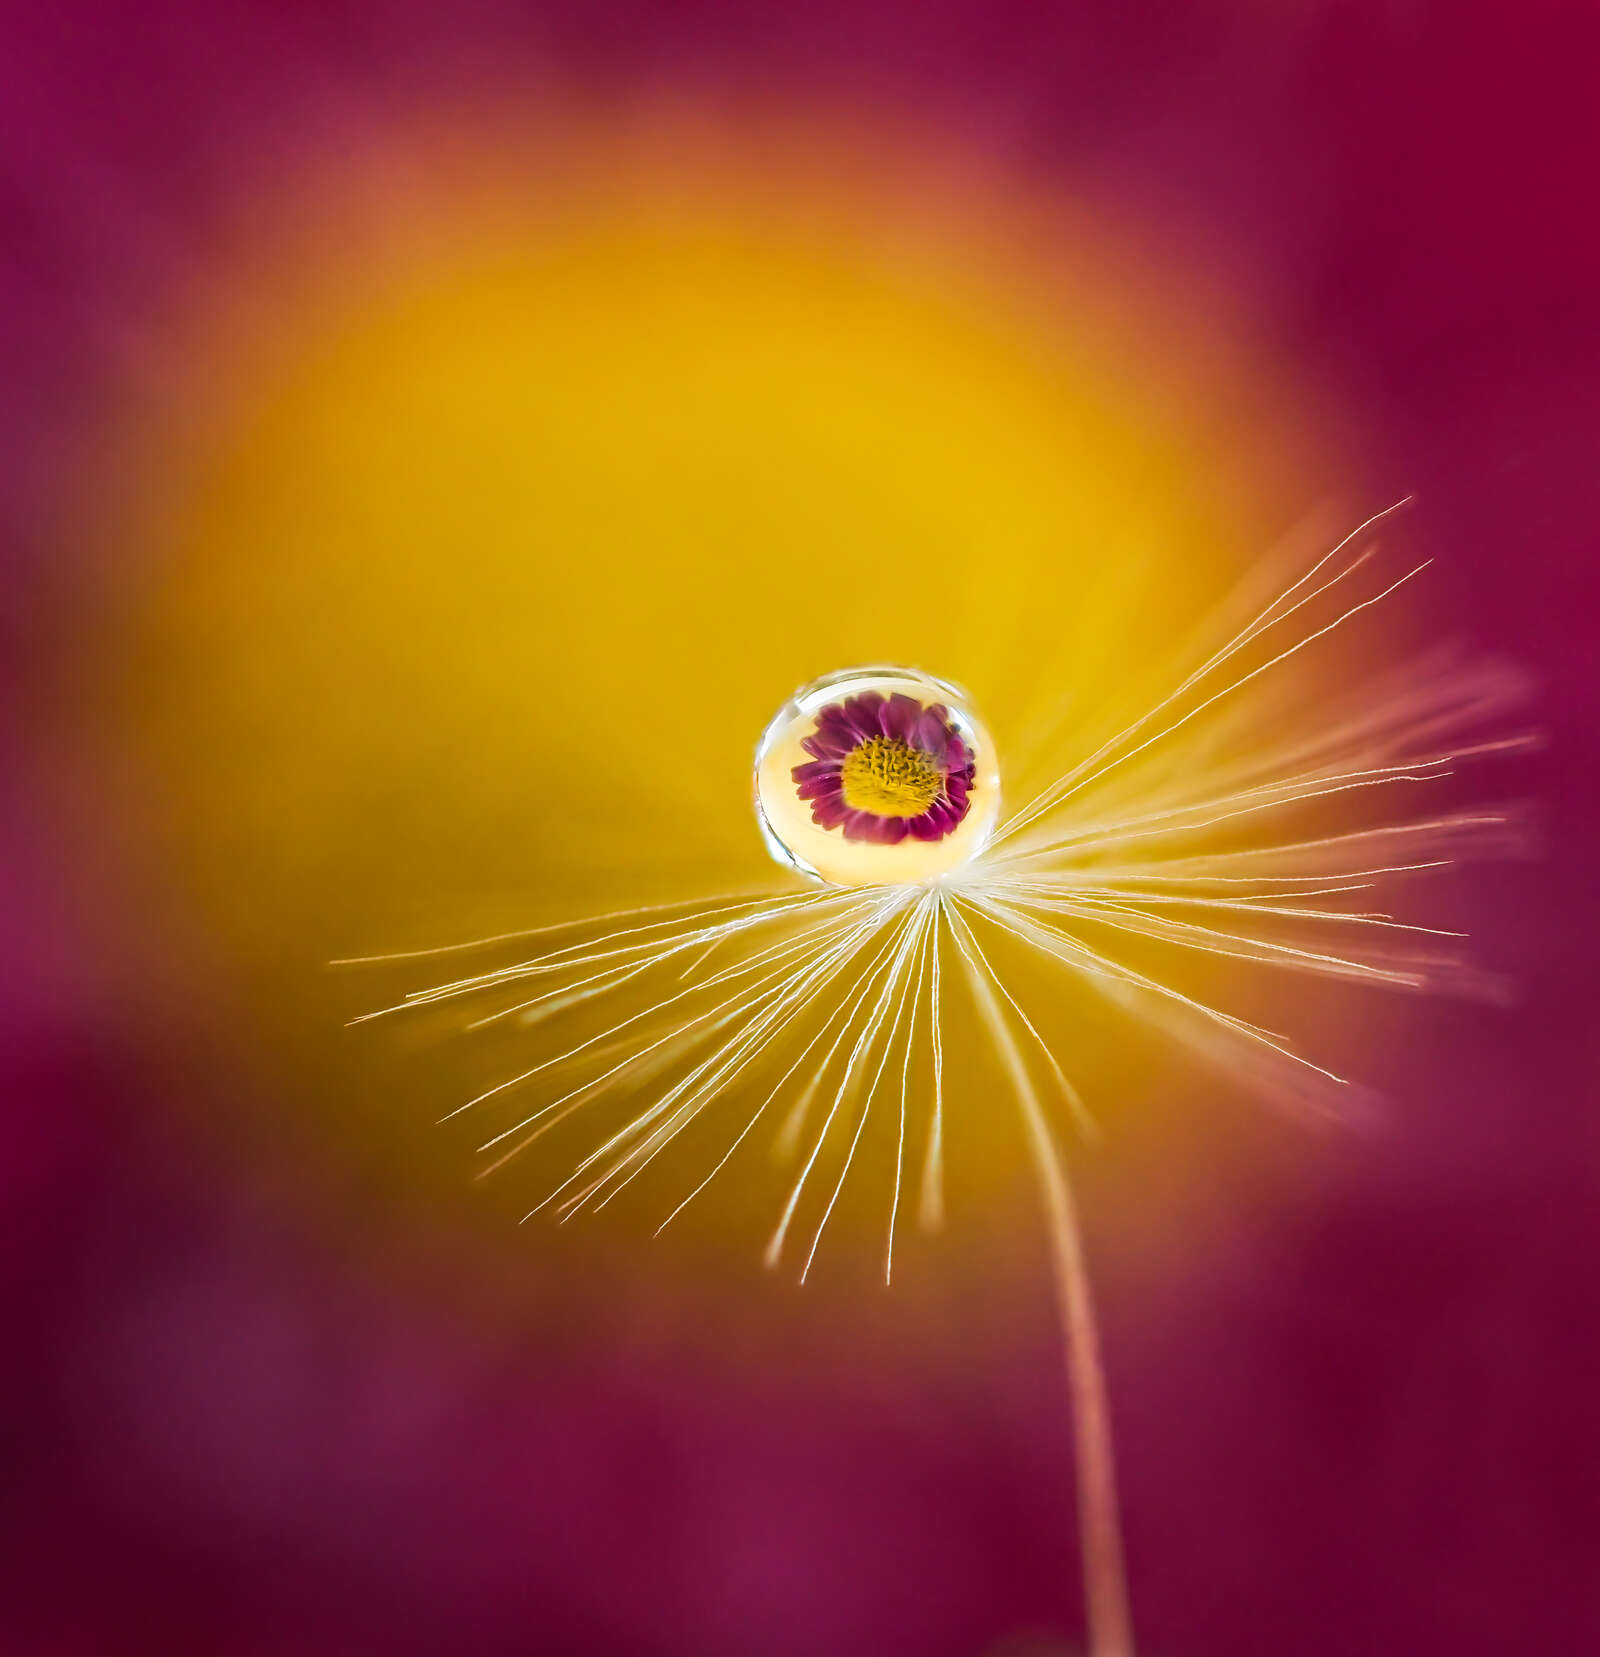
- A flashlight: Highlighting your background is key in refraction and will make your photo pop. If you want to have a red flower refract in your waterdrop, use a flashlight to illuminate the flower. The light will travel to the waterdrop and make the flower inside your drop more radiant.
- Clips: As stabilization is key, clips will help hold your subjects still.
- A tripod: Although I am not a fan of tripods (I primarily shoot handheld thanks to Olympus’s amazing image stabilization), I do use a Platypod or tripod when I do refraction.
Some might recommend a glycerin mixture to keep the water drop in place longer, but personally I just use water. Although water is more ephemeral, in the end, I prefer having to reset my shoot more often as it forces me to explore new angles or compositions instead of being content with one set up that can last for hours.
Setup
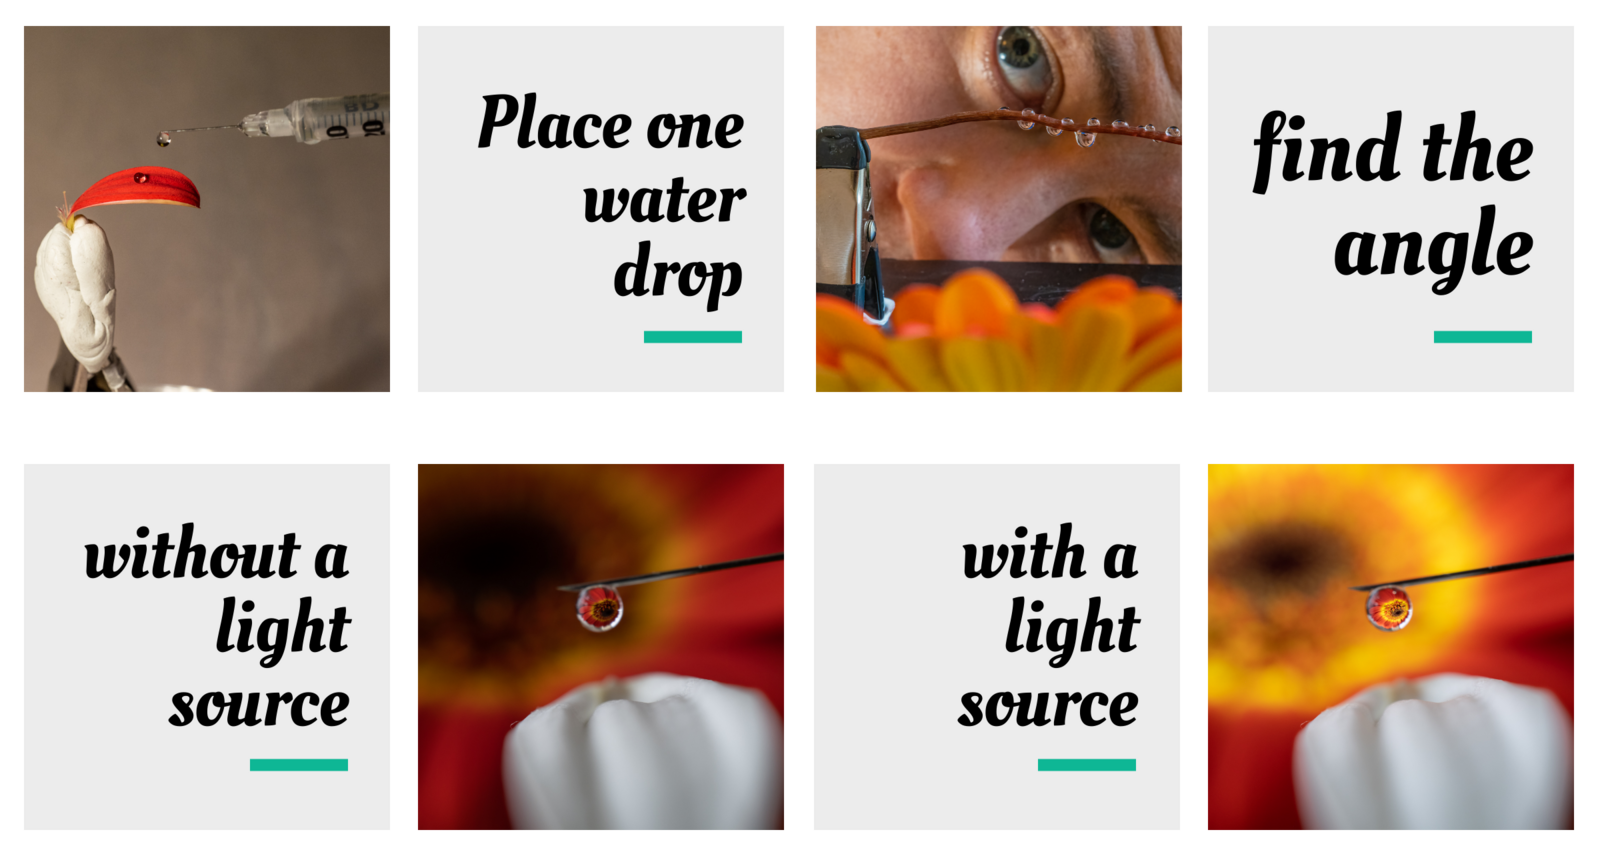
Finding the right angle requires a lot of rearranging. If it is your first attempt at refraction, start with a big flower like a gerbera daisy and get a blade of grass, a small stem or a petal. Using one or two clips, lay the blade of grass, stem or petal a few inches in front of the daisy. Place one water drop on the grass, stem or petal. Then, using your naked eye, find the angle that lets you see the refraction of your flower. Using that reference, set up your camera. You might have to move your daisy to get the perfect refraction.
Once happy with your composition, use a flashlight to illuminate the daisy. Remember that the background (the daisy) needs to be brighter than the foreground (the blade of grass, stem or petal) so that the light will go through the droplet making it brighter.
Settings
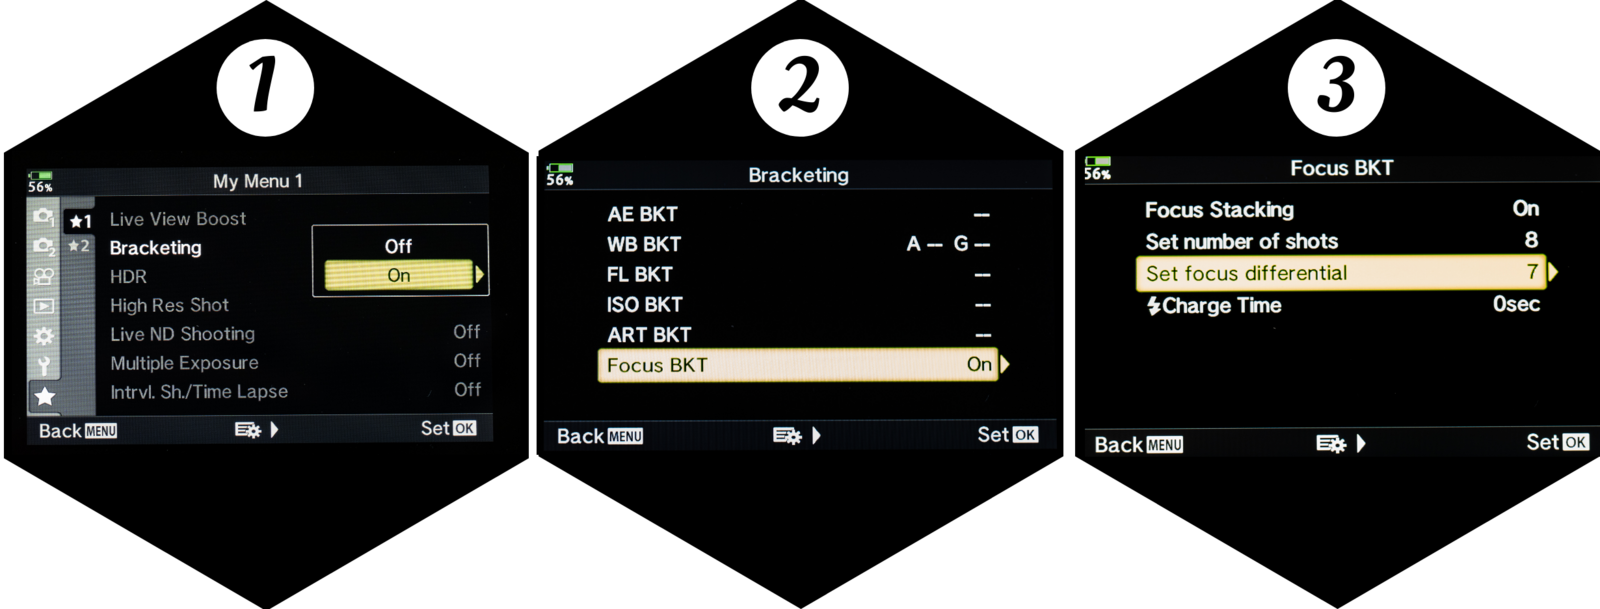
Start with one shot to see what you can get. I like to start at F7.1 and then play with ISO and speed. If using a tripod and in a controlled environment, privilege your ISO over your speed. The second option, if you do not have a moving subject, is to try focus stacking. I love the in-camera focus stacking as it gives me a great finished image in camera 95% of the time. I usually start with 8 for the number of shots, and 7 for the focus differential, and go from there. If my foreground subject is completely parallel to my lens, I will go for a lower f-stop to get as much light as possible and will play with the focus differential until I get a satisfying image. I am always looking for a blurred background with a sharp and detailed flower captured in my water drop. Sometimes, I can use a higher f stop and focus difference if the blade of grass or petal is not set parallel to my lens. You just have to experiment and practice. Don’t limit yourself to one shot. Try a single shot, then focus stack and play with all the tools available.
Tips
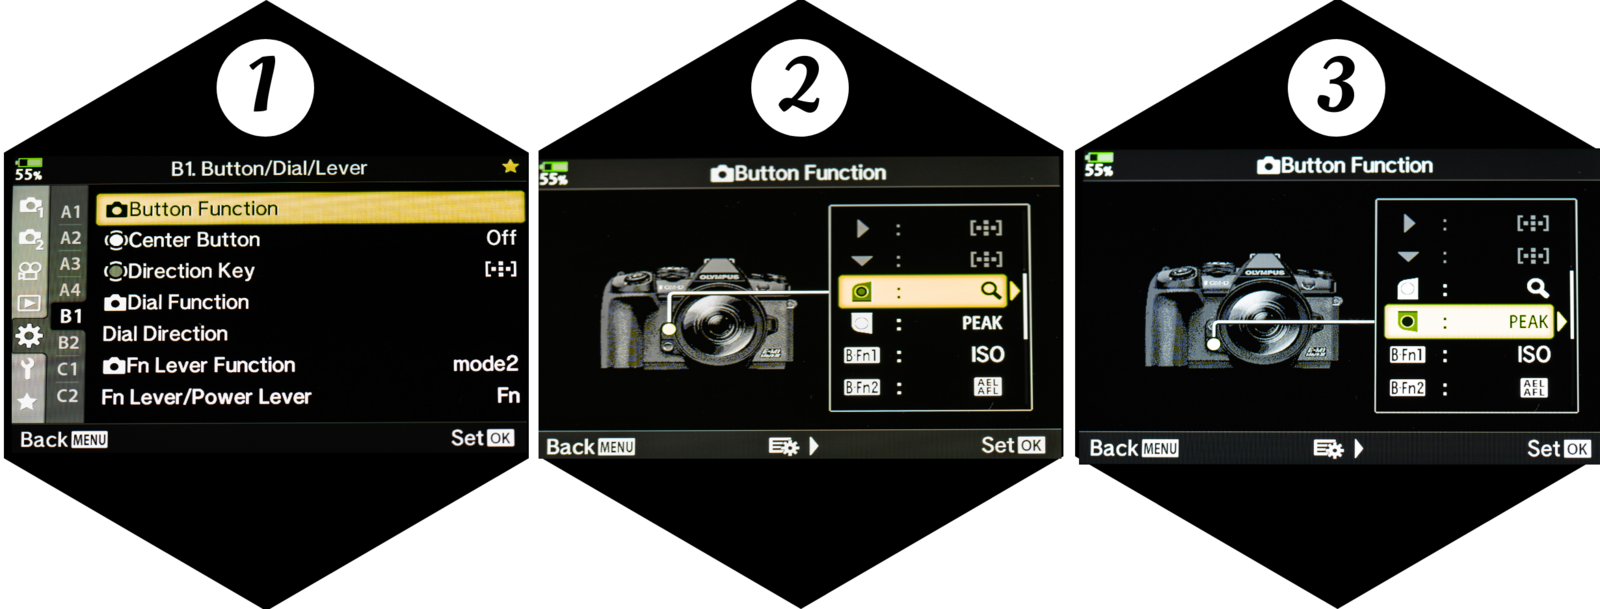
To ensure a sharp image, use the magnify function on your camera. I set one of my front buttons to magnifying glass to help with all my macro and wildlife shots. You can also use the focus peaking function to make sure all your drops are in focus.
Be Creative and Have Fun
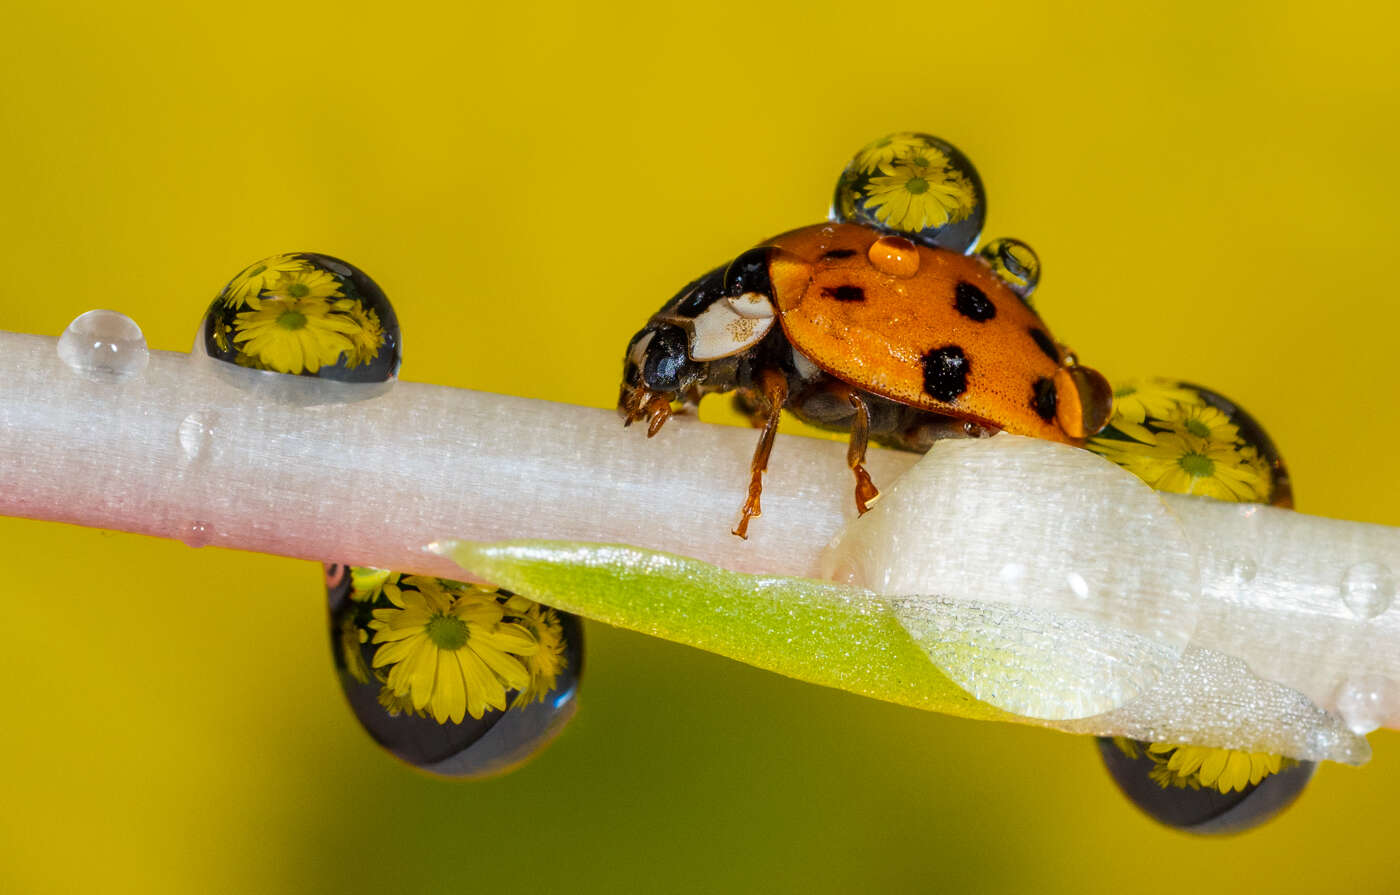
Once you understand the basic concept, experiment and have fun. There are so many ways to capture refractions. You can add a ladybug in your shot – because who doesn’t like a ladybug walking among a field of waterdrops? You can even have her carry a waterdrop refracting a flower.
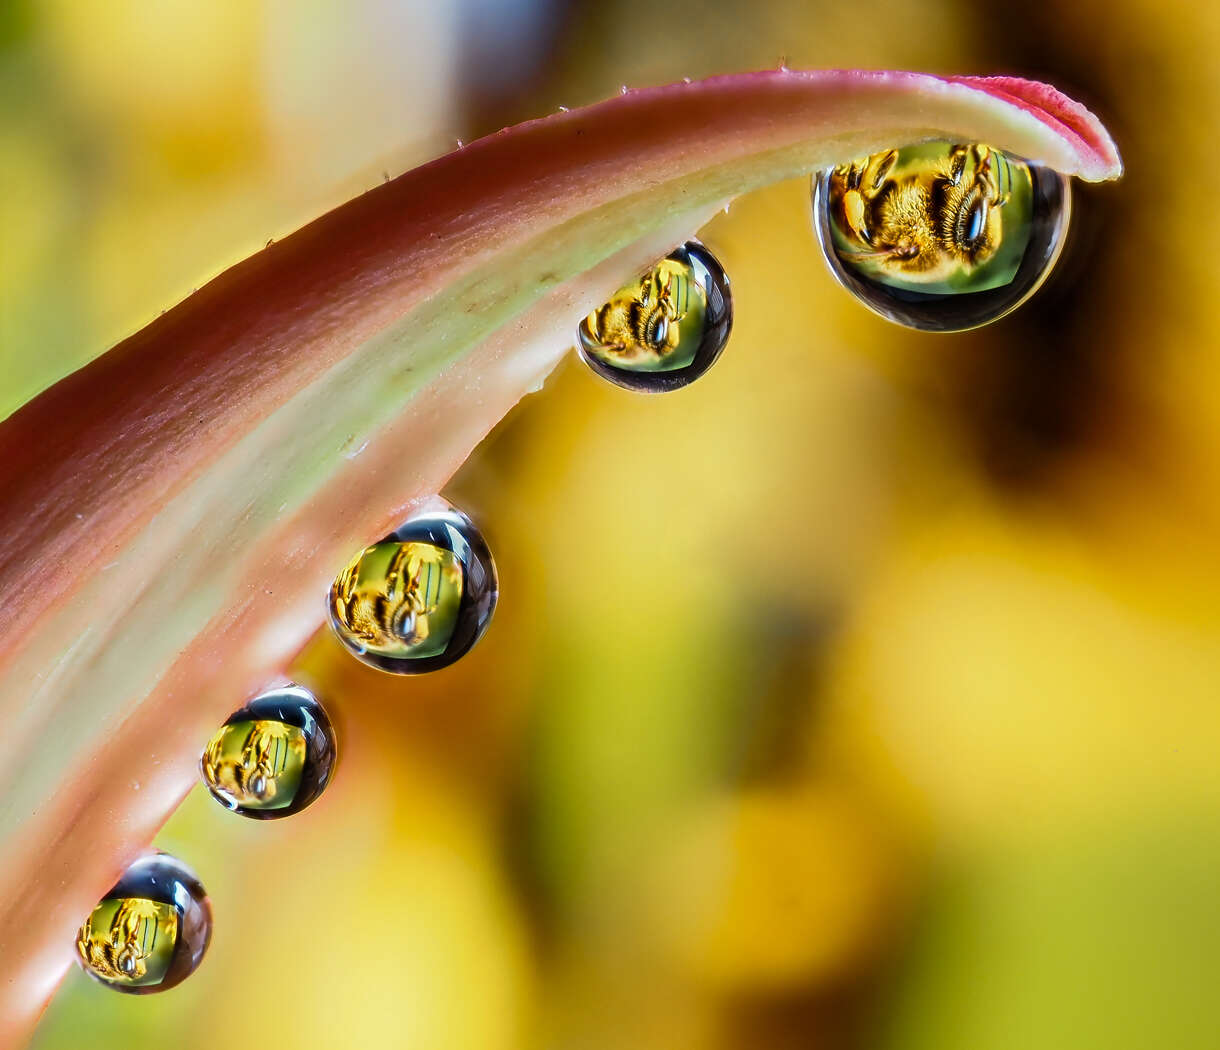
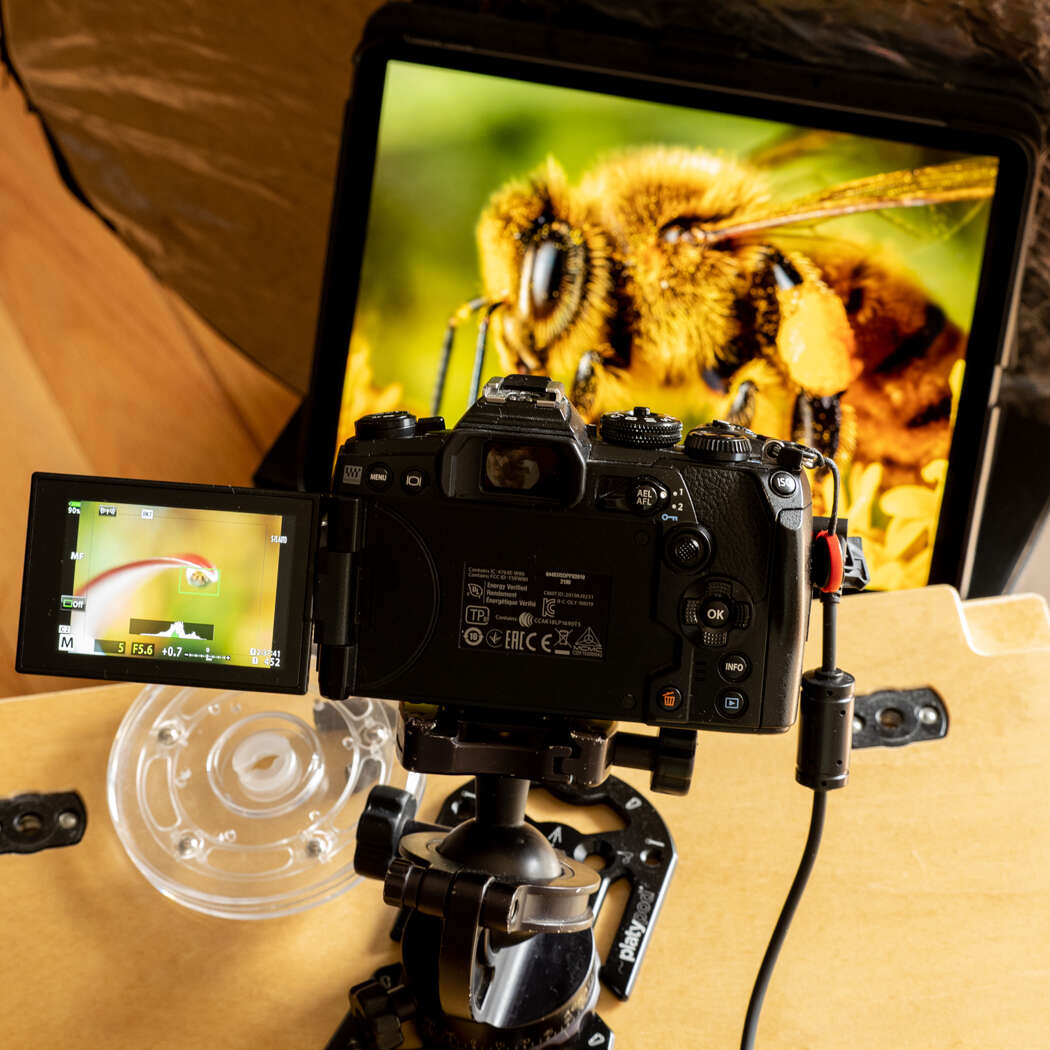
If you do not have a real flower, find a photo on your computer or iPad and place the image behind the drops. The image below was taken with the background as my iPad, displaying one of my Break Free Program photos. One advantage of using an iPad is that you can set the brightness of the display on high to make your water drop stand out.
1/1600s | F4.5 | ISO 2500
0.8s | F10 | ISO 200
12 images focused stacked in-camera
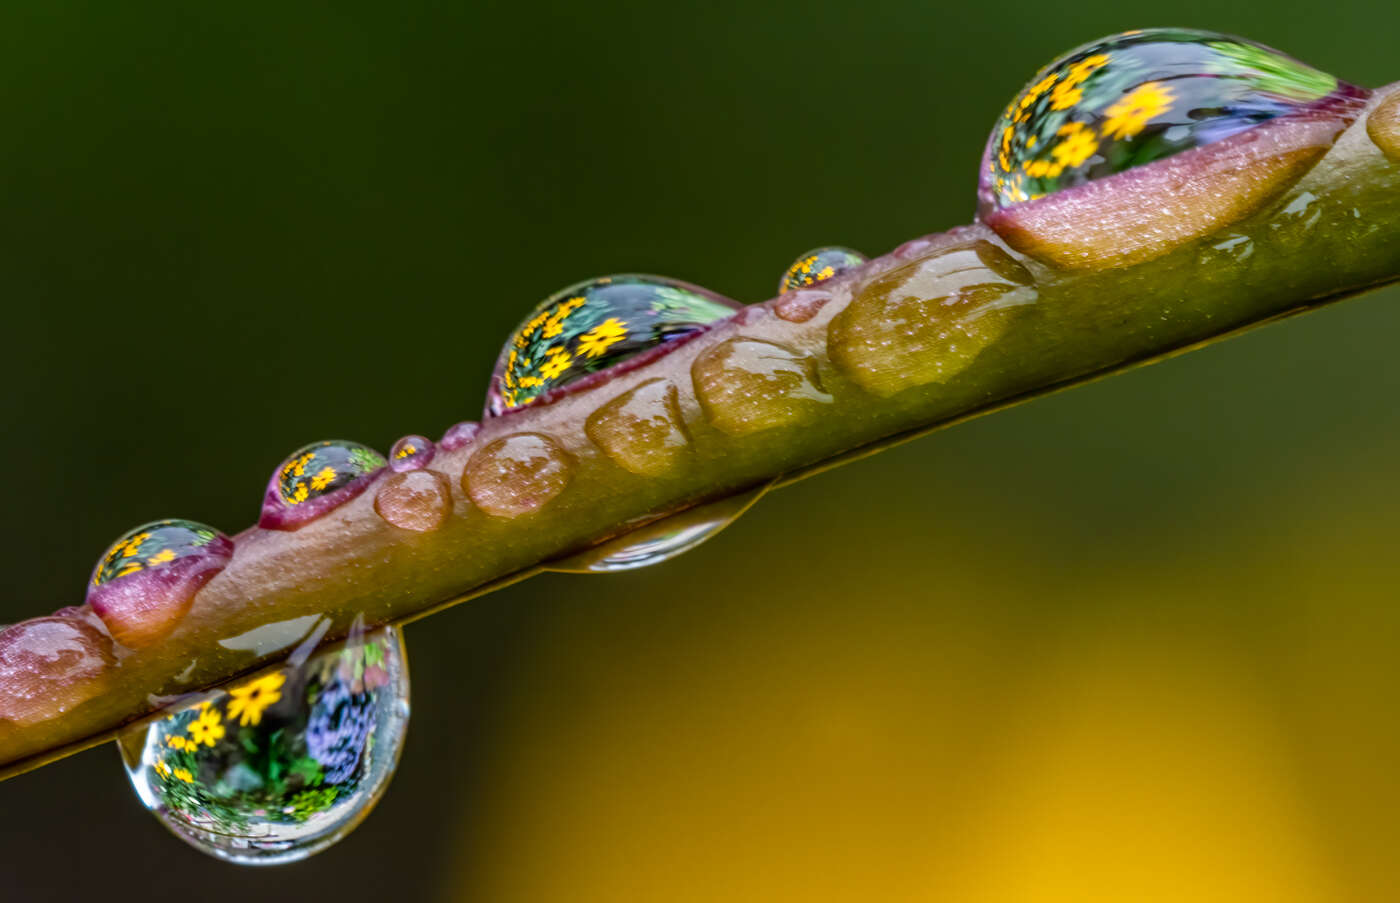
1/6s | F8 | ISO 800
All this said, why even set up a shoot when nature provides a free studio with drops already in place?
Everything is out there waiting to be captured. Just wander around a flower field or your local garden early in the morning when the dew is still in place. This photo was taken in my old garden and remains one of my favorite images to date.
Instagram: @emilietalpin
Emilie Talpin is a French teacher and photographer based in New Hampshire who is passionate about macro, wildlife, night sky and videography. When not in front of her classroom, she loves traveling, exploring the outdoors, and chasing her next photo.