The new OM-1 is here. If you’re familiar with OM-D E-M1 series cameras, you’ll undoubtedly notice plenty of similarities between the OM-1 and its predecessors. You’re also bound to notice some changes. There are new buttons, a deeper grip, an entirely new menu system, and loads of new features and improvements. When it came time to set up my OM-1 for field macro, I drew from what worked with my E-M1 Mark II and made a few adjustments to take advantage of the new camera’s upgrades.
Why Customize?
Before I get into the specifics of my macro settings and button assignments, I want to emphasize the benefits of customizing baseline settings. The OM-1 has four custom positions (C1, C2, C3, and C4) on its mode dial. These custom modes can be used to store settings for whatever you want. I’m a macro photographer and use C1 for my baseline field macro settings, but you can use your custom modes for any type of settings you’d like! Each custom mode can be programmed to behave completely independent from the others. When you head into the field, you can simply dial up the appropriate custom mode. This can save you a ton of time (and frustration) and increase your chances for success. And if you’re nervous about committing to settings, don’t worry! As you discover better, alternative settings, you can tweak or overwrite your custom modes at any time.
My C1 Settings
In this section, I’ll cover my settings and modifications which I’ve mapped to C1 on my OM-1. It is important to note that when making macro photos in the field, I’m typically using the M.Zuiko 60mm F2.8 Macro and a hot shoe-mounted flash (with a diffuser). If you use another lens or do not use a flash, some of these settings will need to be adjusted.
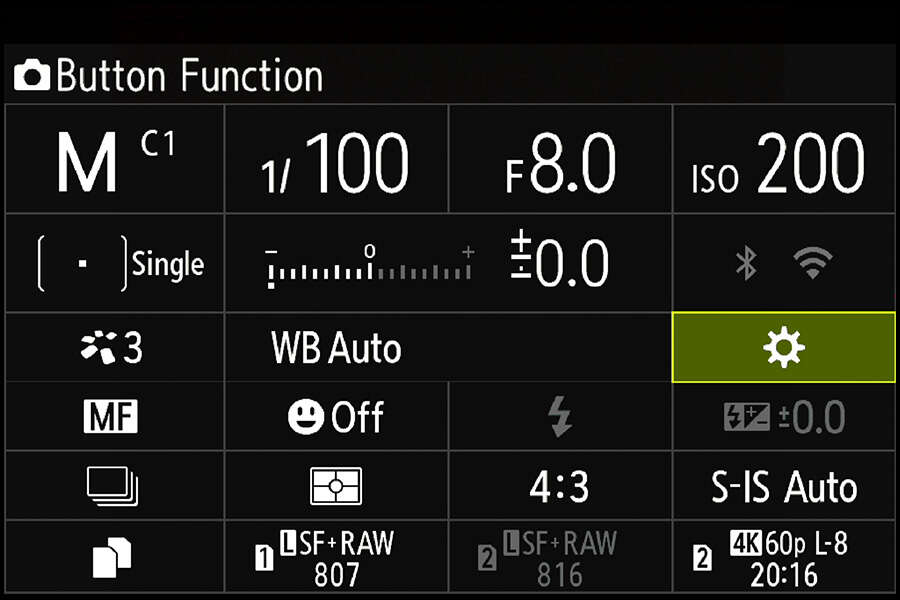
Shooting Mode: Manual
Before storing any custom settings, make sure your camera’s mode dial is set to ‘M’ for Manual. This will ensure the camera behaves as it would in Manual mode when it’s set to C1.
Shutter Speed: 1/100s
Using flash helps illuminate subjects and freeze motion at relatively slow shutter speeds. My shutter speed usually stays between 1/50 sec. and 1/250 sec. Since the OM-1 has improved its shutter speed limit for in-camera focus bracketing (when using flash) to 1/100 sec., shooting at/near 1/100th makes for easy transitions from single shots to stacks.
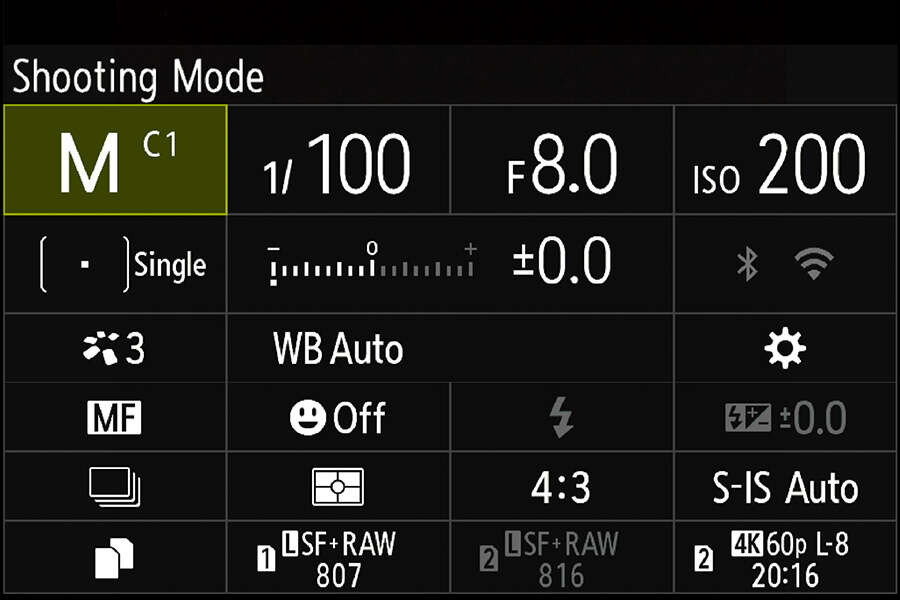
Aperture: F8.0
Lenses tend to be sharpest near the middle of their aperture ranges. Large apertures will reduce depth of field and can produce slightly softer results. Small apertures restrict light and introduce the risk of diffraction which can negatively impact image quality. I like to start at F8.0 and adjust up or down as needed.
ISO: 200
ISO value determines light sensitivity. Low ISO values are less sensitive to light and result in lower amounts of noise than high ISO values. That said, all cameras have their own ‘base’ ISO values which should produce the cleanest results. The base ISO for the OM-1 is 200. Since I use a flash as an onboard light source, I can typically keep my ISO at 200.
AF Target Mode: Single
The OM-1 has a ton of autofocus points (1,053, to be exact) covering the entire sensor. I like using the tiniest AF Target Mode option to really pinpoint my focus. EM-1X or E-M1 Mark III shooters will already be familiar with the joystick, but as a recent E-M1 Mark II stepper-upper, I’m loving it!
AF Mode: MF
I actively switch between autofocus and manual focus. My default setting is MF, but I use the OM-1’s new AF-ON button to activate autofocus. Autofocus is helpful for fast-moving subjects or for locating my subject within the viewfinder before I get too close. If I’m looking for maximum magnification, I’ll engage the 1:1 shortcut on my lens and physically move my entire camera until my desired focus is acquired.
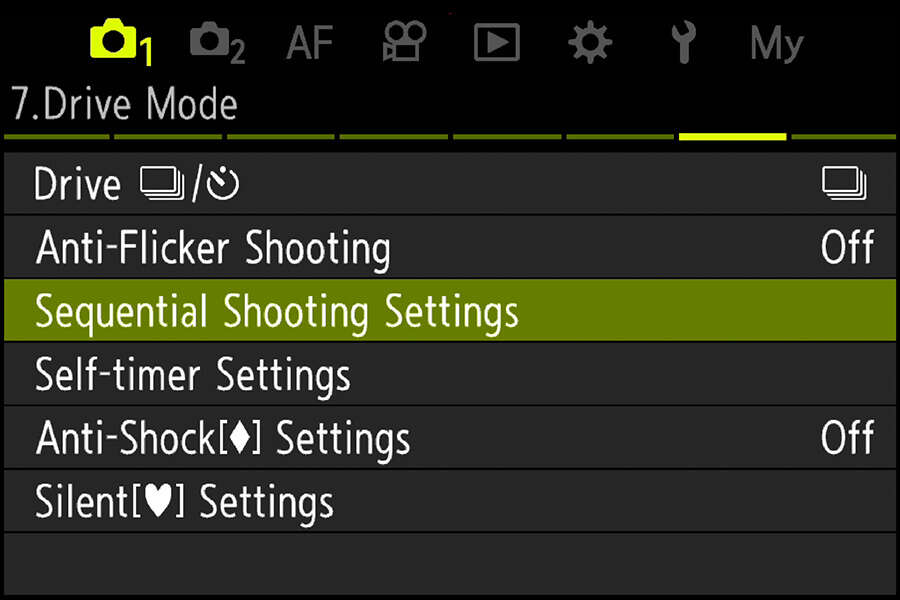
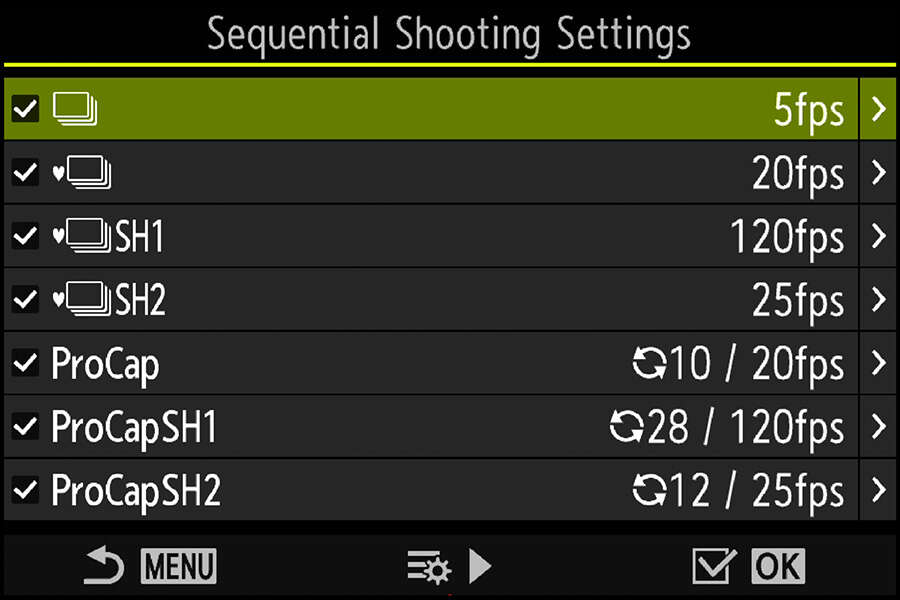
Drive Mode: Sequential
Shooting short bursts will give more chances for perfect focus and will provide potential opportunities to stack focus in post. While I always recommend trying to nail focus on the initial shot, I am also an advocate of capturing a few extra frames, just in case. I actually like to slow down the frame rate to 5 FPS. This reduced frame rate allows time for my flash power to recycle and results in fewer underexposed frames. (Menu > Camera 1 > Tab 7. Drive Mode > Sequential Shooting Settings)
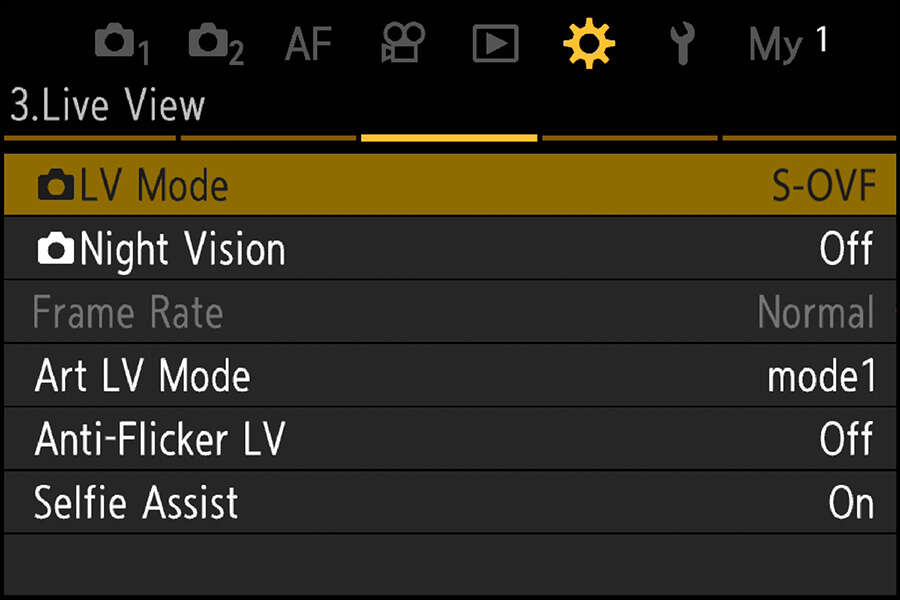
LV Mode: S-OVF (Simulated Optical Viewfinder)
Since I like to use flash, the shooting settings previewed with the ‘Standard’ Live View mode aren’t helpful. I use S-OVF to simulate what is seen with the naked eye and boost the brightness of my image preview. (Menu > Gear > Tab 3. Live View > LV Mode > S-OVF)
Alternatively, you could enable Night Vision (NightLV) to bring even more brightness to the preview. (Menu > Gear > Tab 3. Live View > Night Vision > On)
Additional Preferences
In addition to the settings explained above, I also prefer the following:
- Face and Eye Detection: Off
- Image Quality: LSF+RAW
- White Balance: Auto
- Picture Mode: Natural
- Image Stabilization: S-IS Auto
- Keep Warm Color: Off (Menu > Camera 1 > Tab 2. Picture Mode/WB > WB Auto Keep Warm Color > Off)
Quick Tip: For even more quick access to commonly-used settings, be sure to take advantage of the OM-1’s My Menus. Navigate to any menu item and press the video record button to add that item to your own ‘My Menu.’
My C1 Button Assignments
Besides modifying settings, button functions can also be customized. By assigning my most-used functions to physical buttons, I can quickly access the features I need without going into the camera’s menu system. In fact, I can even do it without even looking. To modify button assignments, just press "OK" to access the Super Control Panel, select the gear icon, and revise assignments as desired.
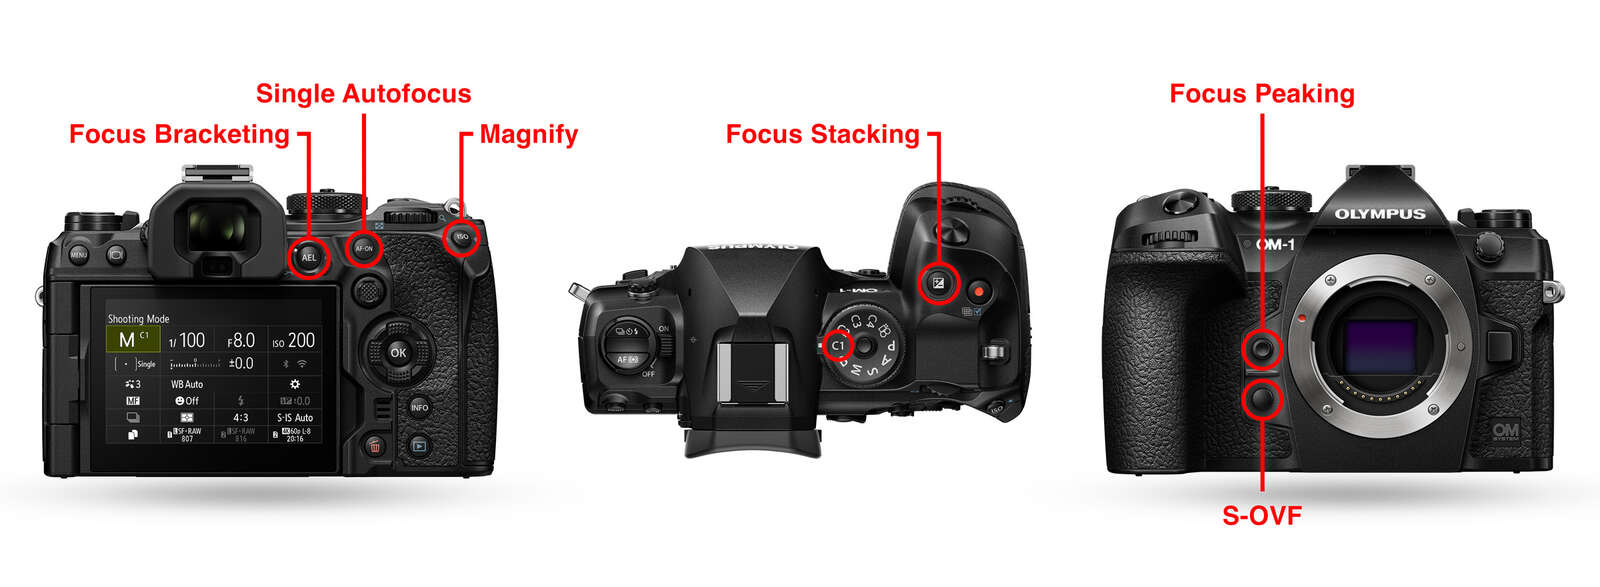
ISO Button: Magnify
Since I usually rarely change my ISO from 200, I don’t need a dedicated ISO button. Instead, I use the ISO button for quick access to magnification. When I press this function button, I’ll see an enlarged view of my subject. The magnified view can be increased or decreased (3x, 5x, 7x, 10x, or 14x) with either dial so I can visually assess critical focus.
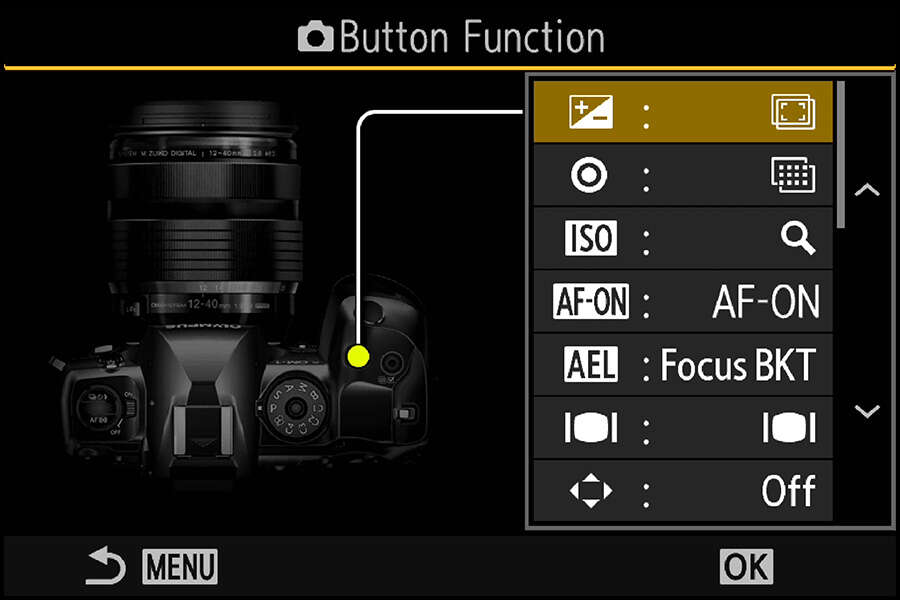
AF-ON Button: AF-ON
When I was using the E-M1 Mark II, I had a function button assigned to toggle between autofocus and manual focus. Since the OM-1 now has a dedicated AF-ON button, I leave my AF Mode set to Manual and use the AF-ON button for autofocus. In order for this setup to work, you’ll need to make sure the AF-ON button is enabled for use when using MF. (Menu > AF > Tab 1. AF > AF-ON in MF Mode > Yes)

AEL Button: Focus Bracketing
I love the Olympus cameras’ automatic, in-camera bracketing feature. I have my camera default to 99 shots with a focus differential of 3 and a flash charge time of 0.1 seconds. This is exactly what I did on my E-M1 Mark II, but using a function button Focus Bracketing on the OM-1 has gotten even better. Now, by long-pressing the button, I’m instantly brought to the Focus Bracketing settings screen and can modify the number of shots, focus differential, and flash charge time! This is a tremendous timesaver. This new long-press shortcut works for many other features, too. Be sure to give it a try.
+/- Button: Focus Stacking
Sometimes, I will bracket my focus to attempt a stack in post. Other times, I’ll have the camera create the stack for me. For in-camera Focus Stacking, my default settings are 10 shots with a focus differential of 4 and a flash charge time of 0.1 seconds. Just like with Focus Bracketing, I can instantly access Focus Stacking settings by long-pressing my function button.
Front Top Function Button: Focus Peaking
Focus peaking brings attention to in-focus areas by highlighting them with a color. I don’t use it often (I prefer Magnify), but it’s nice to have it available at the touch of a button.
Front Bottom Function Button: S-OVF
As described above, S-OVF simulates what is seen with the naked eye for EVF and Live View image previews. I use it a lot, but if I decide to shoot without flash, I’ll deactivate S-OVF to return to Standard LV Mode.
Save Your Customizations
Once you’ve modified camera settings to your liking, you’ll need to assign them to one of the custom positions on your camera’s mode dial. Thankfully, it’s very easy. Just jump into the first screen of the OM-1’s menu: Menu > Camera 1 > Tab 1. Basic Settings/Image Quality > Custom Mode.
Choose C1, C2, C3, or C4 and then ‘Assign’ and ‘Set’ to commit the settings. That’s it! All customizations are now saved and accessible via the custom position of your choosing.

Quick Tip: Go a little at a time. I like to modify a few settings, assign to a custom mode, check to make sure it worked, and then continue my modifications. It’s better to build toward the perfect setup than to waste time doing it all at once, only to realize you’ve been doing something wrong!
Instagram: @innis2winnis
Chris McGinnis is a macro photographer based in Bethlehem, PA. Since 2016, Chris has been getting up close and personal with tiny creatures as he aims to showcase the wonder and beauty of their existence that often go unnoticed.

Finding Macro Subjects in the Field
Chris shares his top tips for locating macro subjects in the field.
Mastering the 60mm Macro
Get tips to help you utilize the M.Zuiko 60mm F2.8 Macro for your photography.

My Gear for Field Macro
Chris shares the gear, accessories, and apps he uses for field macro photography.